eMachines T3302 Support Question
eMachines T3302 Support Question
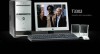
Find answers below for this question about eMachines T3302.Need a eMachines T3302 manual? We have 2 online manuals for this item!
Question posted by jrnonhavv on November 27th, 2011
I Replaced My Power Supply Which I Know Wokks And I Have No Power ??
The person who posted this question about this eMachines product did not include a detailed explanation. Please use the "Request More Information" button to the right if more details would help you to answer this question.
Current Answers
Answer #1: Posted by kcmjr on November 29th, 2011 12:28 AM
kcmjr

Member since:
May 5th, 2011 Points: 4,254,255

Member since:
May 5th, 2011 Points: 4,254,255
How sure are you that it works? Did you use a tester such as this: http://www.newegg.com/Product/Product.aspx?Item=N82E16899887005
Make sure all connections are good and tight and that the 115/220 switch is correct.
Try disconnecting ervything except the 2 motherboard connections, see if that works.
The only thing remaining is a bad motherboard.
Licenses & Certifications: Microsoft, Cisco, VMware, Novell, FCC RF & Amateur Radio licensed.
Related eMachines T3302 Manual Pages
User Guide - Page 17
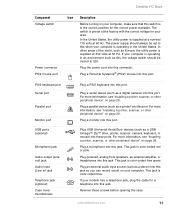
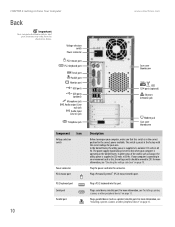
... (such as a digital camera) into this port. This jack is color-coded lime green. The power supply should be set to 230. For more information, see "Installing a printer, scanner, or other peripheral... sound on page 28. Plug the power cord into this jack. This jack is color-coded red or pink.
Desktop PC Back
Component Voltage switch
Power connector PS/2 mouse port
Icon Description
...
User Guide - Page 57
...desktop appears. 10 Click Start, Control Panel, then click Performance and Maintenance (if in Category view).
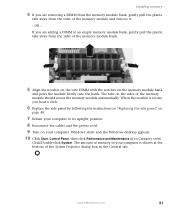
Click/Double-click System. When the module is secure, you hear a click.
6 Replace the side panel by following the instructions in "Replacing...are adding a DIMM to its upright position. 8 Reconnect the cables and the power cord. 9 Turn on your computer is shown at the bottom of the ...
User Guide - Page 74
... bent or damaged pins.
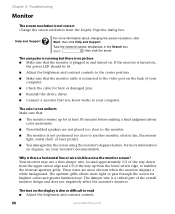
■ Reinstall the device driver.
■ Connect a monitor that you know works to pass through the screen for at least 30 minutes before making a final judgment about changing ...resolution in and turned on degauss, see your computer. If the monitor is turned on,
the power LED should be lit.
■ Adjust the brightness and contrast controls to the center position....
User Guide - Page 94
... starting
computer 9, 19
programs 25 static electricity 45 surge protector 18 system battery
replacing 52
system identification label 9, 13
T
technical support Technical Support 74 tips before contacting... 62
turning off computer 9, 20, 21 turning on computer 9, 19
tutoring fee-based 74
U
uninterruptible power supply (UPS) 18 updating
Norton AntiVirus 39 Windows 38 UPS 18
USB port 9, 11, 28
V
video ...
NG3 Hardware Reference - Page 2
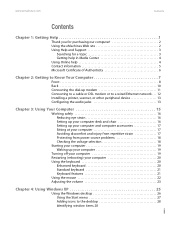
... 4 Using Online help 4 Contact information 5 Microsoft Certificate of Authenticity 6
Chapter 2: Getting to Know Your Computer 7
Front 8 Back 10 Connecting the dial-up modem 11 Connecting to a cable ... discomfort and injury from repetitive strain 17 Protecting from power source problems 18 Checking the voltage selection 18
Starting ...desktop 26 Using the Start menu 27 Adding icons to the...
NG3 Hardware Reference - Page 5
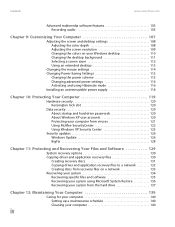
... the colors on your Windows desktop 110 Changing the desktop background 111 Selecting a screen saver 112 Using an extended desktop 113
Changing the mouse settings 114 Changing Power-Saving Settings 115
Changing the power scheme 115 Changing advanced power settings 116 Activating and using Hibernate mode 116 Installing an uninterruptible power supply 118
Chapter 10: Protecting Your...
NG3 Hardware Reference - Page 6
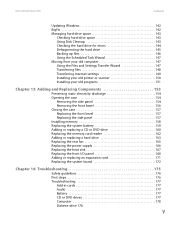
... panel 157 Installing memory 158 Replacing the system battery 159 Adding or replacing a CD or DVD drive 160 Replacing the memory card reader 162 Adding or replacing a hard drive 163 Replacing the rear fan 165 Replacing the power supply 166 Replacing the heat sink 167 Replacing the front I/O panel 168 Adding or replacing an expansion card 171 Replacing the system board 172...
NG3 Hardware Reference - Page 17
...
Case cover thumbscrew
IEEE 1394 ports (optional)
Ethernet (network) jack
Modem jack Case cover thumbscrew
Description
Before turning on page 13.
10 The power supply should be set to Know Your Computer
www.emachines.com
Back
Important
Your computer hardware options and port locations may vary from the illustration below. For more information...
NG3 Hardware Reference - Page 82
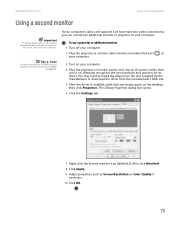
...4 Plug the projector or monitor power cord into an AC power outlet, then turn it must ...have two video connections), you can connect an additional monitor or projector to install the driver from the disc supplied by the manufacturer or download the driver from the manufacturer's Web site.
5 After the driver is installed, right-click any empty space on the desktop...
NG3 Hardware Reference - Page 114
CHAPTER 9
Customizing Your Computer
• Adjusting the screen and desktop settings
• Changing the mouse settings • Changing Power-Saving Settings • Installing an uninterruptible power
supply
NG3 Hardware Reference - Page 160
... Installing memory • Replacing the system battery • Adding or replacing a CD or DVD
drive • Replacing the memory card reader • Adding or replacing a hard drive • Replacing the rear fan • Replacing the power supply • Replacing the heat sink • Replacing the front I/O panel • Adding or replacing an expansion
card • Replacing the system board
NG3 Hardware Reference - Page 161
...Replacing Components
www.emachines.com
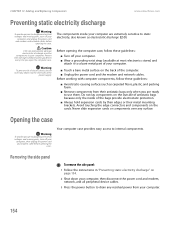
Preventing static electricity discharge
Warning
To avoid exposure to dangerous electrical voltages and moving parts, turn off your computer.
■ Touch a bare metal surface on the back of the
power supply... object into the vent holes of the computer. ■ Unplug the power cord and the modem and network cables. Caution
ESD can permanently damage ...
NG3 Hardware Reference - Page 173
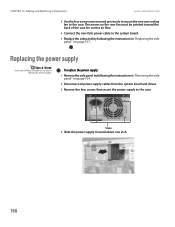
... the side panel by following the instructions in "Replacing the side panel" on page 154.
2 Disconnect all power supply cables from the system board and drives.
3 Remove the four screws that secure the power supply to the case. Screws 4 Slide the power supply forward about one inch.
166
Replacing the power supply
Tips & Tricks
You need a Phillips screwdriver to the...
NG3 Hardware Reference - Page 174
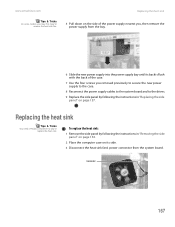
... down on the side of the case.
7 Use the four screws you removed previously to secure the new power supply to the case.
8 Reconnect the power supply cables to the system board and to the drives.
9 Replace the side panel by following the instructions in "Removing the side panel" on page 154.
2 Place the computer...
NG3 Hardware Reference - Page 195
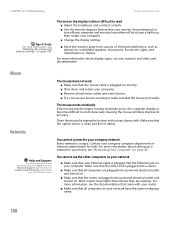
... computer. ■ Remove all extension cables and switch boxes. ■ Try a mouse you know is plugged into the Ethernet jack on page 49. For more information, see the documentation that came...Tricks For more information, see "Adjusting the screen and desktop settings" on your network have lights that indicate they are plugged into a powered electrical outlet and turned on.
■ Make sure ...
NG3 Hardware Reference - Page 206
...AC power connector 10
accessing shared drives 60 shared files 61 shared folders 60
accessories safety precautions 194
accounts Internet 43 ISP 43
activity indicators See indicators
adding icons to desktop ... playing music 84 troubleshooting 177
CD drive adding 160 identifying 73 locating drive 8 replacing 160 troubleshooting 177 using 73
cellular phone memory cards 72
Certificate of Authenticity 6
...
NG3 Hardware Reference - Page 207
... (VGA) 75 mouse 8, 10, 11 network 11, 12 parallel 10 power 10 power cord 10 printer 8, 10, 11 projector 75 PS/2 keyboard 10 PS/2...39 music CD 103 text and graphics 39
creating desktop icons 28 desktop shortcuts 28 documents 36 folders 30 music CD 93..., 179
DVD drive adding 160 identifying 73, 74 locating drive 8 replacing 160 troubleshooting 177, 179 using 73
Dynamic Host Configuration Protocol 53
...
NG3 Hardware Reference - Page 208
... creating 52
expansion card adding 171 replacing 171
extended desktop 113
external audio jack 11
F
fan replacing 165
Fast Ethernet 50
faxes automatically ...replacing 167
help online 4 using 3
Help and Support 3 searching 3 starting 3
Hibernate mode 9, 116
hyperlinks 43
I
i.Link port 9, 11, 13, 90
IEEE 1394 port 9, 11, 13, 90
indicators Caps Lock 21 hard drive 8
Num Lock 21 numeric keypad 21 power...
NG3 Hardware Reference - Page 210
... Hibernate mode 9, 116 indicator 9 schemes 115 source problems 18 Standby/Resume 9 troubleshooting 189 turning off computer 19
turning on computer 19 using UPS 118
power button 9
power supply replacing 166 uninterruptible 118
printer default 190 installing 13, 150 parallel port 10 sharing 59 troubleshooting 189 USB port 8, 11
printing documents 38 files across network...
NG3 Hardware Reference - Page 211
... printer 59
shortcut menus accessing 23
shortcuts adding to desktop 28 closing programs 39 closing windows 39 copying 39...out
jack 76
switch voltage selection 10
system battery replacing 159
system board replacing 172
system identification label 9
T
taskbar 26
TCP/...20
turning on computer 9, 19
tutoring fee-based 192
U
uninterruptible power supply (UPS) 18, 118
un-sharing drives 59 folders 59
updates...
Similar Questions

How To Replace Power Button Switch On T3302?
I can not power up my Emachines T3302 desktop? It appears to be a defective power button switch.How ...
I can not power up my Emachines T3302 desktop? It appears to be a defective power button switch.How ...
(Posted by mv1989 8 years ago)

Need Replacement Power Cord And Other Cable
ser#mqg78doc05972 model e19t6w
ser#mqg78doc05972 model e19t6w
(Posted by 12rant75 9 years ago)
