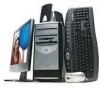
eMachines T2865 Support Question
eMachines T2865 Support Question
Find answers below for this question about eMachines T2865 - 512 MB RAM.Need a eMachines T2865 manual? We have 2 online manuals for this item!
Question posted by jongemaa on September 5th, 2011
Slow System Installed Memory
System is very slow now. Bought memory still slow. now it states need to install hardware. Unsure of the issue.
Current Answers
Related eMachines T2865 Manual Pages
User Guide - Page 1

... shock or bodily injury. Never spill liquid of all of these instructions carefully.
1 Save these openings. Do not use this product or included in a builtin installation unless proper ventilation is provided.
5 Never push objects of the extension cord. The product may touch dangerous voltage points or short out parts that the...
User Guide - Page 8

... Drive ...A-1 Optical Drive ...A-2 Audio ...A-2 Floppy Disk Drive A-3 Display & Monitor A-3 Keyboard ...A-4 Mouse ...A-4
Appendix B. Chapter 4
Installing and Removing Drives
Removing the Cover 4-1 Replacing the Cover 4-3 Installing an Expansion Card 4-4 Installing an Additional Hard Disk Drive 4-6 Installing the 5.25-inch Device in the Peripheral Bay 4-9
Chapter 5
Using the Restore CDs...
User Guide - Page 15

... drive until it . Using Your Computer
To use your computer, you must install the operating system on your computer.
Using an Optional Floppy Disk Drive
To use...system. The procedures in this manual assume that system for instructions on installation and use your floppy disk drive, insert the diskette with already installed on .
You could lose data. Using Your Computer 3-1 NOTE Never...
User Guide - Page 16
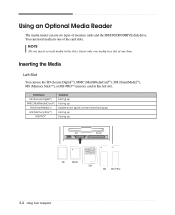
Insert only one media in a slot at one of memory cards and the IBM MICRODRIVE disk drive.
Inserting the Media
Left ...SD (Secure DigitalTM), MMC (MultiMediaCardTM), SM (SmartMediaTM), MS (Memory StickTM), or MS-PROTM memory card in this left slot. Card type SD (Secure DigitalTM) MMC(MultiMediaCardTM) SM (SmartMediaTM) MS (Memory StickTM)
MS-PROTM
Insertion Facing up Facing up Upside down ...
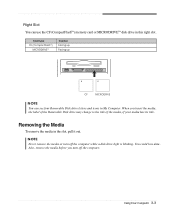
User Guide - Page 17
... has its title. Using Your Computer 3-3
Card type CF (CompactFlashTM)
MICRODRIVETM
Insertion Facing up Facing up
CF
MICRODRIVE
NOTE
You can use the CF (CompactFlashTM) memory card or MICRODRIVETM disk drive in the slot, pull it out.
User Guide - Page 23

Removing the Cover
You need to remove the cover of the procedures described in your system to access its power source and from the back panel.
Installing and Removing Drives 4-1
First of all, disconnect the power cable from the electrical outlet and from any telecommunications links, networks, or modems before performing any ...
User Guide - Page 24
... computer.
4. Set the cover aside. 3. To open the system cover, remove two screws on the back panel of your system every time you touch a component. 4-2 Installing and Removing Drives If you are not properly grounded, you could generate an electric shock when you remove the cover.
NOTE Be sure to free...
User Guide - Page 25
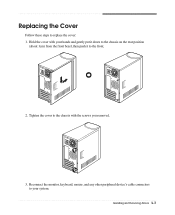
Installing and Removing Drives 4-3 Hold the cover with your system. Tighten the cover to the front.
2. Replacing the Cover
Follow these steps to your hands and ...
User Guide - Page 26
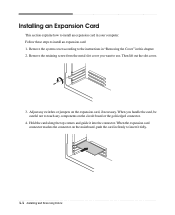
... Card
This section explains how to install an expansion card in this chapter. 2. Remove the retaining screw from the metal slot cover you handle the card,... Cover" in your computer. When you want to insert it into the connector. Remove the system cover according to install an expansion card: 1. Then lift out the slot cover.
3. Hold the card along the top corners and guide it fully...
User Guide - Page 27
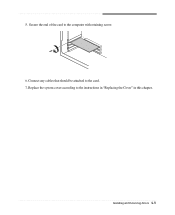
Secure the end of the card to the card. 7. Connect any cables that should be attached to the computer with retaining screw. 6. Installing and Removing Drives 4-5 Replace the system cover according to the instructions in "Replacing the Cover" in this chapter. 5.
User Guide - Page 28
... hard disk drive. Follow these steps to the chassis and pull it .
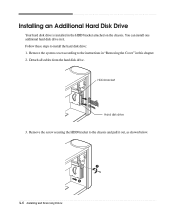
Installing an Additional Hard Disk Drive
Your hard disk drive is installed in this chapter. 2. You can install one additional hard disk drive in it out, as shown below.
4-6 Installing and Removing Drives Remove the system cover according to the instructions in...
User Guide - Page 29

With using the screws, secure the hard disk drive to CS (Cable Select). 5. Installing and Removing Drives 4-7 Slide the hard disk drive into the HDD bracket. 6.
4. Set the jumper of the new hard disk drive to the HDD bracket.
User Guide - Page 30

Replace the system cover according to your hard disk drive. (If you removed the hard disk drive cable from the motherboard, replace it with the retaining screw, as shown below.
8. Slide the HDD bracket into the chassis and secure it .)
9. Connect the power and hard disk drive cable to the instructions in "Replacing the Cover" in this chapter. 4-8 Installing and Removing Drives 7.
User Guide - Page 31
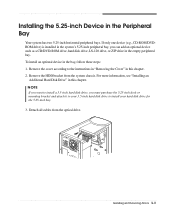
... ZIP drive in the empty peripheral bay. If only one device (e.g., CD-ROM/DVDROM drive) is installed in the system's 5.25-inch peripheral bay, you must purchase the 5.25-inch dock or mounting...the instructions in "Removing the Cover" in this chapter. 2. Installing the 5.25-inch Device in the bay, follow these steps: 1. To install an optional device in the Peripheral Bay
Your system has two 5....
User Guide - Page 32
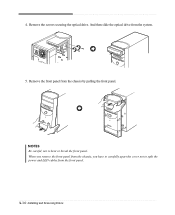
And then slide the optical drive from the front panel.
4-10 Installing and Removing Drives NOTES Be careful, not to split the power and LED cables from the system.
5.
Remove the screws securing the optical drive. When ...
User Guide - Page 33

.... If you want to new device. Remove the faceplate cover from the chassis using your optional device to use the secondary E-IDE drive connector. To install an additional device in the empty bay below the optical drive, you want to CS (Cable Select). 6. Make sure the jumper of your finger...
User Guide - Page 34
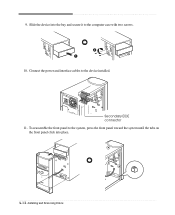
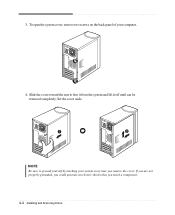
9. Connect the power and interface cables to the computer case with two screws.
10. Slide the device into place.
4-12 Installing and Removing Drives To reassemble the front panel to the system, press the front panel toward the system until the tabs on the front panel click into the bay and secure it to the device installed. Secondary EIDE connector 11.
User Guide - Page 35
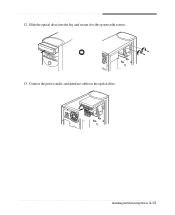
Installing and Removing Drives 4-13 Connect the power, audio, and interface cables to the system with screws. 13. Slide the optical drive into the bay and secure it to the optical drive.
12.
User Guide - Page 37
... your hard disk. (This process may take about 20 minutes.)
WARNING
Chapter 1 If you restore your hard disk, you must reinstall any software not originally installed on the computer. 2. After restoring, you lose all software including Windows® XP. CAUTION If you will be started. 4.
User Guide - Page 45

...and contrast controls aren't set properly Adjust the brightness and contrast controls on the empty desktop area and click Properties. 2. Make sure that is not write-protected.
Solving Common ... connecting the monitor to your Windows Help in Windows. You have a screen blanking utility installed or your computer isn't connected properly. Your current screen will reappear. Select the color ...
Similar Questions


How Can I Get My Emach T3642 To Recognize The New Ram That Has Been Installed?
(Posted by TANSMOM 11 years ago)

Is The El1301 Acer Desktop Compatible With Dial Up? Or Do I Need A Dial Up Modem
(Posted by susanwatson 12 years ago)

I Have A T 3092, 512 Mb, 160 Gb Desktop Computer The Is Very, Very Slow.
Most every time I start up, a message comes up saying that Windows explorer must be shut down. There...
Most every time I start up, a message comes up saying that Windows explorer must be shut down. There...
(Posted by kunca 14 years ago)