
eMachines T2682 Support Question
eMachines T2682 Support Question
Find answers below for this question about eMachines T2682.Need a eMachines T2682 manual? We have 2 online manuals for this item!
Question posted by Anonymous-102391 on March 10th, 2013
How To Replace The Power Switch
how to replace the power switch
Current Answers
Answer #1: Posted by tintinb on March 10th, 2013 5:24 PM
tintinb

Member since:
October 26th, 2012 Points: 7,056,560

Member since:
October 26th, 2012 Points: 7,056,560
You cannot find the instructions in the user's manual or any place online on how you can properly reset the power switch of your eMachines T2682. It is better that you bring the device to a service/repair center for proper repair. Please do not experiment on repairing or opening your computer by yourself. Read the user's manual here:
http://www.helpowl.com/manuals/eMachines/T2682/67075
If you have more questions, please don't hesitate to ask here at HelpOwl. Experts here are always willing to answer your questions to the best of our knowledge and expertise.
Regards,
Tintin
Related eMachines T2682 Manual Pages
User Guide - Page 1

... does not exceed 15 amps.
9 Unplug your computer system's information label. Objects may fall, causing seriousdamage to replace your dealer or local power company. Important Safety Instructions
The following instructions pertain to rest on the power cord. This product should not be placed near water.
11 This product is a safety feature. If you...
User Guide - Page 2
...en place et remettre le cordon d'alimentation.)
ii
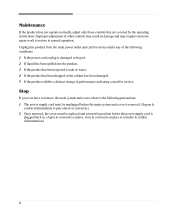
Improper adjustment of the following precautions: 1 The power supply cord must be unplugged before the main system unit cover is removed. (Separe le
cordon ... 2 Once removed, the cover must be replaced and screwed in performance indicating a need for service. Unplug this product from the main power outlet and call for service under any of ...
User Guide - Page 8

...Laser Product ...B-2
viii Chapter 4
Installing and Removing Drives
Removing the Cover 4-1 Replacing the Cover 4-3 Installing an Expansion Card 4-4 Installing an Additional Hard Disk Drive... 6-1 Buttons of the PowerDVD 6-2
Appendix A.
Solving Common Problems
Power ...A-1 Hard Disk Drive ...A-1 Optical Drive ...A-2 Audio ...A-2 Floppy Disk Drive A-3 Display & Monitor A-3...
User Guide - Page 9

Introduction 1-1
Introduction
System Overview
Optical drive Optical drive
(optional) USB connector
(optional) Power button
Emergency eject hole Load/Eject button Floppy disk drive(optional)
Media reader slots(optional) Power indicator Hard disk drive access indicator
IEEE 1394 connectors (optional)
USB 2.0 connectors (optional)
Headphone jack
Microphone jack USB 2.0 connectors (optional)
...
User Guide - Page 11

Appropriate power sources. You need one outlet for the computer, one for the monitor, and an additional outlet for a printer and any other source of your equipment ...
User Guide - Page 12
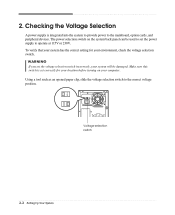
... Up Your System The power selection switch on your environment, check the voltage selection switch. Make sure this switch is integrated into the system to provide power to set the voltage selection switch incorrectly, your system will be used to the mainboard, option cards, and peripheral devices. To verify that your system has the correct setting...
User Guide - Page 13
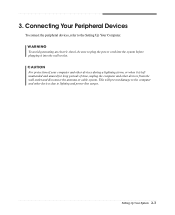
... system. Setting Up Your System 2-3 Connecting Your Peripheral Devices
To connect the peripheral devices, refer to lighting and power line surges. WARNING To avoid generating an electric shock, be sure to plug the power cord into the system before plugging it is left unattended and unused for long periods of your computer...
User Guide - Page 14

... to your computer, follow these steps: 1. Turn off your computer, save your computer, follow these steps: 1. Turning On the Computer
To turn off . Press the power button on your information and close all application programs you use. 2.
When the Turn Off Computer dialog box is booting, the computer will be booted...
User Guide - Page 23

... disconnect the computer from its internal components. First of all, disconnect the power cable from the electrical outlet and from any telecommunications links, networks, or modems before performing any ...cables connected to access its power source and from the back panel. NOTE Turn off the computer and peripheral devices ...
User Guide - Page 25
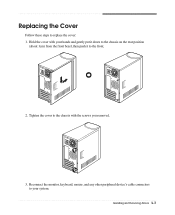
... hands and gently put it down to the chassis on the rear position
(about 1cm) from the front bezel, then push it to the front.
2. Replacing the Cover
Follow these steps to the chassis with your system. Hold the cover with the screws you removed.
3. Tighten the cover to...
User Guide - Page 27
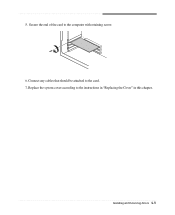
Replace the system cover according to the computer with retaining screw. 6. Secure the end of the card to the instructions in "Replacing the Cover" in this chapter. Installing and Removing Drives 4-5 Connect any cables that should be attached to the card. 7.
5.
User Guide - Page 30

Replace the system cover according to your hard disk drive. (If you removed the hard disk drive cable from the motherboard, replace it with the retaining screw, as shown below.
8. 7. Connect the power and hard disk drive cable to the instructions in "Replacing the Cover" in this chapter. 4-8 Installing and Removing Drives Slide the HDD bracket into the chassis and secure it .)
9.
User Guide - Page 32
... the system.
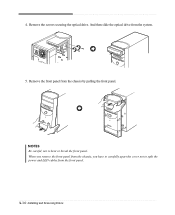
5. When you have to carefully apart the cover not to bent or break the front panel. NOTES Be careful, not to split the power and LED cables from the chassis, you remove the front panel from the front panel.
4-10 Installing and Removing Drives And then slide the optical...
User Guide - Page 34
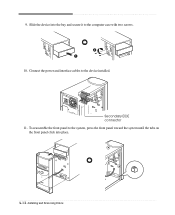
Slide the device into the bay and secure it to the system, press the front panel toward the system until the tabs on the front panel click into place.
4-12 Installing and Removing Drives To reassemble the front panel to the computer case with two screws.
10. Secondary EIDE connector 11.
9. Connect the power and interface cables to the device installed.
User Guide - Page 35
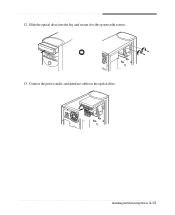
Slide the optical drive into the bay and secure it to the optical drive.
Connect the power, audio, and interface cables to the system with screws. 13. Installing and Removing Drives 4-13 12.
User Guide - Page 36
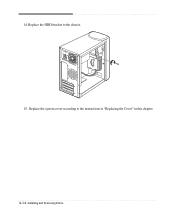
Replace the HDD bracket to the instructions in "Replacing the Cover" in this chapter. 4-14 Installing and Removing Drives 14. Replace the system cover according to the chassis. 15.
User Guide - Page 39

message appears, replace the Restore
CD #1 with #3 (if there is) in the Drivers folder of you lose drivers, install these by ...is in the Restore CD #1 will appear. If there is no executable installation file. All data in the optical drive. message appears, replace the Restore CD
#2 with #2 in the Restore CD #2 will be copied to your optical drive. 12. To continue the restoration, ...
User Guide - Page 45

...You have a screen blanking utility installed or your mouse. Press any key or move your computer entered power management mode. Your current screen will reappear. To open Windows Help, click the Start button, and then... the brightness and contrast controls on the empty desktop area and click Properties. 2.
Or click the right mouse button on the monitor. Solving Common Problems ...
User Guide - Page 47
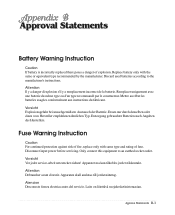
...par le constructeur. Entsorgung gebraushter Batterien nach Angaben des Herstellers. Disconnect input power before servicing. Apparaten skall anslutas till jordat nätuttag. Approval Statements
Battery Warning ICnshtruacptitoenr 1 Caution If battery is incorrectly replaced there poses a danger of fire, replace only with the same or equivalent type recommended by the manufacturer. Mettre...
User Guide - Page 48
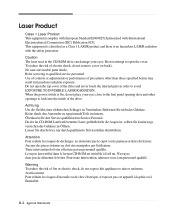
... fire or electric shock, do not remove cover (or back). N'essayez donc pas de démonter le boiter.
Do not open the cover. When the power switch is no hazardous LASER radiation with International Electrotechnical Commission (IEC) Publication 825]. Da der im CD-ROM Laufwerk benutzte Laser gefährlich für die...
Similar Questions

No Sound Or Boot When Power Switch Pressed.
Unfortunately the suggestions made by techygirl did not work. I have verified the power cord, all co...
Unfortunately the suggestions made by techygirl did not work. I have verified the power cord, all co...
(Posted by rfull4 3 years ago)

How To Replace Power Button Switch On T3302?
I can not power up my Emachines T3302 desktop? It appears to be a defective power button switch.How ...
I can not power up my Emachines T3302 desktop? It appears to be a defective power button switch.How ...
(Posted by mv1989 8 years ago)

Power Switch Connector
I need the ordrto put the powr switch wires on the header on the mother board green/white, red/white...
I need the ordrto put the powr switch wires on the header on the mother board green/white, red/white...
(Posted by entmn8r 12 years ago)

Adding Memory To T2682 Emachine
Where can i find an instruction guide for adding memory
Where can i find an instruction guide for adding memory
(Posted by Tonymess 12 years ago)