
eMachines T2682 Support Question
eMachines T2682 Support Question
Find answers below for this question about eMachines T2682.Need a eMachines T2682 manual? We have 2 online manuals for this item!
Question posted by entmn8r on December 5th, 2011
Power Switch Connector
I need the ordrto put the powr switch wires on the header on the mother board green/white, red/white and black/white
Current Answers
Related eMachines T2682 Manual Pages
User Guide - Page 1

...protect it does not exceed the amperage rating of all products plugged into a grounding-type power outlet. If you have been provided for later use.
2 Follow all of these instructions...Slots and openings in the cabinet and the back have to use an extension cord with a 3-wire grounding type plug, a plug having a third (grounding) pin.
Important Safety Instructions
The following instructions...
User Guide - Page 2
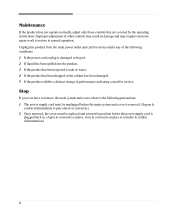
... enleve le couvercle.) 2 Once removed, the cover must be replaced and screwed in position before the power supply cord is damaged or frayed. 2 If liquid has been spilled into the product. 3 If... damaged. 5 If the product exhibits a distinct change in performance indicating a need for service.
Maintenance
If the product does not operate normally, adjust only those controls that are covered...
User Guide - Page 8

Solving Common Problems
Power ...A-1 Hard Disk Drive ...A-1 Optical Drive ...A-2 Audio ...A-2 Floppy Disk Drive A-3 Display & Monitor A-3 Keyboard ...A-4 Mouse ...A-4
Appendix B.
Approval Statements
Battery Warning Instruction B-1 Fuse Warning Instruction B-1 Laser Product ...B-2
viii ...
User Guide - Page 9

... button
Emergency eject hole Load/Eject button Floppy disk drive(optional)
Media reader slots(optional) Power indicator Hard disk drive access indicator
IEEE 1394 connectors (optional)
USB 2.0 connectors (optional)
Headphone jack
Microphone jack USB 2.0 connectors (optional)
NOTE
Chapter 1 Your optical drives may differ from the illustrations described in this user's guide. Introduction 1-1
User Guide - Page 11

...Leave several inches of its components. Avoid direct sunlight or any other peripheral devices. You need one outlet for the computer, one for the monitor, and an additional outlet for ...not place your system too close to any other source of heat. Good air circulation. Appropriate power sources. Setting Up Your System 2-1 A flat and hard surface. Moderate environment conditions. To...
User Guide - Page 12
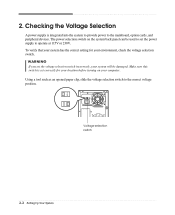
... system back panel can be damaged. 2. Checking the Voltage Selection
A power supply is set correctly for your system will be used to set the voltage selection switch incorrectly, your environment, check the voltage selection switch. Make sure this switch is integrated into the system to provide power to the mainboard, option cards, and peripheral devices.
User Guide - Page 13
... socket.
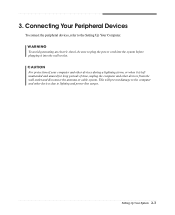
Setting Up Your System 2-3 Connecting Your Peripheral Devices
To connect the peripheral devices, refer to lighting and power line surges. WARNING To avoid generating an electric shock, be sure to plug the power cord into the system before plugging it is left unattended and unused for long periods of time, unplug...
User Guide - Page 14

... devices connected to turn on the monitor, and any other peripheral devices.
2-4 Setting Up Your System Turn on your computer, follow these steps: 1. Press the power button on the computer or to your computer, follow these steps: 1.
When the Turn Off Computer dialog box is booting, the computer will be booted...
User Guide - Page 23

... your system to the computer. Installing and Removing Drives 4-1 Turn off the computer. First of your computer. Removing the Cover
You need to remove the cover of all, disconnect the power cable from the electrical outlet and from any telecommunications links, networks, or modems before performing any cables connected to access its...
User Guide - Page 25
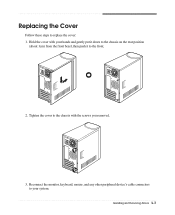
Hold the cover with the screws you removed.
3. Reconnect the monitor, keyboard, mouse, and any other peripheral device's cable connectors to your hands and gently put it down to the chassis on the rear position
(about 1cm) from the front bezel, then push it to ...
User Guide - Page 26
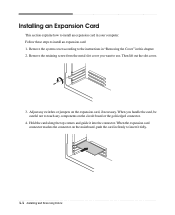
... be careful not to use. When you want to touch any switches or jumpers on the expansion card, if necessary. When the expansion card connector reaches the connector on the circuit board or the gold-edged connector.
4. Remove the system cover according to install an expansion card...this chapter. 2. Installing an Expansion Card
This section explains how to insert it into the connector.
User Guide - Page 30

Slide the HDD bracket into the chassis and secure it .)
9. 7. Replace the system cover according to your hard disk drive. (If you removed the hard disk drive cable from the motherboard, replace it with the retaining screw, as shown below.
8. Connect the power and hard disk drive cable to the instructions in "Replacing the Cover" in this chapter. 4-8 Installing and Removing Drives
User Guide - Page 32
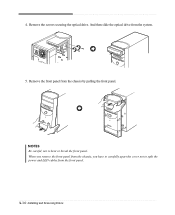
... bent or break the front panel. Remove the front panel from the chassis by pulling the front panel.
4. NOTES Be careful, not to split the power and LED cables from the system.
5.
User Guide - Page 33

...CS (Cable Select). If there is set the jumper of new device to use the spare connector of the front panel using a tool such as a screwdriver. NOTES Like a hard disk drive...have jumpers that connected to this 5.25-inch bay, you can use the secondary E-IDE drive connector. 6. Remove the faceplate cover from the chassis using your system recognizes the device according to location ...
User Guide - Page 34
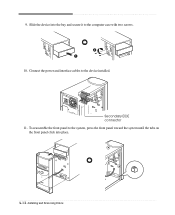
Slide the device into place.
4-12 Installing and Removing Drives Connect the power and interface cables to the computer case with two screws.
10.
To reassemble the front panel to the system, press the front panel toward the system until the tabs on the front panel click into the bay and secure it to the device installed. Secondary EIDE connector 11. 9.
User Guide - Page 42
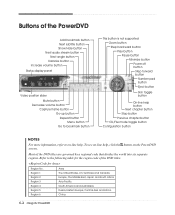
... button Repeat button Menu button Go to bookmark button
This button is not supported Zoom button Step backward button Play button Pause button Minimize button Power off button Step forward button Number pad button
Eject button
Skin toggle button
On-line help button Next chapter button Stop button Previous chapter button...
User Guide - Page 43

... wall outlet works, plug other wall outlet. Read it will not operate if you press the power button.
To turn off your hard disk may be fragmented. Hard Disk Drive
Cause Hard disk...files stored on your computer and wait about 10 seconds for complete discharge and re-plug the power cord. Check for lost allocation units by running Disk Defragmenter. (For more information,refer to ...
User Guide - Page 45

...area and the resolution from a diskette, slide the small black tab on the back of your Windows Help in Windows....Click the OK button. Use another diskette that the monitor connector is incorrectly inserted. Diskette is unformatted. Monitor is not ...brightness and contrast controls on the empty desktop area and click Properties. 2. Make sure the power cord is write-protected. Your current...
User Guide - Page 46
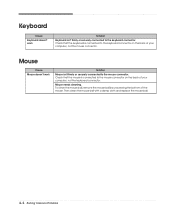
Mouse needs cleaning. Then clean the mouse ball with a damp cloth and replace the mouse ball. A-4 Solving Common Problems
Mouse
Cause Mouse doesn't work
Solution
Keyboard isn't firmly or securely connected to the mouse connector. To clean the mouse ball, remove the mouse ball by unscrewing the bottom of your computer, not the...
User Guide - Page 48
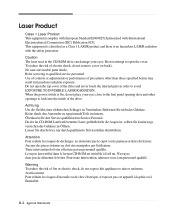
... used in order to qualified service personnel. No user-serviceable parts inside of fire or electric shock, do not remove cover (or back). When the power switch is no hazardous LASER radiation with International Electrotechnical Commission (IEC) Publication 825]. Achtung Um die Gefahr eines elektrischen Schlages zu Vermindem, Entfernen Sie nicht das...
Similar Questions

No Sound Or Boot When Power Switch Pressed.
Unfortunately the suggestions made by techygirl did not work. I have verified the power cord, all co...
Unfortunately the suggestions made by techygirl did not work. I have verified the power cord, all co...
(Posted by rfull4 3 years ago)

How To Wire Power Switch On Emachine W3644 Desktop To Win Fast Motherboard
(Posted by ffmiked2 9 years ago)

I Need To Know Where The 3 Wires From The Power Switch In The Front Panel Go To
the red black and blue wire where do they go inside the computer they are unplugged
the red black and blue wire where do they go inside the computer they are unplugged
(Posted by jackitholkes65 10 years ago)
How To Replace The Power Switch
how to replace the power switch
how to replace the power switch
(Posted by Anonymous-102391 11 years ago)

Adding Memory To T2682 Emachine
Where can i find an instruction guide for adding memory
Where can i find an instruction guide for adding memory
(Posted by Tonymess 12 years ago)