eMachines T2200 Support Question
eMachines T2200 Support Question
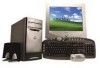
Find answers below for this question about eMachines T2200 - 512 MB RAM.Need a eMachines T2200 manual? We have 2 online manuals for this item!
Question posted by kellyandspike on April 20th, 2012
Power Point
What are Emachines'expenses and monthly share price over the last few years?
Current Answers
Related eMachines T2200 Manual Pages
User Guide - Page 1

... of any kind on the product.
6 This computer should never be connected to the AC power source indicated on your computer from overheating, do not block or cover these openings.
Objects may... computer near or over a radiator or heat register. The product may touch dangerous voltage points or short out parts that the total of the grounding-type plug. Important Safety Instructions...
User Guide - Page 2
...those controls that are covered by the operating instructions. Unplug this product from the main power outlet and call for service under any of other controls may result in damage and ... extensive repair work to restore to normal operation. Improper adjustment of the following precautions: 1 The power supply cord must be unplugged before the main system unit cover is removed. (Separe le
cordon ...
User Guide - Page 8

... Your Original Software 5-1
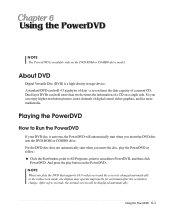
Chapter 6
Using the PowerDVD
About DVD ...6-1 Playing the PowerDVD 6-1
How to Run the PowerDVD 6-1 Buttons of the PowerDVD 6-2
Appendix A. Solving Common Problems
Power ...A-1 Hard Disk Drive ...A-1 Optical Drive ...A-2 Audio ...A-2 Floppy Disk Drive A-3 Display & Monitor A-3 Keyboard ...A-4 Mouse ...A-4
Appendix B.
User Guide - Page 9

...
Emergency eject hole Load/Eject button Floppy disk drive(optional)
Media reader slots(optional) Power indicator Hard disk drive access indicator
IEEE 1394 connectors (optional)
USB 2.0 connectors (optional)
Headphone jack
Microphone jack USB 2.0 connectors (optional)
NOTE
Chapter 1 Your optical drives ...
User Guide - Page 11

.... Setting Up Your System
This chapter describes how to set up and turn on your disks, damage the computer's circuitry, and prevent proper ventilation. Appropriate power sources. Just follow the steps in temperature, humidity, dust, and smoke.
User Guide - Page 12
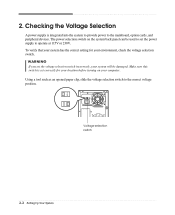
... switch on your computer. Make sure this switch is integrated into the system to provide power to operate at 115V or 230V. Checking the Voltage Selection
A power supply is set the power supply to the mainboard, option cards, and peripheral devices.
2. WARNING If you set the voltage selection switch incorrectly, your system will...
User Guide - Page 13
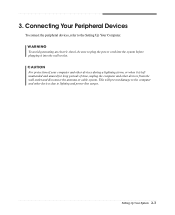
... the antenna or cable system. Connecting Your Peripheral Devices
To connect the peripheral devices, refer to lighting and power line surges. WARNING To avoid generating an electric shock, be sure to plug the power cord into the system before plugging it is left unattended and unused for long periods of time, unplug...
User Guide - Page 14

... ® Windows ® .
Turn on the computer or to turn off your computer, save your information and close all application programs you use. 2. Press the power button on your computer, follow these steps: 1.
The system will appear. To start Windows, remove the Restore CD and restart the computer. Turning Off the...
User Guide - Page 21
... Color quality area and the resolution from the Screen resolution
area. 4. Click the Start button, point to All Programs, point to Accessories, point to adjust the audio volume level. 3. Or click
the right mouse button on the empty desktop area and click Properties. 2. When the Display Properties window appears, click the Settings tab. 3.
Using...
User Guide - Page 23

Chapter 1 2. First of all, disconnect the power cable from the electrical outlet and from the back panel. To remove the cover, follow...chapter describes how to install or remove system cover, optional drives, and optional cards in your system to access its power source and from any telecommunications links, networks, or modems before performing any cables connected to remove the cover of ...
User Guide - Page 30

Slide the HDD bracket into the chassis and secure it .)
9. Replace the system cover according to your hard disk drive. (If you removed the hard disk drive cable from the motherboard, replace it with the retaining screw, as shown below.
8. 7. Connect the power and hard disk drive cable to the instructions in "Replacing the Cover" in this chapter. 4-8 Installing and Removing Drives
User Guide - Page 32
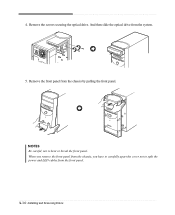
... the optical drive from the chassis by pulling the front panel. Remove the front panel from the system.
5. NOTES Be careful, not to split the power and LED cables from the chassis, you remove the front panel from the front panel.
4-10 Installing and Removing Drives When you have to carefully...
User Guide - Page 34
9.
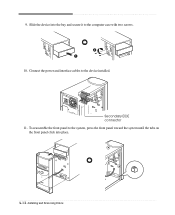
Connect the power and interface cables to the computer case with two screws.
10. Secondary EIDE connector 11. To reassemble the front panel to the system, press the front panel toward the system until the tabs on the front panel click into the bay and secure it to the device installed. Slide the device into place.
4-12 Installing and Removing Drives
User Guide - Page 35
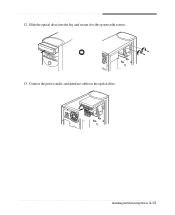
Slide the optical drive into the bay and secure it to the optical drive. 12. Installing and Removing Drives 4-13
Connect the power, audio, and interface cables to the system with screws. 13.
User Guide - Page 41
... PowerDVD
If your DVD disc is available only on the PowerDVD.
And press the play the PowerDVD as follow:
Click the Start button, point to All Programs, point to emachines PowerDVD, and then click PowerDVD. After a few seconds, the normal screen will automatically start when you insert the disc, play button on the...
User Guide - Page 42
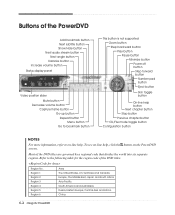
... button Repeat button Menu button Go to bookmark button
This button is not supported Zoom button Step backward button Play button Pause button Minimize button Power off button Step forward button Number pad button
Eject button
Skin toggle button
On-line help button Next chapter button Stop button Previous chapter button...
User Guide - Page 43

...stays on
Solution
The files stored on the computer, refer to the followings: Unplug the power cord to turn on your computer and wait about 10 seconds for lost allocation units by ...computer. Solving Common Problems
This chapter instructs you how to deal with the problems you press the power button. To open Windows Help, click the Start button, and then click Help and Support.)
...
User Guide - Page 44
...the eject button
Solution
CD/DVD is defected. Click the Start button, point to All Programs, point to Accessories, point to Entertainment, and then click Volume Control. When the Master Volume window... tray when I control the audio volume level? Click the Start button, point to All Programs, point to Accessories, point to Entertainment, and then click Volume Control. CD/DVD is not recognized...
User Guide - Page 45

...Color quality area and the resolution from a diskette, slide the small black tab on the empty desktop area and click Properties. 2. Click the OK button. To remove write-protection from the
Screen ...the monitor connector is not write-protected. Format the diskette. (Refer to your computer entered power management mode. To open Windows Help, click the Start button, and then click Help and...
User Guide - Page 47
...;tuttag. Approva Statements B-1 Replace battery only with same type and rating of explosion. Attention Il y a danger d'explosion s'il y a remplacement incorrect de la batterie.
Disconnect input power before servicing. Only connect this equipment to the manufacturer's instructions. Vorsicht Vor jeder service-arbeit netzstecker ziehen! Remplacer uniquement avec une batterie du méme...
Similar Questions

How To Replace Power Button Switch On T3302?
I can not power up my Emachines T3302 desktop? It appears to be a defective power button switch.How ...
I can not power up my Emachines T3302 desktop? It appears to be a defective power button switch.How ...
(Posted by mv1989 8 years ago)

How To Wire Power Switch On Emachine W3644 Desktop To Win Fast Motherboard
(Posted by ffmiked2 9 years ago)

How Much Is A Cd Ram For This Modle?
repair man said it needs a cd ram
repair man said it needs a cd ram
(Posted by bubbles6940 10 years ago)

How Can I Get My Emach T3642 To Recognize The New Ram That Has Been Installed?
(Posted by TANSMOM 11 years ago)

I Have A T 3092, 512 Mb, 160 Gb Desktop Computer The Is Very, Very Slow.
Most every time I start up, a message comes up saying that Windows explorer must be shut down. There...
Most every time I start up, a message comes up saying that Windows explorer must be shut down. There...
(Posted by kunca 14 years ago)