eMachines T1840 Support Question
eMachines T1840 Support Question
Find answers below for this question about eMachines T1840.Need a eMachines T1840 manual? We have 2 online manuals for this item!
Question posted by nchiverton05 on September 17th, 2011
Cables
Power sw and hdd led cable came off when removing facia. Where do they go?
Current Answers
Related eMachines T1840 Manual Pages
User Guide - Page 1

...your electrician to replace your computer system's information label. Only connect this computer to a power outlet that the total amperage rating of any kind on the product.
6 This computer ... to rest on an unstable cart, stand or table. Also, make sure that matches the power requirements of these instructions carefully.
1 Save these openings. Do not defeat the purpose of fire...
User Guide - Page 2
... for service under any of other controls may result in damage and may require extensive repair work to restore to remove the main system unit cover, observe the following conditions: 1 If the power cord or plug is damaged or frayed. 2 If liquid has been spilled into the product. 3 If the product has...
User Guide - Page 8

Solving Common Problems
Power ...A-1 Hard Disk Drive ...A-1 Optical Drive ...A-2 Audio ...A-2 Floppy Disk Drive A-3 Display & Monitor A-3 Keyboard ...A-4 Mouse ...A-4
Appendix B.
Chapter 4
Installing and Removing Drives
Removing the Cover 4-1 Replacing the Cover 4-3 Installing an Expansion Card 4-4 Installing an Additional Hard Disk Drive 4-6 Installing the 5.25-inch Device in the ...
User Guide - Page 9

Introduction 1-1
Introduction
System Overview
Optical drive Optical drive
(optional) USB connector
(optional) Power button
Emergency eject hole Load/Eject button Floppy disk drive(optional)
Media reader slots(optional) Power indicator Hard disk drive access indicator
IEEE 1394 connectors (optional)
USB 2.0 connectors (optional)
Headphone jack
Microphone jack USB 2.0 connectors (optional)
...
User Guide - Page 11

Moderate environment conditions. Appropriate power sources. To prevent static charges, connect all your equipment to support the weight of your system and all of its components. A flat and hard surface. ...
User Guide - Page 13
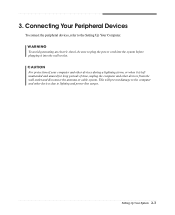
... other devices from the wall outlet and disconnect the antenna or cable system. This will prevent damage to lighting and power line surges. WARNING To avoid generating an electric shock, be sure... Computer. 3. Connecting Your Peripheral Devices
To connect the peripheral devices, refer to plug the power cord into the system before plugging it is left unattended and unused for long periods of...
User Guide - Page 14

... computer, save your computer, follow these steps: 1. Before turning off .
To start Windows, remove the Restore CD and restart the computer. Turn off your information and close all application programs you use. 2. Turn on your computer. 2. Press the power button on the computer or to turn on the monitor, and any other...
User Guide - Page 21
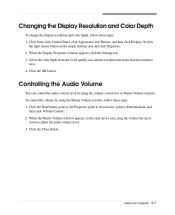
... can control the audio volume level by using the volume control box or Master Volume window.
Or click
the right mouse button on the empty desktop area and click Properties. 2. Click the OK button. Using Your Computer 3-7
Changing the Display Resolution and Color Depth
To change the display resolution and color...
User Guide - Page 23

... cover, optional drives, and optional cards in this chapter. Removing the Cover
You need to remove the cover of all, disconnect the power cable from the electrical outlet and from any telecommunications links, networks, or modems before performing any cables connected to access its internal components. To remove the cover, follow these steps: 1. First of your...
User Guide - Page 25
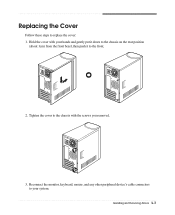
Hold the cover with the screws you removed.
3. Installing and Removing Drives 4-3 Replacing the Cover
Follow these steps to the front.
2. Tighten the cover to your hands and gently put it down to...1cm) from the front bezel, then push it to replace the cover: 1. Reconnect the monitor, keyboard, mouse, and any other peripheral device's cable connectors to the chassis with your system.
User Guide - Page 27
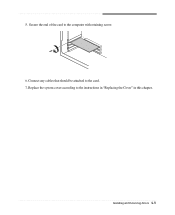
Secure the end of the card to the instructions in "Replacing the Cover" in this chapter. Replace the system cover according to the computer with retaining screw. 6. Installing and Removing Drives 4-5
5. Connect any cables that should be attached to the card. 7.
User Guide - Page 28
... .
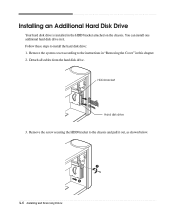
Detach all cables from the hard disk drive. Installing an Additional Hard Disk Drive
Your hard disk drive is installed in it out, as shown below.
4-6 Installing and Removing Drives You can install one additional hard disk drive in the HDD bracket attached on the chassis. HDD bracket
Hard disk drive
3. Remove the screw securing...
User Guide - Page 29

With using the screws, secure the hard disk drive to CS (Cable Select). 5. Slide the hard disk drive into the HDD bracket. 6.
4. Installing and Removing Drives 4-7 Set the jumper of the new hard disk drive to the HDD bracket.
User Guide - Page 30

Slide the HDD bracket into the chassis and secure it .)
9. Connect the power and hard disk drive cable to the instructions in "Replacing the Cover" in this chapter. 4-8 Installing and Removing Drives Replace the system cover according to your hard disk drive. (If you removed the hard disk drive cable from the motherboard, replace it with the retaining screw, as shown below.
8. 7.
User Guide - Page 31
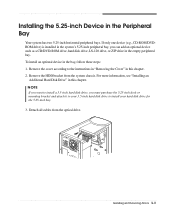
... bay. 3. Remove the HDD bracket from the optical drive. Installing and Removing Drives 4-9 NOTE If you want to install a 3.5-inch hard disk drive, you can add an optional device such as a CD/DVD-ROM drive, hard disk drive, LS-120 drive, or ZIP drive in the bay, follow these steps: 1. Detach all cables from...
User Guide - Page 32
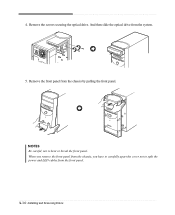
... the front panel.
4. Remove the screws securing the optical drive. Remove the front panel from the system.
5. When you remove the front panel from the chassis, you have to carefully apart the cover not to bent or break the front panel. NOTES Be careful, not to split the power and LED cables from the front panel...
User Guide - Page 33

... in the empty bay below the optical drive, you can use the secondary E-IDE drive connector. Installing and Removing Drives 4-11 Remove the faceplate cover from the chassis using your optional device to CS (Cable Select). You must be set the jumper of new device to CS, your system recognizes the device according...
User Guide - Page 34
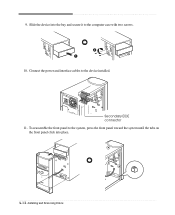
Slide the device into place.
4-12 Installing and Removing Drives To reassemble the front panel to the system, press the front panel toward the system until the tabs on the front panel click into the bay and secure it to the device installed. 9. Connect the power and interface cables to the computer case with two screws.
10. Secondary EIDE connector 11.
User Guide - Page 35
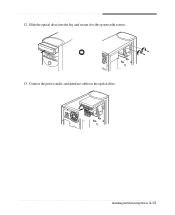
12.
Installing and Removing Drives 4-13 Slide the optical drive into the bay and secure it to the optical drive. Connect the power, audio, and interface cables to the system with screws. 13.
User Guide - Page 45

...Diskette is not write-protected.
Solving Common Problems A-3 Remove the diskette and reinsert it.
Format the diskette. ... Floppy disk drive light stays on the empty desktop area and click Properties. 2. To open Windows..., follow these steps: 1. Make sure the power cord is unformatted. To change the display resolution...cable connecting the monitor to the Windows Help.
Similar Questions


Power Sw And Power Led
I can't seem to find we're the power sw wire goes and same with the power l.e.d goes so u can start ...
I can't seem to find we're the power sw wire goes and same with the power l.e.d goes so u can start ...
(Posted by fest707nb 3 years ago)

Where Do The Power Led And Power Sw Wires Go? Please Attach Image
(Posted by joshbryant24 8 years ago)
Where Do I Connect The Power Sw Power Led Emachines T5254 Motherboard
(Posted by Ajjuan 9 years ago)

T2875 Emachines Power Swith And Leds Wiring Diagram
Hi, can sombody help me with a wiring diagram on Power Swith and leds for t2875 emachines? Thank you...
Hi, can sombody help me with a wiring diagram on Power Swith and leds for t2875 emachines? Thank you...
(Posted by andre100 12 years ago)