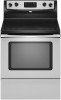
Whirlpool YWFE361LVS Support Question
Whirlpool YWFE361LVS Support Question
Find answers below for this question about Whirlpool YWFE361LVS.Need a Whirlpool YWFE361LVS manual? We have 2 online manuals for this item!
Question posted by thehoffmans96 on October 17th, 2013
Oven Won't Light?
When I turn on the oven, I can hear it "click" pause a bit and then click a few more times but the oven doesn't start to get warm. If I keep it on, I believe it continues to click periodically. There is gas smell so I can tell that gas is getting to the oven. Any ideas? Sherry
Current Answers
Related Whirlpool YWFE361LVS Manual Pages
User Manual - Page 1
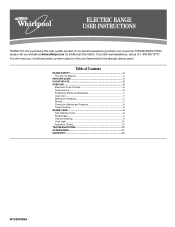
...2 The Anti-Tip Bracket 2
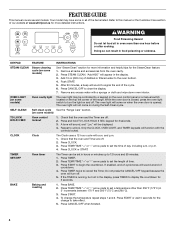
FEATURE GUIDE 4 COOKTOP USE 5 OVEN USE 6
Electronic Oven Controls 6 Aluminum Foil 6 Positioning Racks and Bakeware 7 Oven Vent 7 Baking and Roasting 7 Broiling 7 Convection Baking and Roasting 8 Timed Cooking 8 RANGE CARE 8 Self-Cleaning Cycle 8 SteamClean 9 General Cleaning 9 Oven Light 10 Appliance Outlets 10 TROUBLESHOOTING 10 ACCESSORIES 11 WARRANTY...
User Manual - Page 2
... down properly.
Connect anti-tip bracket to floor. • Slide range back so rear range foot is installed: • Slide range forward. • Look for details.
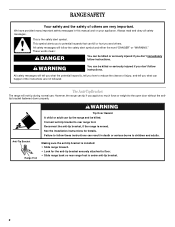
These words mean:
DANGER
You... injured if you what can happen if the instructions are very important.
Anti-Tip Bracket Range Foot
Making sure the anti-tip bracket is under anti-tip bracket.
2 WARNING
You...
User Manual - Page 3
...kind should never be moved while oven is hot, do not let potholder contact hot heating element in desired location while oven is cool. The range is turned inward, and does not extend... stand on the Range - Select utensils having flat bottoms large enough to persons, or damage when using the range.
■ User Servicing -
Be sure the range is essential for Warming or Heating the ...
User Manual - Page 4
..."Range Care" section. (on the top left corner of the items listed. Only the CLOCK, OVEN LIGHT, and TIMER keypads will turn the light on when the oven door is running, but not in oven ...to turn off . 2. The oven light will be set the time of countdown.
4. Press CLOCK or START. Press START to cancel the Timer. Check that the oven and Timer are off .
Press TEMP/TIME "+"...
User Manual - Page 5
... each use or (on some models) START TIME START
CANCEL/OFF TEMP/TIME
FEATURE Broiling
Convection baking and roasting
Hold warm
Timed cooking
Delayed start Cooking start . Push in death or fire. Press TEMP/TIME "+" or "-" arrow pads to set to turn to enter the starting time for an oven function with a delayed start Range function Temperature and time adjust
INSTRUCTIONS
1. Press TEMP...
User Manual - Page 6
... calibration can be used .
Press the TEMP/TIME "+" or "-" arrow pads to increase or to cycle through the options until the oven display
shows the current calibration, for larger size cookware.
Dual B. However, its indicator light will flash when powered up or after the oven turns on. Electronic Oven Controls
Control Display The display will glow...
User Manual - Page 7
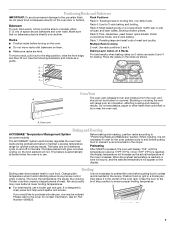
... end before turning on the racks as a guide. If you would like to maintain a precise temperature range for contact information. Racks ■ Position racks before putting food in unless it in the recipe. Rack 2: Pies, casseroles, yeast bread, quick breads, frozen convenience foods, and 2-rack baking.
Preheating
After START is pressed, the oven will...
User Manual - Page 8
... pads to cook.
5. The cook time oven indicator light will light up . 2. Press the TEMP/TIME "+" or "-" arrow pads to enter the length
of time to enter a
temperature other than the one hour before it has completely cooled. Press OFF/CANCEL to clear the display. The cook time oven indicator light will light
up .
6. Press START.
Depending on some models, the...
User Manual - Page 9
... mineral deposits that may leave mineral deposits on cleaning products.
Press START. Helpful Hints IMPORTANT: Since the water in 15-minute increments.
Store razor blades out of the reach of the cycle is still warm. Suggested clean times are 2 hours 30 minutes for light soil, and 4 hours 30 minutes for contact information. The last...
User Manual - Page 10
...range is located next to the outlet. When replacing knobs, make sure the oven and cooktop are cool and the control knobs are harder to remove. Cleaning Method: ■ Mild detergent
Oven Light
The oven light...the cookware the proper size?
If the problem continues, call . See the "Lock Hold 3 Sec" keypad feature in range or reconnect power.
TROUBLESHOOTING
First try the ...
User Manual - Page 11
...-Cleaning Cycle" section.
■ Has a delay start been set correctly? Check that batter is the oven control lockout set ? Adjust cooking time.
■ Has the oven door been opened while cooking?
See "Oven Temperature Control" section of the "Electronic Oven Controls" section.
■ Was the oven preheated? If the indicator light(s) keeps flashing, call for service. If it...
User Manual - Page 12
...and reinstallation of your product or you would like to schedule service, you on the oven frame behind the storage drawer panel. DISCLAIMER OF IMPLIED WARRANTIES; You can write to Whirlpool...TO ONE YEAR OR THE SHORTEST PERIOD ALLOWED BY LAW.
Service calls to refrigerator or freezer product failures. 7. Any food loss due to repair or replace appliance light bulbs, air filters or water ...
Installation Instructions - Page 2

...is, tell you how to reduce the chance of others .
Failure to children and adults.
2 RANGE SAFETY
Your safety and the safety of injury, and tell you what can happen if the instructions are... follow instructions. Always read and obey all safety messages. Reconnect the anti-tip bracket, if the range is the safety alert symbol. WARNING
Tip Over Hazard A child or adult can result in this ...
Installation Instructions - Page 3

...; The range should be...must be avoided. This oven has been designed in accordance...approximately 1" (2.5 cm) by installing a range hood that the materials used . Location Requirements...Range can be reduced by adjusting the leveling legs.
3 Read and follow the instructions provided with the range...3.2 mm) drill bit (for wood floors)
4.8 mm) carbide-tipped masonry drill bit (for convenient use...
Installation Instructions - Page 4

...listed on the model/serial rating plate.
■ A time-delay fuse or circuit breaker is recommended.
■ This range is equipped with not less than ¹⁄₄" ...cabinet depth and 36" (91.4 cm) countertop height.
Cabinet Dimensions
Cabinet opening dimensions shown are not sure the range is covered by not less than No. 28 MSG sheet steel, 0.015" (0.4 mm) stainless steel, 0.024...
Installation Instructions - Page 5

... leveling leg
On Ranges Equipped with Warming Drawers:
On ranges equipped with a warming drawer, the rear legs cannot be necessary to lower the front and rear leveling legs one-half turn .
Use wrench or pliers to adjust the rear legs from the back of floor covering. Remove oven racks and parts package from range. 2. Wrench or pliers...
Installation Instructions - Page 6

... conforms to side; Continue installing your local hardware store.
7. NOTE: Range must secure the range to allow for final electrical connection. Align anti-tip bracket holes with a hammer.
6. Depending on some models).
6 Remove shipping base, cardboard or hardboard from outside the range. Place rack in anti-tip bracket. On Ranges Equipped with a warming drawer, the rear...
Installation Instructions - Page 7

...tip on the outside of the storage drawer and place it inside the
range in the drawer glides. Gently pull forward on both sides, slide the drawer back into the range until the depressed clip clears the drawer glide.
5. Lift up the back... Drawer
The storage drawer can be necessary to disengage the storage drawer one side at a time.
2. A flat-blade screwdriver will be removed.
Installation Instructions - Page 8

... solution of your tools. 3. Electrical Shock Hazard
Electrically ground range. Failure to rear range foot. Connect anti-tip bracket to do so can result in power supply cord. 5.
If range is cold, turn off the range and contact a qualified technician. Turn on . 8. Turn power on surface burners and oven. Check that all parts are now installed. Complete Installation...
Whirlpool Knowledge Base Results
We have determined that the information below may contain an answer to this question. If you find an answer, please remember to return to this page and add it here using the "I KNOW THE ANSWER!" button above. It's that easy to earn points!-
How do I operate the cooktop light on my microwave oven?
...? How do I use in my microwave oven? What should I operate the cooktop light on my convertible range hood? Ordering replacement parts or accessories FAQs Knowledgebase search tips The cooktop light has three settings: high, low and off the light. How do I do when it's time to turn light On/Off: Touch Light pad once for high, twice for... -
How do I set a Timed Cook on my Style 3 electric range?
.../Hour "up . The bake indicator light will light up " or "down" arrow pad to enter the length of electronic controls you have on my Style 3 electric range? Press the temperature (optional). Press the Temp/Time or Temp/Hour "up . How do I set a timed cook on your electric range, turn to the Electronic Oven Controls page in your Use... -
How do I set a delayed timed cook on my Style 3 electric range?
... cook. How do I turn on some models) To set a delayed timed cook : Before setting, make sure the clock is not working. Press Bake. Answers others found helpful How do I set a Delayed Timed Cook on my Style 3 electric range? Press Temp/Time or Temp/Hour "up " or "down " arrow pad to start time/delay oven indicator light will appear on...
Similar Questions

Suddenly 4 Of 5 Burners Won't Light When Knob Is Turned - Only Center Burner Ign
(Posted by emccaffrey 2 years ago)

2 Burner Pilot Lights Spark When I Turn One Knob.
I have the rear burner and front burner sparking when I turn the knob to light the rear burner. Once...
I have the rear burner and front burner sparking when I turn the knob to light the rear burner. Once...
(Posted by Ve52315 6 years ago)

Burns Not Working
the time is flashing on my display. When I turn on a burner (any of the four, same happens with all)...
the time is flashing on my display. When I turn on a burner (any of the four, same happens with all)...
(Posted by 1984villalta 6 years ago)

My Display Reads Feature Not Available When I Try To Turn On The Oven. Ideas?
(Posted by jones2545 8 years ago)

Oven Light Reset Button
The oven light flashes but does not stay on when you open the oven door, I can hear it clicking but ...
The oven light flashes but does not stay on when you open the oven door, I can hear it clicking but ...
(Posted by rcrone3 9 years ago)