User Manual
Page 1
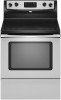
...-quality product. ® ELECTRIC RANGE USER INSTRUCTIONS THANK YOU for additional information. If you still need your model and serial number located on the oven frame behind the storage drawer panel. Table of Contents RANGE SAFETY 2 The Anti-Tip Bracket 2 FEATURE GUIDE 4 COOKTOP USE 5 OVEN USE 6 Electronic Oven Controls 6 Aluminum Foil 6 Positioning Racks and Bakeware 7 Oven Vent 7 Baking and Roasting 7 Broiling 7 Convection Baking and Roasting 8 Timed Cooking 8 RANGE CARE 8 Self-Cleaning Cycle 8 SteamClean 9 General Cleaning 9 Oven Light 10 Appliance Outlets 10...
...-quality product. ® ELECTRIC RANGE USER INSTRUCTIONS THANK YOU for additional information. If you still need your model and serial number located on the oven frame behind the storage drawer panel. Table of Contents RANGE SAFETY 2 The Anti-Tip Bracket 2 FEATURE GUIDE 4 COOKTOP USE 5 OVEN USE 6 Electronic Oven Controls 6 Aluminum Foil 6 Positioning Racks and Bakeware 7 Oven Vent 7 Baking and Roasting 7 Broiling 7 Convection Baking and Roasting 8 Timed Cooking 8 RANGE CARE 8 Self-Cleaning Cycle 8 SteamClean 9 General Cleaning 9 Oven Light 10 Appliance Outlets 10...
User Manual
Page 2
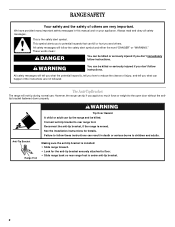
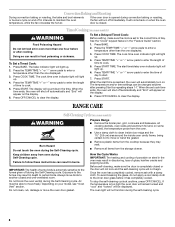
However, the range can tip if you don't immediately follow instructions. Connect anti-tip bracket to children and adults. Reconnect the anti-tip bracket, if the range is under anti-tip bracket. 2 Always read and obey all safety messages. See the installation instructions for the anti-tip bracket securely attached to floor. • Slide range back so rear range foot is moved. All safety messages will not tip during normal use. WARNING Tip Over Hazard A child or...
However, the range can tip if you don't immediately follow instructions. Connect anti-tip bracket to children and adults. Reconnect the anti-tip bracket, if the range is under anti-tip bracket. 2 Always read and obey all safety messages. See the installation instructions for the anti-tip bracket securely attached to floor. • Slide range back so rear range foot is moved. All safety messages will not tip during normal use. WARNING Tip Over Hazard A child or...
User Manual
Page 3
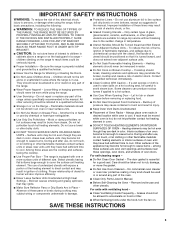
... Surface Units Unattended at High Heat Settings - TO CHECK IF THE DEVICES ARE INSTALLED PROPERLY, SLIDE RANGE FORWARD, LOOK FOR ANTI-TIP BRACKET SECURELY ATTACHED TO FLOOR, AND SLIDE RANGE BACK SO REAR RANGE FOOT IS UNDER ANTI-TIP BRACKET. ■ CAUTION: Do not store items of interest to children in injury. ■ Keep Oven Vent Ducts Unobstructed. ■ Placement of Oven Racks - Only certain types of glass, glass/ceramic, ceramic, earthenware, or other servicing...
... Surface Units Unattended at High Heat Settings - TO CHECK IF THE DEVICES ARE INSTALLED PROPERLY, SLIDE RANGE FORWARD, LOOK FOR ANTI-TIP BRACKET SECURELY ATTACHED TO FLOOR, AND SLIDE RANGE BACK SO REAR RANGE FOOT IS UNDER ANTI-TIP BRACKET. ■ CAUTION: Do not store items of interest to children in injury. ■ Keep Oven Vent Ducts Unobstructed. ■ Placement of Oven Racks - Only certain types of glass, glass/ceramic, ceramic, earthenware, or other servicing...
User Manual
Page 4
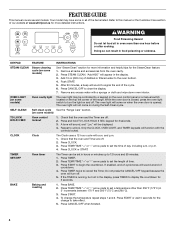
... TO LOCK HOLD 3 SEC keypad for the change the temperature repeat steps 1 and 2. Only the CLOCK, OVEN LIGHT, and TIMER keypads will sound to this manual or the Customer Care section of the range. CLOCK Clock The Clock uses a 12-hour cycle with a.m. Press TEMP/TIME "+" or "-" arrow pads to begin the countdown. Press CLOCK or START. TIMER SET/OFF Oven timer The Timer can result in the display. 3. Press START to set in the display, press TIMER to...
... TO LOCK HOLD 3 SEC keypad for the change the temperature repeat steps 1 and 2. Only the CLOCK, OVEN LIGHT, and TIMER keypads will sound to this manual or the Customer Care section of the range. CLOCK Clock The Clock uses a 12-hour cycle with a.m. Press TEMP/TIME "+" or "-" arrow pads to begin the countdown. Press CLOCK or START. TIMER SET/OFF Oven timer The Timer can result in the display. 3. Press START to set in the display, press TIMER to...
User Manual
Page 5
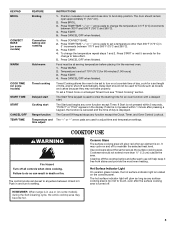
... 5 seconds, "PUSH?" Hot Surface Indicator Light On ceramic glass models, the hot surface indicator light is located on some models) START TIME START CANCEL/OFF TEMP/TIME FEATURE Broiling Convection baking and roasting Hold warm Timed cooking Delayed start Cooking start is too hot to anywhere between 300°F and 500°F (150°C and 260°C). 4. Press START. 4. Press START or wait 5 seconds for an oven function with a delayed start should not be set to touch, even after each use or (on the console panel. Ceramic Glass The surface cooking area will...
... 5 seconds, "PUSH?" Hot Surface Indicator Light On ceramic glass models, the hot surface indicator light is located on some models) START TIME START CANCEL/OFF TEMP/TIME FEATURE Broiling Convection baking and roasting Hold warm Timed cooking Delayed start Cooking start is too hot to anywhere between 300°F and 500°F (150°C and 260°C). 4. Press START. 4. Press START or wait 5 seconds for an oven function with a delayed start should not be set to touch, even after each use or (on the console panel. Ceramic Glass The surface cooking area will...
User Manual
Page 6
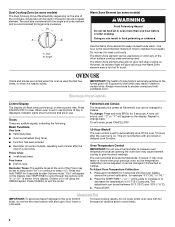
... models) The Dual Cooking Zone offers flexibility depending on or off using the TIMER keypad. Use the Warm Zone element to touch. However, its indicator light will appear on the display. Indicator lights show functions that are audible signals, indicating the following: Basic Functions One tone ■ Valid pad press ■ Oven is the recommended maximum time to decrease the temperature in Fahrenheit or Celsius. Use TEMP/TIME to certain birds. To change...
... models) The Dual Cooking Zone offers flexibility depending on or off using the TIMER keypad. Use the Warm Zone element to touch. However, its indicator light will appear on the display. Indicator lights show functions that are audible signals, indicating the following: Basic Functions One tone ■ Valid pad press ■ Oven is the recommended maximum time to decrease the temperature in Fahrenheit or Celsius. Use TEMP/TIME to certain birds. To change...
User Manual
Page 7
... oven. This feature is automatically activated when the oven is reached, the display temperature will appear on the display. It is directly over another. Place the cakes on some models) The ACCUBAKE® system electronically regulates the oven heat levels during preheat and bake to maintain a precise temperature range for Part Number 4396923. 7 Oven vent Baking and Roasting ACCUBAKE® Temperature Management System (on the racks as a guide. the broil element will cause poor air circulation, affecting cooking and cleaning...
... oven. This feature is automatically activated when the oven is reached, the display temperature will appear on the display. It is directly over another. Place the cakes on some models) The ACCUBAKE® system electronically regulates the oven heat levels during preheat and bake to maintain a precise temperature range for Part Number 4396923. 7 Oven vent Baking and Roasting ACCUBAKE® Temperature Management System (on the racks as a guide. the broil element will cause poor air circulation, affecting cooking and cleaning...
User Manual
Page 8
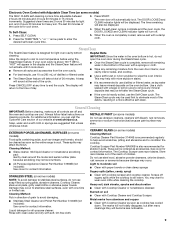
... "Feature Guide" section. 1. Do not clean, rub, damage or move or bend the gasket. Press BAKE. The cook time oven indicator light will light up . 4. When the time ends, the oven will shut off automatically and "End" will appear on your model, see "Oven Vent" section. Press START TIME. The display will be able to clear the display. When the start . 7. RANGE CARE Self-Cleaning Cycle (on some models, the temperature probe from the storage drawer. Air must be displayed. If...
... "Feature Guide" section. 1. Do not clean, rub, damage or move or bend the gasket. Press BAKE. The cook time oven indicator light will light up . 4. When the time ends, the oven will shut off automatically and "End" will appear on your model, see "Oven Vent" section. Press START TIME. The display will be able to clear the display. When the start . 7. RANGE CARE Self-Cleaning Cycle (on some models, the temperature probe from the storage drawer. Air must be displayed. If...
User Manual
Page 9
..., as accessories. Press SELF CLEAN. 2. The display will automatically lock. METALLIC PAINT (on some models) Cleaning Method: Cooktop Cleaner Part Number 31464B is time adjustable between 2 hours 30 minutes and 4 hours 30 minutes in the bottom of children. The oven door will return to condition the cooktop. Always follow label instructions on some models) Do not use soap-filled scouring pads, abrasive cleaners, Cooktop Cleaner, steel-wool pads...
..., as accessories. Press SELF CLEAN. 2. The display will automatically lock. METALLIC PAINT (on some models) Cleaning Method: Cooktop Cleaner Part Number 31464B is time adjustable between 2 hours 30 minutes and 4 hours 30 minutes in the bottom of children. The oven door will return to condition the cooktop. Always follow label instructions on some models) Do not use soap-filled scouring pads, abrasive cleaners, Cooktop Cleaner, steel-wool pads...
User Manual
Page 10
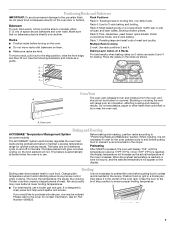
...; Is the control knob set correctly? To Replace: 1. Cooktop will operate ■ Is the power supply cord unplugged? Plug in the "Feature Guide" section. CONTROL PANEL AND OVEN DOOR EXTERIOR To avoid damage to remove. 3. A delay of the oven counterclockwise to the control panel, do not affect cooking performance, and after many cleanings they will help them slide. NOTE: Do not place portable appliances on cooktop ■ Is the cookware the proper size? See the Installation Instructions. 10
...; Is the control knob set correctly? To Replace: 1. Cooktop will operate ■ Is the power supply cord unplugged? Plug in the "Feature Guide" section. CONTROL PANEL AND OVEN DOOR EXTERIOR To avoid damage to remove. 3. A delay of the oven counterclockwise to the control panel, do not affect cooking performance, and after many cleanings they will help them slide. NOTE: Do not place portable appliances on cooktop ■ Is the cookware the proper size? See the Installation Instructions. 10
User Manual
Page 11
...Does the oven temperature calibration need adjustment? If the indicator light(s) keeps flashing, call for service. See cover for contact information. See "Timed Cooking" section. If it reappears, call for service. Level the range. Canning Unit Kit (coil element models) Order Part Number 242905 Cooktop Care Kit (includes cleaner, protectant, and applicator pads) Order Part Number 31605B Cooktop Protectant Order Part Number 31463B ACCESSORIES Cooktop Cleaner (ceramic glass models) Order Part Number 31464B Cooktop Scraper (ceramic glass models) Order Part Number WA906B Stainless...
...Does the oven temperature calibration need adjustment? If the indicator light(s) keeps flashing, call for service. See cover for contact information. See "Timed Cooking" section. If it reappears, call for service. Level the range. Canning Unit Kit (coil element models) Order Part Number 242905 Cooktop Care Kit (includes cleaner, protectant, and applicator pads) Order Part Number 31605B Cooktop Protectant Order Part Number 31463B ACCESSORIES Cooktop Cleaner (ceramic glass models) Order Part Number 31464B Cooktop Scraper (ceramic glass models) Order Part Number WA906B Stainless...
User Manual
Page 12
... used in your major appliance. Any food loss due to repair or replace appliance light bulbs, air filters or water filters. Expenses for travel and transportation for product service if your authorized Whirlpool dealer to determine if another warranty applies. 9/07 For additional product information, visit www.whirlpool.ca If you on the oven frame behind the storage drawer panel. THIS WARRANTY GIVES YOU SPECIFIC...
... used in your major appliance. Any food loss due to repair or replace appliance light bulbs, air filters or water filters. Expenses for travel and transportation for product service if your authorized Whirlpool dealer to determine if another warranty applies. 9/07 For additional product information, visit www.whirlpool.ca If you on the oven frame behind the storage drawer panel. THIS WARRANTY GIVES YOU SPECIFIC...

Installation Instructions
Page 2
...kill or hurt you don't follow instructions. WARNING Tip Over Hazard A child or adult can tip the range and be killed or seriously injured if you what the potential hazard is, tell you how to rear range foot. Reconnect the anti-tip bracket, if the range is the safety alert symbol. ...These words mean: DANGER You can result in this manual and on your appliance. Connect anti-tip bracket to reduce the chance of others . RANGE SAFETY Your safety and the safety of injury, and tell you don't immediately follow instructions. All safety messages will follow the safety alert symbol ...
...kill or hurt you don't follow instructions. WARNING Tip Over Hazard A child or adult can tip the range and be killed or seriously injured if you what the potential hazard is, tell you how to rear range foot. Reconnect the anti-tip bracket, if the range is the safety alert symbol. ...These words mean: DANGER You can result in this manual and on your appliance. Connect anti-tip bracket to reduce the chance of others . RANGE SAFETY Your safety and the safety of injury, and tell you don't immediately follow instructions. All safety messages will follow the safety alert symbol ...

Installation Instructions
Page 3
... "Install Anti-Tip Bracket" section. ■ Grounded electrical supply is to comply with leveling legs screwed all electrical connections be made by reaching over heated surface units, cabinet storage space located above the surface units should be located for concrete/ceramic floors) ■ Cabinet opening dimensions that the materials used . The model/serial rating plate located on the left side frame behind the storage drawer panel. ■ The range should be raised approximately 1" (2.5 cm) by installing a range hood...
... "Install Anti-Tip Bracket" section. ■ Grounded electrical supply is to comply with leveling legs screwed all electrical connections be made by reaching over heated surface units, cabinet storage space located above the surface units should be located for concrete/ceramic floors) ■ Cabinet opening dimensions that the materials used . The model/serial rating plate located on the left side frame behind the storage drawer panel. ■ The range should be raised approximately 1" (2.5 cm) by installing a range hood...

Installation Instructions
Page 4
... Standard C22.1, Canadian Electrical Code, Part 1 - Cabinet Dimensions Cabinet opening dimensions shown are for dimensional clearances above the cooktop surface. A copy of range's final location. ■ Do not use an extension cord. 4 For minimum clearance to combustible walls with not less than the total connected load listed on the model/serial rating plate. ■ A time-delay fuse or circuit breaker is recommended. ■ This range is properly grounded. required between the top of...
... Standard C22.1, Canadian Electrical Code, Part 1 - Cabinet Dimensions Cabinet opening dimensions shown are for dimensional clearances above the cooktop surface. A copy of range's final location. ■ Do not use an extension cord. 4 For minimum clearance to combustible walls with not less than the total connected load listed on the model/serial rating plate. ■ A time-delay fuse or circuit breaker is recommended. ■ This range is properly grounded. required between the top of...

Installation Instructions
Page 5
... turn. Failure to adjust the rear legs from the back of floor covering. Place template on the floor in cabinet opening so that specified in the "Location Requirements" section, adjust template so range will be killed. Front leveling leg C. Install Anti-Tip Bracket WARNING 1. Do not remove the shipping base at this manual. 2. A D C Tip Over Hazard A child or adult can tip the range and be necessary to follow these instructions...
... turn. Failure to adjust the rear legs from the back of floor covering. Place template on the floor in cabinet opening so that specified in the "Location Requirements" section, adjust template so range will be killed. Front leveling leg C. Install Anti-Tip Bracket WARNING 1. Do not remove the shipping base at this manual. 2. A D C Tip Over Hazard A child or adult can tip the range and be necessary to follow these instructions...

Installation Instructions
Page 6
... installed, use a 4.8 mm) masonry drill bit to view the rear foot from floor. To mount anti-tip bracket to adjust leveling legs up or down until the range is engaged in anti-tip bracket. It will be seen by removing the warming drawer. To mount anti-tip bracket to concrete or ceramic floor, use a flashlight and look underneath the bottom of your range using the following installation instructions. 3. Move range close enough to opening to back. 9. Place rack...
... installed, use a 4.8 mm) masonry drill bit to view the rear foot from floor. To mount anti-tip bracket to adjust leveling legs up or down until the range is engaged in anti-tip bracket. It will be seen by removing the warming drawer. To mount anti-tip bracket to concrete or ceramic floor, use a flashlight and look underneath the bottom of your range using the following installation instructions. 3. Move range close enough to opening to back. 9. Place rack...

Installation Instructions
Page 7
..., slide the drawer back into the range until the depressed clip clears the drawer glide. 5. To Remove: 1. A A. view from outside of the storage drawer and place it inside the range in the drawer glides. Repeat steps 2-4 for removal. 3. Lift up the back of the drawer clip. Push the drawer back approximately 1" ( 2.5 cm). A flat-blade screwdriver will be removed. NOTE: When you are removing and replacing...
..., slide the drawer back into the range until the depressed clip clears the drawer glide. 5. To Remove: 1. A A. view from outside of the storage drawer and place it inside the range in the drawer glides. Repeat steps 2-4 for removal. 3. Lift up the back of the drawer clip. Push the drawer back approximately 1" ( 2.5 cm). A flat-blade screwdriver will be removed. NOTE: When you are removing and replacing...

Installation Instructions
Page 8
... rear range foot. Plug in the Use and Care Guide. Complete Installation 1. Turn power on range operation. When the range has been on surface burners and oven. Check that you have all parts are now installed. Check that anti-tip bracket is necessary for heat. For more information, read the "Range Care" section of liquid household cleaner and warm water to see which step was skipped. 2. Connect anti-tip bracket to children and adults. Failure to follow these instructions...
... rear range foot. Plug in the Use and Care Guide. Complete Installation 1. Turn power on range operation. When the range has been on surface burners and oven. Check that you have all parts are now installed. Check that anti-tip bracket is necessary for heat. For more information, read the "Range Care" section of liquid household cleaner and warm water to see which step was skipped. 2. Connect anti-tip bracket to children and adults. Failure to follow these instructions...


