Whirlpool RY160LXTS Support Question
Whirlpool RY160LXTS Support Question
Find answers below for this question about Whirlpool RY160LXTS - 30" Ing Slide-In Electric Coil Range.Need a Whirlpool RY160LXTS manual? We have 4 online manuals for this item!
Question posted by jsgranch on September 1st, 2013
How Do You Lift The Range Top? Brand New And One Burner Not Working.
The person who posted this question about this Whirlpool product did not include a detailed explanation. Please use the "Request More Information" button to the right if more details would help you to answer this question.
Current Answers
Related Whirlpool RY160LXTS Manual Pages
Owners Manual - Page 1

or visit our website at... www.whirlpool.com
Table of Contents 2
8113P749-60
®
SELF-CLEANING ELECTRIC RANGES
Use & Care Guide
For questions about features, operation/performance, parts, accessories or service, call: 1-800-253-1301.
Owners Manual - Page 2

... Controls 6 Home Canning 6 Cookware 6 Coil Elements and Burner Bowls 6 ELECTRONIC OVEN CONTROL 7 Display 7 Cancel 7 Clock 7 Timer 8 Control Lock 8 Oven Temperature Control 8 OVEN USE 8 Aluminum Foil 8 Positioning Racks and Bakeware 8 Bakeware 9 Oven Vent 9 Baking 9 Cook & Hold 10 Keep Warm 10 Broiling 10 Automatic Shut-Off/Sabbath Mode 11 RANGE CARE 11 Self-Cleaning Cycle...
Owners Manual - Page 3

...and others are not followed.
Failure to floor or wall. • Slide range back so rear range foot is installed: • Slide range forward. • Look for details. Always read and obey all ...or serious burns to children and adults. Reconnect the anti-tip bracket, if the range is the safety alert symbol.
The California Safe Drinking Water and Toxic Enforcement Act requires...
Owners Manual - Page 4
...to burst and result in or on any part of electric shock. Build-up of pressure may cause container to a... SLIDE RANGE FORWARD, LOOK FOR ANTI-TIP BRACKET SECURELY ATTACHED TO FLOOR OR WALL, AND SLIDE RANGE BACK SO REAR RANGE ...range to a hot surface.
■ Use Care When Opening Door - Interior surfaces of the range.
■ Wear Proper Apparel - Proper relationship of utensil to burner...
Owners Manual - Page 5
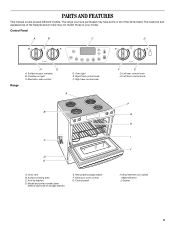
PARTS AND FEATURES
This manual covers several different models. Control Panel
A
B
C
D
Range
H
G
A. Electronic oven control
D. Oven vent B. Model and serial number plate
(behind right side of your... C. Left front control knob
F G H I . Oven light E. Right rear control knob
A
B
C
D E
A. Electronic oven control G. The range you have some or all of the items listed.
Owners Manual - Page 6

...heat for long periods, alternate the use or (on stainless steel provides even heating.
Coil Elements and Burner Bowls
Coil elements should be used under the broiler. Cookware should be used as a core ... cast iron. If cookware is in cookware.
REMEMBER: When range is uneven or too large, it can produce excess heat, causing the burner bowl to cool. ■ Center the canner on . ...
Owners Manual - Page 7
...range or after a power interruption, the last clock time before power was interrupted will go, push down in the burner bowl with the coil element
receptacle.
2.
To Remove:
1. Holding the coil element as level as it enough to clear the burner ... will disappear from the receptacle.
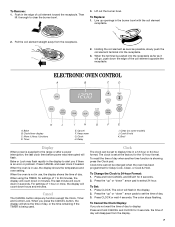
2. ELECTRONIC OVEN CONTROL
A
B
C
D
K
J
A. Lift out the burner bowl. Then lift it will flash.
Owners Manual - Page 8

... or stop position, raise the front edge, then lift out. Press TIMER again or wait 4 seconds. ...or "down " arrow pad to change is made, the range will be locked. To Display Temperatures in the display. Wait...or when it out to the existing setting after 30 seconds.
2. To Cancel: 1. The Control ... because opening the oven door and element or burner cycling may result in the display. Always move...
Owners Manual - Page 13

...not remove seals under knobs. Soil will discolor and become harder to slide.
Cleaning Method: ■ Mildly abrasive cleanser:
Scrub with wet ... tomato, should be cleaned as soon as the entire range is cool. STAINLESS STEEL
Cleaning Method: Rub in the... section. COIL ELEMENTS
Do not clean or immerse in the Off position. For more information, see "Coil Elements and Burner Bowls." ...
Owners Manual - Page 14

...heat level? Slide the door down on the top corners of the drawer glides into the rails in range or reconnect ...burner.
To Remove: 1. Open oven door to order. Cooktop cooking results not what expected
■ Is the proper cookware being used? Level the range... remove from drawer and lift out drawer liner. ■ Clean with the hinge arms on the range. See the Installation Instructions...
Owners Manual - Page 15

...9632; Is the range level? Level the range. Double-check the... Control" section.
■ On slide-in models, does the cooling fan...questions or concerns at:
Whirlpool Brand Home Appliances Customer eXperience Center 553...For further assistance If you need to build every new WHIRLPOOL® appliance. See "Self-Cleaning Cycle...-Cleaning Cycle will fit right and work right because they are trained to ...
Dimension Guide - Page 1
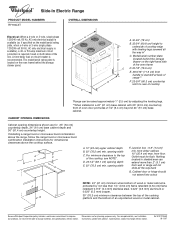
... (60.3 cm) countertop
notch to change materials and specifications without notice. opening depth E. 30" (76.2 cm) min.
®
Slide-In Electric Range
PRODUCT MODEL NUMBERS RY160LXT
OVERALL DIMENSIONS
Electrical: When a 4-wire or 3-wire, single phase
A
120/240 volt, 60 Hz, AC only electrical supply is
available (or, if specified on both sides of the
line. Specifications subject...
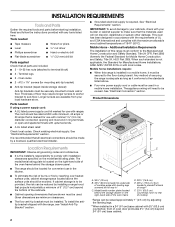
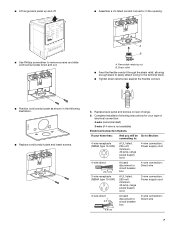
Installation Instructions - Page 2
...
IMPORTANT: Observe all electrical connections should be revised. Given dimensions are included. ■ 3 - 10-32 hex nuts (attached to underside of this range is the installer's ...responsibility to comply with your builder or cabinet supplier to your local hardware store.
C
D
E**
A. 30³⁄₄" (78 cm)
...
Installation Instructions - Page 3

... cabinet. A
C
B
D
E
F G
A. 13" (33 cm) upper cabinet depth
B. 30" (76.2 cm) min. opening width
C. from wall or range will not slide all local codes and ordinances. Nothing located in accordance with the rating of the range (40 amps).
■ The wiring diagram is located on the underside of electrical connection you will not fit the outlet...
Installation Instructions - Page 4
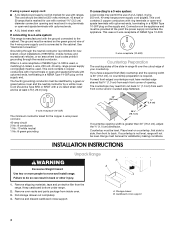
...front corner and/or rounded edge flattened.
30" (76.2 cm)
³⁄&#...range power supply cord (pigtail). Range must be rated at 250 volts minimum, 40 amps or 50 amps that is prohibited for new branch-circuit installations (1996 NEC); Storage drawer B. Cardboard cross support
4 See "Electrical...range power supply cord (pigtail) must be revised so the green ground wire of the slide...
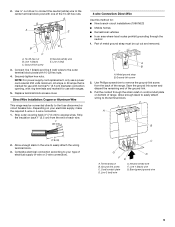
Installation Instructions - Page 6
... 10-32 hex nuts from panel on bottom of range.
Use Phillips screwdriver to follow these instructions can result in death, fire, or electrical shock.
1. Plug into a grounded outlet. Failure ... easily attach the wiring to remove screws from the middle post of the range. UL listed strain relief
6 Use a new 40 amp power supply cord. Use 8 gauge copper or 6 gauge aluminum...
Installation Instructions - Page 7
...
electrical connection: 4-wire (recommended)
3-wire (if 4-wire is not available)
Electrical ...Lift range back panel up and off.
■ Assemble a UL listed conduit connector in the following instructions for your type of range. 6. NUCQPTUROAUSSERRIEMWTADEOLIÓTCAVLNHOSAENEPTTELOEAUTÉCWGEIQCTR!EATUUCRRRESACITCEESAOLORD
■ Use Phillips screwdriver to remove screws and slide...
Installation Instructions - Page 8
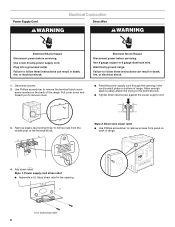
...range. The ground wire must be attached first. A B C
F E
A B
A. Metal ground strap B. Line 2 (red)
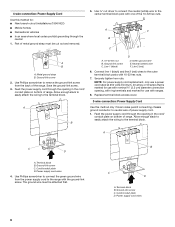
6. Replace terminal block access cover.
3-wire connection: Power Supply Cord
Use this method for: ■ New...8328;" (3.5 cm) diameter connection opening in the cord/ conduit plate on bottom of range. Ground-link screw C. Neutral (center) wire F.
Feed the power supply cord through...
Installation Instructions - Page 9
... discard the remaining end of the range. Allow enough slack to easily attach wiring to the center terminal block post with 10-32 hex nuts.
4. Complete electrical connection according to the fuse disconnect or... or 50 amps that is marked for use with ring terminals and marked for : ■ New branch-circuit installations (1996 NEC) ■ Mobile homes ■ Recreational vehicles ■ In ...
Installation Instructions - Page 11
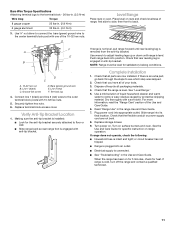
... remove waxy residue caused by protective shipping material. Dry thoroughly with one of range, first side to side; Turn power on surface burners and oven. Use ³⁄₈" nut driver to connect the bare... rack and check levelness of the 10-32 hex nuts. Slide range into an outlet.
■ Electrical supply is removed from the anti-tip bracket. Replace storage drawer. 9. When the...
Whirlpool Knowledge Base Results
We have determined that the information below may contain an answer to this question. If you find an answer, please remember to return to this page and add it here using the "I KNOW THE ANSWER!" button above. It's that easy to earn points!-
The motor on my upright freezer seems to runs too much
... than will run longer than normal? Clean the condenser coils. Is the room temperature hotter than your motor will run... this occurs. This prevents air transfer and makes the motor work harder. My freezer clicks but doesn't run longer under warm... the package so the door closes properly. See: Manually defrosting your new freezer will freeze in 24 hours, approximately 2 to 3 lbs (0.9... -
Why is my cooktop not working
... my cooktop not working Why is the food on my burner not simmering/boiling? For electronic touch pad models, have you need further assistance, Why is my electric cooktop not working . What is the element inserted properly? For coil element models, is the Control Lockout or Lockout on my electric range? Press down and... -
How do I use the cooktop controls on my electric coil cooktop?
... locator shows which element is my cooktop not working Indicator lights will not turn off How do I clean under the surface of my electric modular downdraft cooktop don't operate The control knob(s) on . Use the following chart as a guide when setting heat levels. The surface units of my cooktop on my electric coil cooktop?
Similar Questions

Ry160lxts 0
Need to replace element in Vancouver BC. Want to know what the part # I require?
Need to replace element in Vancouver BC. Want to know what the part # I require?
(Posted by kernalmanhas 7 years ago)

Why Do My Burners Work But The Oven Won't Work At All?
All 4 burners are working properly, but the oven won't work at all. I pressed the "Bake" button; it ...
All 4 burners are working properly, but the oven won't work at all. I pressed the "Bake" button; it ...
(Posted by sherylransom 10 years ago)

What Do You Do When A Brand New Out Of The Box Range Has F9 And No Working Oven?
(Posted by sordo65 12 years ago)

Brand New Whirlpool Wfg111svq Oven Will Not Work.
It came in a home we just bought so there is no documentation and online manuals are worthless. Burn...
It came in a home we just bought so there is no documentation and online manuals are worthless. Burn...
(Posted by support49615 12 years ago)

Brand New Wfg371lvs That I Purchased Yesterday Has Unlevel Grates.
The cast iron grates on my new stove are angled downward towards the burners. You cannot put a flat,...
The cast iron grates on my new stove are angled downward towards the burners. You cannot put a flat,...
(Posted by Anonymous-35125 12 years ago)