Vivitar F332 Support Question
Vivitar F332 Support Question
Find answers below for this question about Vivitar F332.Need a Vivitar F332 manual? We have 3 online manuals for this item!
Question posted by 32812 on May 27th, 2018
F332 Lens Error
I have a Vivicam F332. I use to use it a lot. Recently, its been viving me a Lens Error message when I turrn it on. Do you know what happened and how to fix it? I would greatly appreciate it. Thanks!
Current Answers
Answer #1: Posted by Odin on May 27th, 2018 6:15 PM
Odin

Member since:
April 10th, 2010 Points: 41,236,690

Member since:
April 10th, 2010 Points: 41,236,690
Hope this is useful. Please don't forget to click the Accept This Answer button if you do accept it. My aim is to provide reliable helpful answers, not just a lot of them. See https://www.helpowl.com/profile/Odin.
Related Vivitar F332 Manual Pages
Camera Manual - Page 1

Windows and the Windows logo are the property of Microsoft Corporation. ViviCam F332 Digital Camera
User Manual
© 2010 Sakar International, Inc.
All other trademarks are registered trademarks of their respective companies. All rights reserved.
Camera Manual - Page 2

WINDOWS OS 9 Computer System Requirements - MAC OS 9 Powering ON/OFF Your Digital Camera 10 Changing Camera Mode ...10 Navigating the Menus...11 Photo Capture Mode ...12 Photo Playback Mode ...31 Video Capture Mode ...37 Video Playback Mode...50 Installing the Software ...54 Connecting the Camera to the Computer 55 Getting Photos and Videos from your...
Camera Manual - Page 3

... included.
2
USB cable 3. Please read this camera. Digital Camera 2. Note: Your camera needs an SD Memory card (up to 32GB) for purchasing this manual carefully first in order to get the most out of your camera. Everything you for normal use. Vivitar Experience Image Manager
software Installation CD 4. Introduction
Thank you need to be purchased separately. SD...
Camera Manual - Page 4

... Memory Card Slot 20. LCD Screen 4. LED 5. Microphone 14. Flash Light 15. Battery Compartment 19. Parts of the Camera
1. SET button 9. Flash / Up / Slide Show 11. Wrist Strap Connector 21. Speaker 22. Optical Lens 18. Zoom Out 7. ViviLink / Down Button 13. Tripod Socket 17. Delete / Right Button
12. Self-Timer LED
3 Shutter...
Camera Manual - Page 6

... through the initial camera setup. Select "Yes" to continue or "No" to exit the setup. Note: After the camera is powered on the LCD display. A message will appear. These...your digital camera. If you would like to continue with Camera Setup?" The Language selection
menu will appear: "Continue with the initial camera setup.
Use 3x AAA (1.5v) batteries. Select the language of your camera ...
Camera Manual - Page 7

...to the next part of your choice with your camera‟s photos and videos to choose the default ViviLink...allows you to quickly and easily upload your camera. Highlight the
desired default social network and press the SET...After the ViviLink Video option is confirmed the camera is now ready to set the default ViviLink...networks of the camera setup. Setting the ViviLink Default Option Once the Date...
Camera Manual - Page 8

...camera. You can switch modes by pressing the MODE button on your camera after the camera has been powered ON. This is the default mode when the camera is in the Video Capture mode. After turning on your digital camera...mode, press the SET button while in progress. Video Capture Mode Use this mode to your camera‟s memory card.
To access the various menus for the Photo...
Camera Manual - Page 9

Camera Technical Specifications
Image Sensor
CMOS Sensor
Image Resolution Video Resolution
(14M) 4416 x 3312, (12M) 4000 ...(30 fps)
File Format Internal Memory External Memory
JPEG/AVI 1 Test Photo Use Only SD Card (up to 32GB)
LCD Display Lens Zoom
2.7 Inch TFT f=6.0-12.18mm F3.0-4.5 3 X Optical Zoom; 4 X Digital Zoom
Exposure White Balance ISO
-3.0EV ~ +3.0EV Auto, Daylight, Cloudy, ...
Camera Manual - Page 11

... left idle. The icons that appear on , you can begin to 32GB - The camera will automatically turn your camera ON. Note: Your digital camera also has an Auto Power Off feature that your camera. Use this mode to view the photos and videos
you can press the Power button again at any point to turn off...
Camera Manual - Page 13

... will automatically be saved to capture pictures with your digital camera.
Once you reach the maximum of the Optical Zoom, re-press the T/Zoom In button to continue zooming using the Digital Zoom.
3)
Click the Shutter button on the top of the box.
To use the Optical Zoom: Press the T/Zoom In and W/Zoom...
Camera Manual - Page 14

... Scene menu
Flash Options - Photo Capture Mode Quick Function Buttons Your digital camera has a four-directional pad that functions as desired. 1) Hold the MODE button for Photo Capture Mode Saves your selected menu option Note: To navigate through the Menus, use the Left, Up, Right, and Down directions control buttons. Toggles...
Camera Manual - Page 31

... to select your system Language, Date/Time and ViviLink for Photos and Videos. You will be reset. 6) If you would like to proceed with the digital camera settings set to the Factory Default Settings.
7) If you would like to exit the format, select „No‟ and press the SET button. Note...
Camera Manual - Page 33

...Show, press any button)
Right
Displays the NEXT image
Down
ViviLink - Photo Playback Mode Quick Function Buttons Your digital camera has a four-directional pad that appear in the Thumbnail View: press the SET button
Opens the menu... select a JPG in your selected menu option Note: To navigate through the Menus, use the Left, Up, Right,
and Down directions control buttons.
Camera Manual - Page 38

... if
desired. Press the MODE button once to direct the
camera at the top of these buttons may vary per camera model.
Video Capture uses the Optical Zoom feature only. Adjust the zoom before you begin
recording your digital camera.
When the camera is in Photo Capture Mode.
Video Capture Mode
The Video Capture Mode allows...
Camera Manual - Page 39
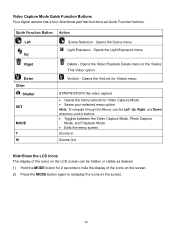
... Video Capture Mode Saves your selected menu option Note: To navigate through the Menus, use the Left, Up, Right, and Down directions control buttons. Toggles between the Video...
Right
Down Other
Shutter SET
MODE T W
Delete - Video Capture Mode Quick Function Buttons Your digital camera has a four-directional pad that functions as desired. 1) Hold the MODE button for 2 seconds...
Camera Manual - Page 50

...
49 The memory card will be prompted to the previous mode. Firmware (Factory Default Settings) Menu Use this menu to view the Firmware version on , you would like to begin. 5) To proceed with...the SET button. You will automatically exit the menu and return to the previous mode with the digital camera settings set to the Factory Default Settings. 7) If you will be reset. You will be...
Camera Manual - Page 52

...: To navigate through the Menus, use the Left, Up, Right, and
Down directions control buttons.
Quick Function Button Action
Left
Displays the PREVIOUS image
Up Right Down Other Shutter
W/Zoom out
SET
STOPS a playing video
Displays the NEXT image
ViviLink - Video Playback Mode Quick Function Buttons Your digital camera has a four-directional pad...
Camera Manual - Page 56

...14) If you close the application you can run the Vivitar Experience Image Manager from my camera to my computer" button for instructions.
5) If you will be installed, and then click...when the installation is complete. Connecting the Camera to the Computer
1) Use the USB cable that came with your camera to connect your camera to your computer. 2) Power the camera ON. 3) The first time you connect...
Camera Manual - Page 58

... Manager, you copy the images into the Pictures/My Pictures folder and the videos into your computer.
Then select a folder and choose Paste from my camera to use the Vivitar Experience Image Manager open the Help file or click the "Take the Tour" button on the application`s Home page. Transfer media from...
Camera Manual - Page 59

Camera Maintenance
The digital camera is a delicate device. Do not expose your computer. Please handle your camera with your camera to connect your camera to your computer. 2) MSDC appears on the LCD. 3) The camera&#...disconnect the cable during transfer. Do not use you copy the images into the Pictures folder and the videos into your camera to heat sources. Optionally, select the ...
Similar Questions

Vivitar Ipc 112 Camera Did Not Connect
camera did not connect at the end error message shows wrong password
camera did not connect at the end error message shows wrong password
(Posted by Jagdevsdeol 5 years ago)

Clicking Sound And Dirty Lens.
I have a ViviCam F332. Ive recently fixed a jammed lens. After I fixed it, the camera started making...
I have a ViviCam F332. Ive recently fixed a jammed lens. After I fixed it, the camera started making...
(Posted by 32812 5 years ago)

Vivitar Camera Model F128
New camera, new batteries insrted correctly Will not turn on why. Thanks.
New camera, new batteries insrted correctly Will not turn on why. Thanks.
(Posted by bill35wh 9 years ago)

Vivatar Vivicam X022 Card Protected
We have a Vivicam X022 that we bought 6 months ago. We could only take one picture without a card, s...
We have a Vivicam X022 that we bought 6 months ago. We could only take one picture without a card, s...
(Posted by azzyisme 9 years ago)
