
Toro 20334 Support Question
Toro 20334 Support Question
Find answers below for this question about Toro 20334 - Personal Pace Electric Start Walk Power Mower.Need a Toro 20334 manual? We have 2 online manuals for this item!
Question posted by jtiborsr on June 25th, 2019
Drive Wheels Locking
model #20334 s/n 311036405 transmission #121-9178 drives fwd good , belt , cable adjustment , all bushings , wheel and shaft gears good. Wheels lock up when pulling back wards ( no freewheel ) No clicking or grinding from wheels.. Wont even turn backwards by hand. Noticed there was some type of Toro Bulliten about the transmissions back in 2011 ?? creating a p/n change to115-4652
Current Answers
Answer #1: Posted by Odin on June 26th, 2019 6:42 AM
Odin

Member since:
April 10th, 2010 Points: 41,236,700

Member since:
April 10th, 2010 Points: 41,236,700
Hope this is useful. Please don't forget to click the Accept This Answer button if you do accept it. My aim is to provide reliable helpful answers, not just a lot of them. See https://www.helpowl.com/profile/Odin.
Related Toro 20334 Manual Pages
Owner's Manual - Page 2

...lawn mower will be
ordered through the engine manufacturer. never run.
• Disengage the drive...personal injury hazards.
Safety
This lawn mower meets or exceeds the CPSC blade safety requirements for walk-behind before starting...only in daylight or good artificial light.
&#...pull machine backward unless absolutely necessar> Always look down . stop before you fed uneasy on this mower...
Owner's Manual - Page 3
... a nozzle lock-open flame, spark, or pilot light such as necessar)_ If this is extremely flammable and the vapors are sharp. If fuel is not alert to the machine and the mowing activit?: Never assume that may block your vehicle before starting .
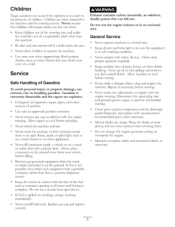
Service
Safe Handling of a child. If you . Remove gas-powered equipment...
Owner's Manual - Page 4
... maintenance.
4. Safety and instruction decals are located near areas of hand or foot, mower
blade--remove the ignition key and read the instructions before leaving the operating position; Warning--...mower blade--stay away from moving parts.
5. do not operate up . operate side to side on charging the battery; Warning--read the Operator's Manual for information on slopes;
Lock...
Owner's Manual - Page 5
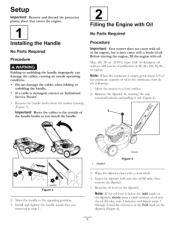
...the mower housing (Figure 3). Max. Move the handle to a level surface.
2. Read the oil level on the dipstick (Figure 4).
Remove the dipstick by rotating the cap counterclockwise and pulling it... capacity of oil.
Important: Route the cables to the outside of the handle knobs as you
removed in the crankcase, then do the following: 1. Before starting the engine, fill the engine with ...
Owner's Manual - Page 6

with oil until
6. Refer to Changing the Engine Oil.
[3
Charging the Battery
No Parts Required
Procedure
Electric-start models only)
Handle 2. Blade control bar 3. Air filter 10. Fuel tank cap
11. Spark plug
1
G009526
Figure 6
1. Battery charger (electric-start models only Refer to Charging the Battery in the Maintenance
section. Cutting height lever (4) 9. Bag-on the dipstick...
Owner's Manual - Page 8
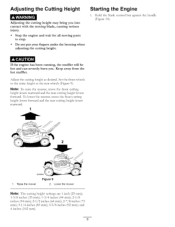
... and wait for all moving blade, causing injury. Set the front wheels to stop.
• Do not put your fingers under the housing when adjusting the cutting height. Starting the Engine
1.
Adjust the cutting height as the rear wheels (Figure 9). To lower the mower, move the front cutting height levers rearward and the rear cutting height...
Owner's Manual - Page 9

... 12 s/
Note: If the mower does not start handle, pull it lightly until you feel resistance, then pull it sharply (Figure 12). Blade control bar
7
_/_'G009546
Figure 10
, Turn the ignition key (Figure 11) (electric-start models only) or pul the recoil start handle (Figure 12).
You can also try reaching just under the personal pace handle to the metal...
Owner's Manual - Page 10

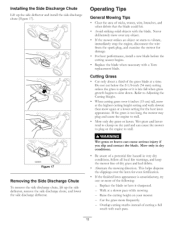
...the lawn.
Installing the Grass Bag
1. Notches 2.
If the grass bag is on the mower and the bag-on the mower, ...mower (electric-start models only). If the bag-on -demand lever and move the lever to the recycling position (refer to stop using
your mower immediately Service Dealer. Install the grass bag, ensuring that the pins on the bag rest in serious personal injury or death to the mower...
Owner's Manual - Page 12
... the grass blade at a lower setting for the best lawn appearance.
This helps disperse the clippings over aW object.
• If the mower strikes an object or starts to Adjusting the Cutting Height.
• When cutting grass over 6 inches (15 cm) tall, mow at a slower pace while mowing. - Walk at the highest cutting height setting and...
Owner's Manual - Page 13
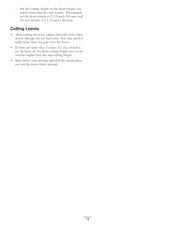
...wheels one notch lower than 5 inches (13 cm) of the lawn shows through the cut the leaves finely enough.
13 Set the cutting height on the lawn, set the front wheels at 2-1/8-inch (54 ram) and the rear wheels... more than the rear wheels. You may need to make more than one or two notches higher than the rear cutting height.
• Slow down your mowing speed if the mower does not cut leaf ...
Owner's Manual - Page 14

...mower prior to running out of the machine from the spark plug (Figure 18) before annual storage.
• Change the engine oil. • Replace the blade or have it more frequently in dusty operating conditions. • Charge the battery for 24 hours (electric-start models...fuel. Always tip the mower onto its side, with a hand pump; Tipping Gasoline personal
the mower may cause the fuel ...
Owner's Manual - Page 16

... a adhesive-backed covering that secures the battery compartment, pull out the batter); Plug the charger into a wall outlet.
Connect the charger to local codes.
Always use the charger in type fuse.
1. Figure 22
G009555
2. Charging the Battery
Service Interval: Every 25 hours
Electric-start models only
If the battery does not charge or the...
Owner's Manual - Page 18
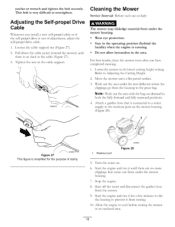
... to a water supply to the washout port on -demand in the cable (Figure 27). 3. Start the engine and run it for the purpose of adjustment , adjust the self-propel drive cable.
, Loosen the cable support nut (Figure 27). 2. Shut off the water and disconnect from under the mower housing. • Wear eye protection. • Stay in the operating...
Owner's Manual - Page 19

... hole, and pull the starter rope slowly several times to distribute oil throughout the cylinder to the spark plug.
19 Charge the battery for 24 hours (electric-start model only). 2. Folding or unfolding the handle improperly can no longer start models only). Remove the ignition key (electric-start models only).
2.
Removing the Mower from running out of hard starting. Charge the...
Owner's Manual - Page 20

... Total Coverage Guarantee
A 2-Year Full Warranty (45 Day Limited Warranty for Commercial Use)
The Toro GTS Starting Guarantee
A 3-Year Full Warranty (Not Applicable for Commercial Use)
22 in Recycler ¢
20 in Mulcher/Bagger Walk Power Mowers
Conditions and Products Covered
Items and Conditions Not Covered
The Toro Company and its affiliate, Toro Warranty...
Parts Catalog - Page 2
...wheel by reference numbers 6:1,6:2, and 6:3.
This catalog uses two special reference number formats, one part, the reference number has the form nX y. List of Abbreviations
AR: as required ASM: assembly BBC: blade brake control BHTF: button head thread forming CARR: carriage CCW: counter clockwise CW: clockwise DEG: degrees DPA: Dual Point Adjustment... truss head PTO: power-take-off RH: ...
Parts Catalog - Page 3

All Rights Reserved Contents
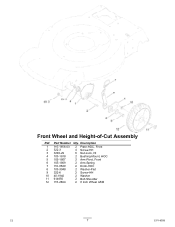
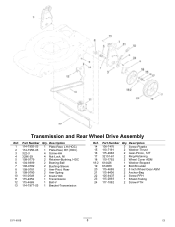
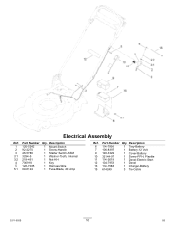
Deck, Side Chute and Rear Door Assembly 4 Rear Bag Assembly 5 Engine and Blade Assembly 6 Front Wheel and Height-of-Cut Assembly 7 Transmission and Rear Wheel Drive Assembly 8 Handle Assembly 9 Electrical Assembly 10 Attachments and Accessories 11
© 2012-The Toro® Company
Contact us at www.Toro.com.
8111 Lyndale Avenue South...
Parts Catalog - Page 7
...
2 322-3
4 Screw-HH
3 3296-29
6 Nut-Lock, NI
4 105-1818
2 Bushing-Mount, HOC
5 105-1807
2 Arm-Pivot, Front
6 105-1809
2 Arm-Spring
7 110-0549
2 Knob-HOC
8 105-3048
2 Washer-Flat
9 322-6
2 Screw-HH
10 40-1940
2 Washer
11 614650
2 Bolt-Shoulder
12 115-2894
2 8 Inch Wheel ASM
C2
7
3371-850B Part Number Qty.
Parts Catalog - Page 8
...)
3 322-3
4 Screw-HH
4 3296-29
4 Nut-Lock, NI
5 108-9779
2 Retainer-Bushing, HOC
6 104-8699
2 Bearing-Ball
7 108-9782
2 Bushing-Sleeve
8 108-9781
2 Arm-Pivot, Rear
9 108-9780
2 Arm-Spring
10 110-0549
2 Knob-HOC
11 115-4652
1 Transmission
12 115-4669
1 Belt-V
13 114-7977-03 1 Bracket-Transmission
Ref. Part Number Qty. Part Number Qty...
Parts Catalog - Page 10
...
7 106-8397
1 Battery-12 Volt
9 120-3329
1 Cover-Battery
10 32144-97
1 Screw-PPH, Plastite
11 114-2619
1 Decal-Electric Start
12 104-7953
1 Decal
13 114-1588
1 Charger-Battery
15 614249
3 Tie-Cable
3371-850B
10
D5 Description
1 120-5242
1 Mount-Switch
2 92-2270
1 Screw-Handle
3 46-5780
1 Starter Switch ASM
3:1 3254...
Similar Questions

Owners Manual For Toro 190 Cc Personal Pace Lawn Mower
(Posted by nelsontim1 9 years ago)

Toro Personal Pace Electric Starter Does Not Engage
(Posted by tejsmigg 9 years ago)

Walking Lawn Mower Back Wheels Wont Go Backwards
(Posted by Alic3ae367 10 years ago)

Electric Start Toro Law Mower Will Not Start Cold 20334
(Posted by pinoNtha 10 years ago)
I Have A Toro And The Back Wheels Wont Go Backwards At All
I have cleaned the wheels,sprayed lubication on the wheels, greased the gears.and the back wheels wi...
I have cleaned the wheels,sprayed lubication on the wheels, greased the gears.and the back wheels wi...
(Posted by huelster 10 years ago)