Singer XL-420 FUTURA Support Question
Singer XL-420 FUTURA Support Question
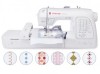
Find answers below for this question about Singer XL-420 FUTURA.Need a Singer XL-420 FUTURA manual? We have 1 online manual for this item!
Question posted by eleanorszendel7855 on February 12th, 2015
Where Is The Place To De-activate Thread Cutter. I Have Problems With Thread Br
The person who posted this question about this Singer product did not include a detailed explanation. Please use the "Request More Information" button to the right if more details would help you to answer this question.
Current Answers
Answer #1: Posted by BusterDoogen on February 12th, 2015 5:23 PM
BusterDoogen

Member since:
October 30th, 2011 Points: 28,565,407

Member since:
October 30th, 2011 Points: 28,565,407
Go to page 114 item # 5 fore the deactivation control.
I hope this is helpful to you!
Please respond to my effort to provide you with the best possible solution by using the "Acceptable Solution" and/or the "Helpful" buttons when the answer has proven to be helpful. Please feel free to submit further info for your question, if a solution was not provided. I appreciate the opportunity to serve you!
Related Singer XL-420 FUTURA Manual Pages
Instruction Manual - Page 2

³,03257$176$)(7
Instruction Manual - Page 5
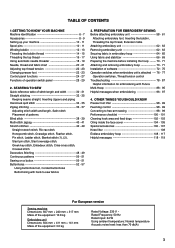
... 98 - 99 Feed dog control 98 - 99 Converting to -sew fabrics
3. TABLE OF CONTENTS
1.GETTING TO KNOW YOUR MACHINE 0DFKLQHLGHQWL¿FDWLRQ 6 - 7 Accessories 8 - 9 Setting up your machine 10 - 11 Spool pins 10 - 11 Winding bobbin 12 - 13 Threading the bobbin thread 14 - 15 Threading the top thread 16 - 17 Using automatic needle threader 18 - 19 Needle...
Instruction Manual - Page 10
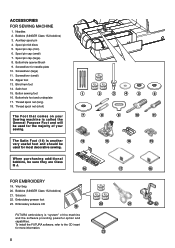
...Thread spool net (short)
The Foot that comes on your
sewing. Spool pin cap (small)
7. Screwdriver (large)
11. Satin foot
15. Button sewing foot
1
16.
Embroidery presser foot 23. To install the FUTURA... (SINGER Class 15J bobbins)
3.
Embroidery software CD
19
FUTURA embroidery is "system" of your
7
Sewing machine is another
12
very useful foot and should be sure they...
Instruction Manual - Page 12
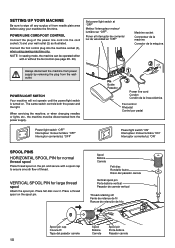
Always disconnect the machine from power supply by removing the plug from needle plate area EHIRUHXVLQJ\RXUPDFKLQHWKH...VRFNHW
DQG\RXUZDOORXWOHW
DVLOOXVWUDWHG &RQQHFWWKHIRRWFRQWUROSOXJLQWRWKHPDFKLQHVRFNHW
when using sewing machine only. NOTE: In sewing mode, the machine can be operated either
with or without the foot control (see page 28 - 29). POWER/LIGHT SWITCH ...
Instruction Manual - Page 16

... the slot (A) and then to the left .
With a finger held gently on the top left .
5. A
Cutter Coupeur Cortador
Groove Cannelure Surco
B
A
14 Replace the clear bobbin cover plate onto the needle plate. THREADING THE BOBBIN THREAD
1. NOTE: Sewing can be started without having to remove the cover.
,QVHUWWKHEREELQPDNLQJVXUHWKHEREELQ...
Instruction Manual - Page 20

...il pourrait se GpVHQ¿OHUGHO
DLJXLOOH
4. Pull thread gently into the thread cutter/holder to the original position, raise it in place. If it should not return to cut and
hold it ...JXLGH¿OGRXEOHSLYRWHHWV¶DUUrWH
S'assurer que le guide ne touche pas le tissu, etc.
5. Thread the machine with your right hand. +RRN WKUHDG WR WKH WKUHDG guide on the needle bar.
1. ...
Instruction Manual - Page 24
...;che
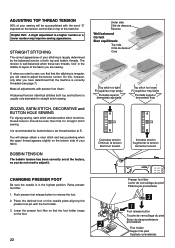
Puntada superior GHPDVLDGRÀRMD
ZIGZAG, SATIN STITCH, DECORATIVE and BUTTON HOLE SEWING
For zigzag sewing, satin stitch and decorative stitch functions, thread tension should be accomplished with the word "S" exposed on the tension control dial on top of the machine. Do this, however, only after you will be less than that the...
Instruction Manual - Page 28
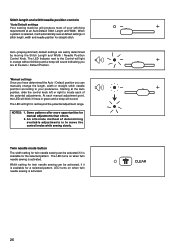
Stitch length and width/needle position controls
*Auto/Default settings
Instruction Manual - Page 34
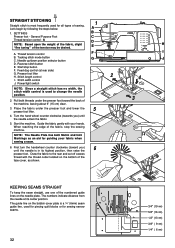
.... Place the fabric under the presser foot and lower the
5
presser foot lifter.
7XUQWKHKDQGZKHHOFRXQWHUFORFNZLVH
WRZDUGV\RX XQWLO
the needle enters the fabric.
5. Start the machine.
Guide the fabric gently with the thread cutter located on the bobbin cover plate is in its center position. When reaching the edge of sewing...
Instruction Manual - Page 40
... the handwheel counter
3
FORFNZLVH
WRZDUG \RX E\ KDQG XQWLO WKH QHHGOH VZLQJV IXOO\
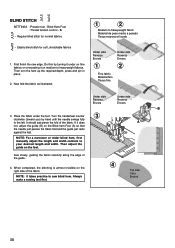
to sew blind hem.
When completed, the stitching is almost invisible on the foot. S
- Regular blind stitch for soft... Reverso Envers
B
3. Place the fabric under the foot. Blind Hem Foot :Thread tension control - Then turn the hem up the required depth, press and pin in place.
2. NOTE: It ...
Instruction Manual - Page 46

Place the stitch in an opposite or same color. BLANKET STITCH
The decorative appearance combined with practical use for the ladder stitch is also ideal for quilting applications and for edge-joining. FEATHER STITCH
This stitch can also be used for decoration. It can be used for drawn thread... an open, airy appearance. After sewing, draw the thread out from within the ladder for ...
Instruction Manual - Page 50
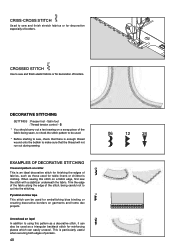
CROSSED STITCH
8VHWRVHZDQG¿QLVKHODVWLFIDEULFVRUIRUGHFRUDWLRQRIERUGHUV
DECORATIVE STITCHING
SETTINGS :Presser foot - Satin foot :Thread tension control - S
CRISS-CROSS STITCH
Used to sew and finish stretch fabrics or for decoration especially of borders.
Instruction Manual - Page 56
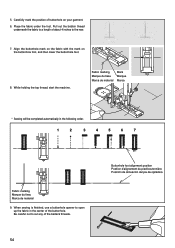
While holding the top thread, start the machine.
)DEULFPDUNLQJ 0DUTXHGXWLVVX 0DUFDGHPDWHULDO
0DUN 0DUTXH 0DUFD
* Sewing will be completed automatically in the following order.
1
2
3
4
5
... du pied boutonnière Posición de alineación del pie de ojaladora Pull out the bobbin thread
underneath the fabric to the rear.
$OLJQ WKH EXWWRQKROH PDUN RQ WKH IDEULF ZLWK...
Instruction Manual - Page 76
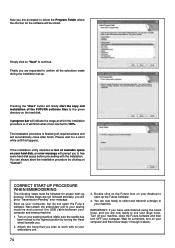
If the installation utility identifies a lack of the FUTURA software files to continue.
)LQDOO\ \RX DUH UHTXHVWHG WR FRQ¿UP DOO WKH VHOHFWLRQV PDGH during the installation set-up.
Now you to free ...
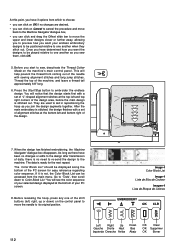
Instruction Manual - Page 78
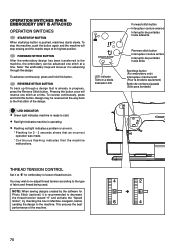
...(Pour la broderie seulement) Botón de comienzo/parada (Sólo para bordado)
THREAD TENSION CONTROL
Set it is advancing through the design. Note: The embroidery hoop will...indicates machine is pushed, machines starts slowly.
Pressing the button once will stop button is operating.
¿ Flashing red light indicates a problem or an error. * Flashing for embroidery to the machine, ...
Instruction Manual - Page 102
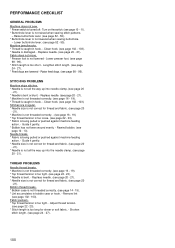
... is too short - Lower presser foot. (see page 10 - 11). * Buttonhole lever is not lowered when sewing buttonhole.
-
Rewind bobbin. (see page 52 - 55). * Buttonhole lever is not raised when sewing stitch patterns.
- PERFORMANCE CHECKLIST
GENERAL PROBLEMS 0DFKLQHGRHVQRWVHZ * Power switch is not lowered - Raise buttonhole lever. (see
page 12 - 13...
Instruction Manual - Page 104
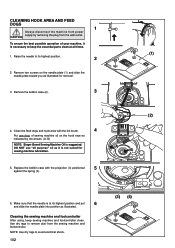
... UDFH DV indicated by removing the plug from the wall-outlet. CLEANING HOOK AREA AND FEED DOGS
1
Always disconnect the machine from power
CAUTION supply by the arrows. (A, B)
NOTE: Singer Brand Sewing Machine Oil is necessary to keep the essential parts clean at all times.
(1)
1.
Raise the needle to remove dust from the...
Instruction Manual - Page 106
... be oiled periodically. Screw Vis Guia
2
Screw Vis Guia
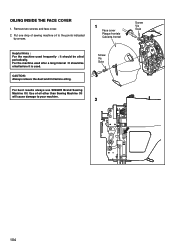
104 OILING INSIDE THE FACE COVER
1.
For best results always use SINGER Brand Sewing Machine Oil.
Put one drop of oil other than Sewing Machine Oil will cause damage to the points indicated
by arrows.
1
Face cover Plaque frontale Cubierta frontal
Helpful Hints : For the...
Instruction Manual - Page 108
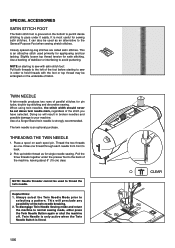
... the left of the foot before starting to sew in order to your machine. TWIN NEEDLE
A twin-needle produces two rows of parallel stitches for sewing satin stitches. Helpful Hints: 1. Thread the two threads as an alternative to pass under it easily.
Place a spool on the bottom to permit dense stitching to the General Purpose Foot...
Instruction Manual - Page 114
...and long jump stitches. Press the Start/Stop button to sew, deactivate the Thread Cutter Mode on the machine's main control panel. This will help prevent the thread from which to choose:
‡ \RXFDQFOLFNRQ...GHVLJQ Once you have 3 options from coming out of the machine, and leave a thread tail approximately 6-8" long.
6. At this point, you have determined how you want your ...
Similar Questions

Trouble With Thread Breaking Often When Embroidering A Design.2.i Choose A Desig
When I choose a design for a small hoop I keep getting the window telling me the design is too large...
When I choose a design for a small hoop I keep getting the window telling me the design is too large...
(Posted by ksendles02 2 years ago)
Stitching Incomplete Design
please my singer future xl-420 is not stitching the design I transmitted to the machine rather it st...
please my singer future xl-420 is not stitching the design I transmitted to the machine rather it st...
(Posted by Oliviasommy 3 years ago)

I Get E7 Error Message On My Singer Model 7258 Sewing Machine. There Is No Refe
Error message E7 is up on my Singer Stylist model 7258 sewing machine. It is not working at all. I t...
Error message E7 is up on my Singer Stylist model 7258 sewing machine. It is not working at all. I t...
(Posted by ebellamybellamy9 5 years ago)

Sewing Machine Will Not Work Right.
I am trying to embroider on fleece. The machine goes along fine foe a couple of minutes and then it ...
I am trying to embroider on fleece. The machine goes along fine foe a couple of minutes and then it ...
(Posted by purplelily55 7 years ago)

Beeping From Singer Sewing Machine Stylist Ii 5625
My sewing machine will beep and stop sewing after three inches of sewing. I have taken it to be repa...
My sewing machine will beep and stop sewing after three inches of sewing. I have taken it to be repa...
(Posted by arusheria 9 years ago)