Singer XL-420 FUTURA Support Question
Singer XL-420 FUTURA Support Question
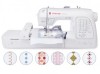
Find answers below for this question about Singer XL-420 FUTURA.Need a Singer XL-420 FUTURA manual? We have 1 online manual for this item!
Question posted by mumshearer on June 6th, 2020
Alignment
hi when I attach my small and large hoop my machines is telling me to fix the alingment. But I dont know how.
Current Answers
Answer #1: Posted by Odin on June 6th, 2020 11:36 AM
Odin

Member since:
April 10th, 2010 Points: 41,236,690

Member since:
April 10th, 2010 Points: 41,236,690
See the instructions at https://www.manualslib.com/manual/780326/Singer-Xl-420.html?page=90&term=align&selected=5.
If the issue persists or if you require further advice (or if these instructions don't seem to apply to your model), you'll have to consult the manufacturer, for which use the contact information at https://www.contacthelp.com/singer/customer-service.
Hope this is useful. Please don't forget to click the Accept This Answer button if you do accept it. My aim is to provide reliable helpful answers, not just a lot of them. See https://www.helpowl.com/profile/Odin.
Related Singer XL-420 FUTURA Manual Pages
Instruction Manual - Page 2

³,03257$176$)(7
Instruction Manual - Page 5
... FOR EMBROIDERY SEWING Before attaching embroidery unit 58 - 61
Attaching embroidery foot, Inserting the bobbin, Threading the top thread, Extension table Attaching embroidery unit 62 - 63 Removing embroidery unit 62 - 63 Securing fabric in embroidery hoop 64 - 65 Using fabric and stabilizer 66 - 69 Preparing the machine before installing the hoop ------- 70 - 71 Attaching and removing...
Instruction Manual - Page 8
.... Presser foot release button
15
19
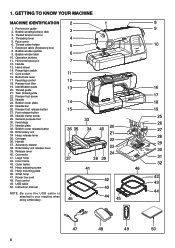
27. Large hoop
37
22 23 24 38 39
28 29 30 31
42. Pre-tension guide %REELQZLQGLQJWHQVLRQGLVN
3
9
3. Bobbin winder latch
6
10. Power/light switch &RUGVRFNHW
11
16. Small hoop 47. Horizontal spool pin
7
12. GETTING TO KNOW YOUR MACHINE
MACHINE IDENTIFICATION
2
1
8
1. Thread cutter/holder
5
10
7. Bobbin...
Instruction Manual - Page 10
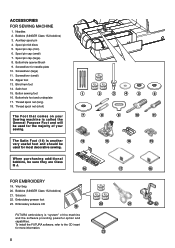
.... Satin foot
15.
Spool pin cap (large)
8. Screwdriver (large)
11. Spool pin cap (mini)
6. Thread spool net (long)
18. Bobbins (SINGER Class 15J bobbins)
3. Bobbins (SINGER Class 15J bobbins) 21. Auxiliary spool pin
4. Vinyl bag 20. Embroidery software CD
19
FUTURA embroidery is "system" of your
7
Sewing machine is another
12
very useful foot and...
Instruction Manual - Page 12
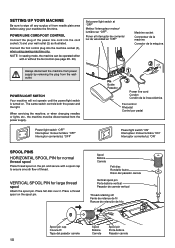
POWER/LIGHT SWITCH Always disconnect the machine from power supply by removing the plug from needle plate area EHIRUHXVLQJ\RXUPDFKLQHWKH...RXUZDOORXWOHW
DVLOOXVWUDWHG &RQQHFWWKHIRRWFRQWUROSOXJLQWRWKHPDFKLQHVRFNHW
when using sewing machine only. NOTE: In sewing mode, the machine can be operated either
with or without the foot control (see page 28 - 29). SETTING UP YOUR...
Instruction Manual - Page 24
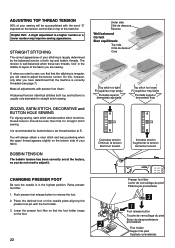
...tension control. Do this, however, only after you will be less than that the machine is correctly threaded (see page 7). 0DNHDOODGMXVWPHQWVZLWKSUHVVHUIRRWµGRZQ¶...for straight stitch sewing. ADJUSTING TOP THREAD TENSION
90% of your stitching is largely determined by the balanced tension of both top and bottom) is usually only desirable for straight stitch sewing. Helpful Hint: ...
Instruction Manual - Page 34
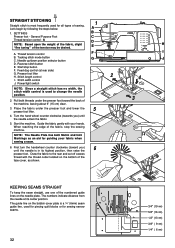
...in its center position. Thread tension control % 7DFNLQJVWLWFKPRGHEXWWRQ
C. Start/stop the sewing machine. Presser foot lifter H. NOTE: The Needle Plate has both Metric and Inch Markings as shown.... Guide the fabric gently with the thread cutter located on the needle plate. Start the machine.
Feed dog control (at its highest position, then raise the
6
presser foot. Stitch...
Instruction Manual - Page 56
... Place the fabric under the foot. While holding the top thread, start the machine.
)DEULFPDUNLQJ 0DUTXHGXWLVVX 0DUFDGHPDWHULDO
0DUN 0DUTXH 0DUFD
* Sewing will be completed automatically in the following order.
1
2
3
4
5
...RIWKHEDUWDFNWKUHDGV
54
Buttonhole foot alignment position Position d'alignement du pied boutonnière Posición de alineación del pie de ojaladora
Instruction Manual - Page 72
... de liberación del aro
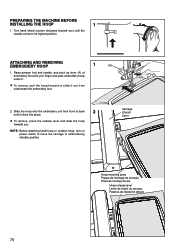
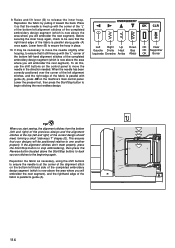
70 ATTACHING AND REMOVING EMBROIDERY HOOP
1
(A)
1.
Raise presser foot and needle, and push up lever (A) of HPEURLGHU\IRRWZLWK\RXU¿QJHUDQGSDVVHPEURLGHU\KRRS
under it.
¿ To remove, pull the hoop forward to its highest position. NOTE: Before attaching small hoop or endless hoop, turn on power switch to...
Instruction Manual - Page 74
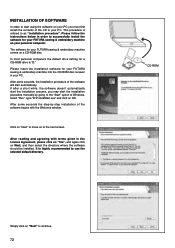
... order to your PC. If after a short while, the software doesn't automatically start the installation process, you may start automatically. The software for your FUTURA sewing & embroidery machine FRPHVRQD&'520GLVF
In most personal computers the default drive setting for a &'520GULYHLV³'
´
Please insert the installation software for your...
Instruction Manual - Page 76
... Program Folder where the shortcut for a short while until this happens. Please wait for the software will finally start the copy and installation of the FUTURA software files to free VRPHKDUGGLVNVSDFHEHIRUHSURFHHGLQJZLWKWKHLQVWDOODWLRQ Pressing the ³1H[W´ button will be stored.
6LPSO\FOLFNRQ...
Instruction Manual - Page 90
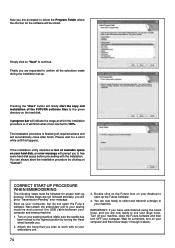
...When stitching an embroidery design that is too large for the hoop or a combination of the cross lines.
...sews them precisely, matching one VHFWLRQ WR WKH RWKHU :KHQ UHKRRSLQJ WKH IDEULF WKH 0XOWL hoop feature will be referred to the alignment...machine exactly as possible. This embroidery data may be at perfect 90 degree angles. Please try to three additional hoops...
Instruction Manual - Page 92
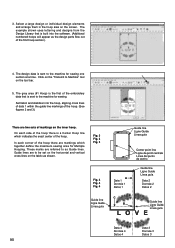
...are two sets of the hoop there is built into the hoop, aligning cross lines RIGDWDZLWKLQWKHJXLGHOLQHPDUNLQJVRIWKHKRRS
6HH ¿JXUHVDQG
There are to the machine for sewing one VHFWLRQDWDWLPH&OLFN...horizontal and vertical cross lines on the screen.
Select a large design or individual design elements
and arrange them in the hoop area on the fabric as shown. 3.
Instruction Manual - Page 104
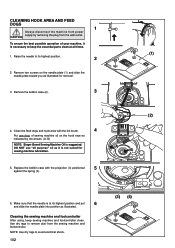
...KRRNDUHDZLWKWKHOLQWEUXVK
4
Put one drop RI VHZLQJ PDFKLQH RLO RQ WKH KRRN UDFH DV indicated by removing the plug from the sewing machine and footcontroller. 127(
8 VHGU\UDJVWRDYRLGHOHFWULFDOVKRFN
102
(3) (4)
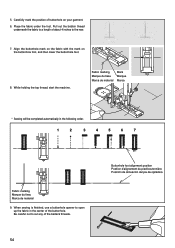
Replace the bobbin case with the projection (3) positioned
5
against the spring (4).
(2)
(A) (B)
0DNHVXUHWKDW...
Instruction Manual - Page 106
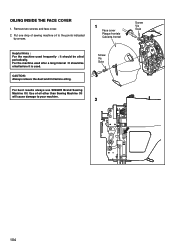
... will cause damage to the points indicated
by arrows.
1
Face cover Plaque frontale Cubierta frontal
Helpful Hints : For the machine used .
For best results always use SINGER Brand Sewing Machine Oil. OILING INSIDE THE FACE COVER
1.
Remove two screws and face cover. 2. CAUTION: Always remove the dust and lint before it is used...
Instruction Manual - Page 110
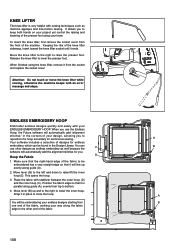
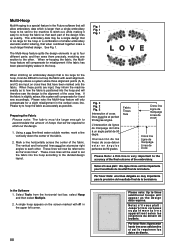
ENDLESS EMBROIDERY HOOP
(PEURLGHU HQGOHVV GHVLJQV TXLFNO\ DQG HDVLO\ ZLWK \RXU (1'/(66(0%52,'(5 It allows you to NHHS ERWK KDQGV RQ \RXU SURMHFW...WKHVRFNHW DQGUHSODFHWKHVRFNHWFRYHU
Attention: Do not touch or move the knee lifter while sewing, otherwise the machine beeps with an error message and stops. KNEE LIFTER
7KHNQHHOLIWHULVYHU\KHOSIXOZLWKVHZLQJWHFKQLTXHVVXFKDV...
Instruction Manual - Page 112
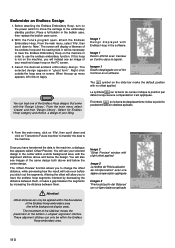
...7KHVFUHHQZLOOGLVSOD\DOLNHQHVVRI the endless hoop and the sewing feld. Imagen 1 Diseño desplegado con ...machine's large hoop on the machine, you have the Endless Embroidery Hoop on the machine in the bobbin case, then replace the bobbin case cover.
2. From the main menu select 'Create' and then 'Design Library'. Embroider an Endless Design
1. With the Futura program open, attach...
Instruction Manual - Page 114
...start to embroider the endless GHVLJQ Once you have 3 options from coming out of the machine, and leave a thread tail approximately 6-8" long.
6. This will help prevent the thread ...be positioned relative to one another when they stitch out. Thread the top of the needle with sewing alignment stitches and long jump stitches. At this point, you have determined how you want your endless ...
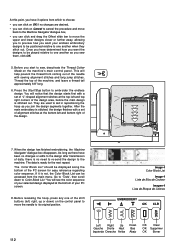
Instruction Manual - Page 116
...sewing, the alignment stitches from the bottom
(left alignment stitches, and the right edge of the completed embroidery design segment (which is parallel along guide (A) once again.
If the alignment...on the machine's main...alignment
stitches at the corner of the current design should
meet, forming a small "side ways T" shapes (E). Raise and lift lever (B) to release the inner hoop...
Instruction Manual - Page 118
...the presser foot lifter. Replace the presser foot and needle to remove the hoop from the machine. Helpful Tips: ‡ When embroidering larger or heavier pieces of fabric,
it...sewing the alignment stitches and long jump stitches. ‡ To change a bobbin during embroidery, raise the needle by turning the handwheel toward you lower the embroidery speed. ‡ Be sure to remove the hoop...
Similar Questions

Stitching Incomplete Design
please my singer future xl-420 is not stitching the design I transmitted to the machine rather it st...
please my singer future xl-420 is not stitching the design I transmitted to the machine rather it st...
(Posted by Oliviasommy 3 years ago)

Straight Line When Suppose To Be Following Embroidery Design
In Need Off Help... My Singer XL-420 futura Keeps Going In A Straight Line When I Use The Large Hoop...
In Need Off Help... My Singer XL-420 futura Keeps Going In A Straight Line When I Use The Large Hoop...
(Posted by anggriffis 3 years ago)

I Get E7 Error Message On My Singer Model 7258 Sewing Machine. There Is No Refe
Error message E7 is up on my Singer Stylist model 7258 sewing machine. It is not working at all. I t...
Error message E7 is up on my Singer Stylist model 7258 sewing machine. It is not working at all. I t...
(Posted by ebellamybellamy9 5 years ago)

Sewing Machine Will Not Work Right.
I am trying to embroider on fleece. The machine goes along fine foe a couple of minutes and then it ...
I am trying to embroider on fleece. The machine goes along fine foe a couple of minutes and then it ...
(Posted by purplelily55 7 years ago)

Beeping From Singer Sewing Machine Stylist Ii 5625
My sewing machine will beep and stop sewing after three inches of sewing. I have taken it to be repa...
My sewing machine will beep and stop sewing after three inches of sewing. I have taken it to be repa...
(Posted by arusheria 9 years ago)