Singer SEQS-6700 FUTURA QUARTET Support Question
Singer SEQS-6700 FUTURA QUARTET Support Question
Find answers below for this question about Singer SEQS-6700 FUTURA QUARTET.Need a Singer SEQS-6700 FUTURA QUARTET manual? We have 1 online manual for this item!
Question posted by Wendyenglish89 on March 12th, 2015
Where Is The Green Indecator Light?
The person who posted this question about this Singer product did not include a detailed explanation. Please use the "Request More Information" button to the right if more details would help you to answer this question.
Current Answers
Answer #1: Posted by sabrie on March 12th, 2015 9:58 PM
sabrie
Member since:
May 23rd, 2013 Points: 3,306,778

Member since:
May 23rd, 2013 Points: 3,306,778
download the instruction manual on the link below
http://www.helpowl.com/manuals/Singer/SEQS6700FUTURAQUARTET/205228
www.techboss.co.za
Related Singer SEQS-6700 FUTURA QUARTET Manual Pages
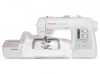
Instruction Manual - Page 1

SEQS-6700
INSTRUCTION MANUAL
67
Instruction Manual - Page 2

...Unplug the foot controller of electric shock:
1. Moving parts-To reduce risk of the sewing machine and foot
control free from the electrical outlet when removing covers, lubricating, or when making..., or changing presser foot, etc.
18. Never operate the sewing machine with the appliance. 3. Switch the sewing machine off („0") position, then remove plug from the electric outlet...
Instruction Manual - Page 3
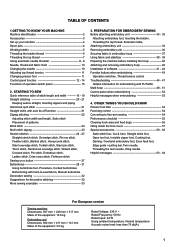
...sew fabrics, Manual buttonhole Decorative sewing 32 Suggestions for embroidering with FUTURA Multi hoop 48 - 51 Control panel when embroidering 52 Helpful messages when embroidering 53
4. STARTING TO SEW...Twin needle, Threading the twin needle, Wing needle Helpful messages 63 - 64
For European version
Sewing machine Dimensions: 567 mm × 240 mm × 317 mm Mass of the equipment: 10.8...
Instruction Manual - Page 4
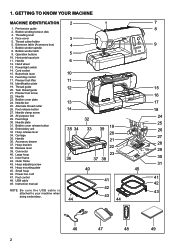
...
8
2. Operation buttons
5
10. Handle
6
12. Power/light switch
14. Feed dogs
32
24
30. Bobbin cover release ... Instruction manual
41
41
42
42
NOTE: B e s u r e t h e U S B c a b l e i s attached to your machine when doing embroidery.
43
43
44
44
46
47
48
49
2 Threading lever
4. Thread cutter/holder
6. Extension table (Accessory box)
4
9
7. Cord socket
15...
Instruction Manual - Page 5

... in the vinyl bag, packaged with the embroidery unit.
19. Scissors
19
22. ACCESSORIES
FOR SEWING MACHINE
Sewing machine accessories are located in the storage compartments of your
sewing machine is another very useful foot and should be used for most decorative sewing. Screwdriver (large)
11. Thread spool net (long)
7
18. Embroidery software CD
To install the...
Instruction Manual - Page 6

...
4 The same switch controls both the power and the light.
SET UP YOUR MACHINE
Be sure to wipe off any surplus oil from needle plate area
POWER LINE CORD/FOOT CONTROL
Connect the plug of the power line cord into the machine socket (3), when using sewing machine only. Connect the foot control plug into the...
Instruction Manual - Page 11

HELPFUL SUGGESTIONS: If the machine is deviated from needle hole, adjust the position of sewing machine oil onto the felt disc. If the threading hook is not used frequently, put a drop of the hook using a small screw driver.
Felt disc
9
Instruction Manual - Page 12
...4. The use of alternative brand needles can be of weight. TYPE
Light- Batiste Weight Chiffon
Crepe
Cotton-wrapped 2000 or 2020
Polyester
red
100... position by pulling it before a new sewing project. IMPORTANT: Use only SINGER brand needles for best results..../90 blue band
16/100 purple band
Always disconnect the machine from the wall outlet. Loosen the needle clamp screw by...
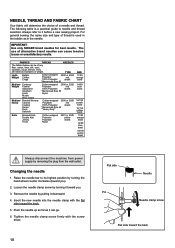
Instruction Manual - Page 13

... PRESSER FOOT
Be sure the needle is usually only desirable for straight stitch sewing. Push presser foot release button to decrease thread tension for buttonholes. Lower the presser foot lifter so that the machine is correctly threaded (see page 7).
A balanced tension (identical stitches both top and bobbin threads.
Raise presser foot lifter...
Instruction Manual - Page 16
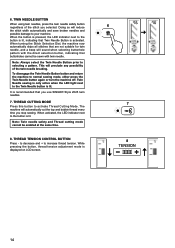
... LED indicator next to the button is lit, indicating that buttonholes cannot be enabled at the same time.
8. Twin Needle sewing is only active when the LED light next to your machine. Note: Always select the Twin Needle Button prior to activate Thread Cutting Mode. To disengage the Twin Needle Button button and...
Instruction Manual - Page 17

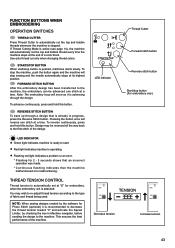
... , the lever serves as a top speed limiter. LED INDICATOR
Green light indicates machine is set at its down-stop position with upper LED lamp lit. When foot control
is pushed once more, the machine stops. TACKING STITCH MODE BUTTON
Press Tacking Stitch Button and the sewing machine makes
1
2
START/STOP to start. When the button is...
Instruction Manual - Page 22

...sewing machine.
Turn the hand wheel counter clockwise (towards you )
until
the needle enters the fabric.
5. The numbers indicate distance from the needle at rear side) G. Needle up/down position selector button D. Pull both Metric and Inch Markings as shown. Start the machine...highest position, then raise the presser foot. Power/light switch
F G
2
NOTE: Since a straight ...
Instruction Manual - Page 43
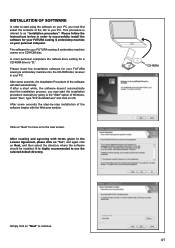
... then select the directory where the software should be installed.
This procedure is highly recommended to use the selected default directory. The software for your FUTURA sewing & embroidery machine comes on OK. INSTALLATION OF SOFTWARE
install the contents of the CD to your personal computer. After some seconds the step-by going to...
Instruction Manual - Page 44

...
hard disk. A progress bar will get a "Transmission Pending" error message. Make sure the needle has been moved to the highest position by clicking on your machine.
42 Boot up your sewing machine. Double click on the FUTURA icon shortcut your desktop to the given directory on your computer, but do not open up .
Instruction Manual - Page 45
... up through the design.
FORWARD STITCH BUTTON After the embroidery design has been transferred to the machine, the embroidery can be reversed all the way back
LED indicator
LED INDICATOR Green light indicates machine is malfunctioning. NOTE: When sewing designs created by checking the box in progress, press the Reverse Stitch button. FUNCTION BUTTONS WHEN...
Instruction Manual - Page 47

...stitch on an imported design when sizing, but thread is broken, machine lights are missing
If the embroidery machine detects that the thread is not in the thread tension.
The ... small net that is supplied with the accessories over .
2. HELPFUL INFORMATION FOR EMBROIDERING WITH FUTURA
1.
Step back through the embroidering data to step back through the embroidery data. Press the reverse...
Instruction Manual - Page 54

... to stitch position
Step between color blocks
OK Turn the lower dial. GO TO APPROXIMATE STITCH POSITION WITHIN A COLOR BLOCK
To go to your FUTURA sewing and embroidery machine, the display shows number of current color block and total number of the upper dial. Turn the upper dial clockwise to step forward, and...
Instruction Manual - Page 58
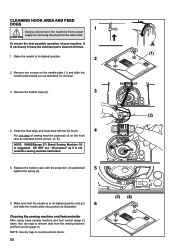
... at all times.
(1)
1.
Remove two screws on the hook race as indicated by removing the plug from the sewing machine and foot control (page 2). Remove the bobbin case (2).
3
4. To ensure the best possible operation of sewing machine (optional) oil on the needle plate (1) and slide the needle plate toward you as illustrated. Clean the...
Instruction Manual - Page 59

... to the points indicated
by arrows.
1
Face cover
Helpful Hints : For the machine used .
For the machine used after a long interval : It should be oiled before oiling. For best results always use SINGER Brand Sewing Machine Oil. Use of sewing machine oil to your machine. Screw
2
Screw
57 CAUTION: Always remove the dust and lint before it...
Instruction Manual - Page 64

... when the twin needle switch is not included with the SEQS-6700. The wing needle works best with the wing needle. Always select the twin needle mode prior to decrease the upper tension slightly for a better quality stitch, do a test sample before sewing your machine, regardless of the stitch you have selected. Do not...
Similar Questions

How Do I Change The Light Bulb In My 9340 Sewing Machine?
(Posted by keistuff 2 years ago)

Singer Futura Quartet Seqs 6700 Sewing Machine
how to set my singer futura quartet seqs 6700 sewing machine to sew. A distance more than one inch a...
how to set my singer futura quartet seqs 6700 sewing machine to sew. A distance more than one inch a...
(Posted by johour2194 3 years ago)

I Get E7 Error Message On My Singer Model 7258 Sewing Machine. There Is No Refe
Error message E7 is up on my Singer Stylist model 7258 sewing machine. It is not working at all. I t...
Error message E7 is up on my Singer Stylist model 7258 sewing machine. It is not working at all. I t...
(Posted by ebellamybellamy9 5 years ago)

I Have A Heavy Duty Singer Sewing Machine (model 4432)
stopped sewing after bobbin replacement?
stopped sewing after bobbin replacement?
(Posted by sueisforme 9 years ago)

Beeping From Singer Sewing Machine Stylist Ii 5625
My sewing machine will beep and stop sewing after three inches of sewing. I have taken it to be repa...
My sewing machine will beep and stop sewing after three inches of sewing. I have taken it to be repa...
(Posted by arusheria 9 years ago)