
Singer S800 FASHIONISTA Support Question
Singer S800 FASHIONISTA Support Question
Find answers below for this question about Singer S800 FASHIONISTA.Need a Singer S800 FASHIONISTA manual? We have 1 online manual for this item!
Question posted by reillyclan01 on October 26th, 2017
Stitches Are Coming Out
I am having trouble with the straight stitches being too loose and pull right out
Current Answers
Answer #1: Posted by Bruce7194 on October 27th, 2017 12:27 AM
Bruce7194

Member since:
September 17th, 2017 Points: 95,560

Member since:
September 17th, 2017 Points: 95,560
please refer to this youtube video link to know more on "How to Fix Loose and Looping Sewing Machine Stitches" :
https://www.youtube.com/watch?v=9B831h_p6oY
Hope, this will help. Best Of luck.
Related Singer S800 FASHIONISTA Manual Pages
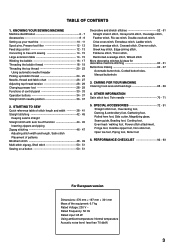
Instruction Manual - Page 2

...and before using this sewing machine. "Switch the sewing machine off ("0") when making any opening." 8. "Attention the following ." Unplug the foot controller of lint, dust, and loose cloth." 7. FOOT CONTROL... recycled in this sewing machine is being used or where oxygen is used as contained in doubt please contact your retailer for household use by pulling on disposal, this...
Instruction Manual - Page 5
... 72 - 91 Straight stitch foot, Overcasting foot,
'DUQLQJ HPEURLGHU\IRRW*DWKHULQJIRRW 5ROOHGKHPIRRW6LGHFXWWHU0DJQLI\LQJJODVV
Seam guide, Beading foot, Cording foot, Even feed / walking foot, Flower stitch attachment, Fringe foot, Invisible zipper foot, Non-stick foot, Open toe foot, Piping foot, Roller foot
6. KNOWING YOUR SEWING MACHINE 0DFKLQHLGHQWL¿...
Instruction Manual - Page 8

... cover
5. Needle clamp screw
31. Needle plate
34. Thread guide
13
21. Thread cutter
29. Presser foot
16
32. Thread guide
14
24. 1. KNOWING YOUR SEWING MACHINE
MACHINE IDENTIFICATION
1. Bobbin winder shaft
8. Bobbin winder stop 9. Operation buttons
12. Buttonhole lever 20. Automatic needle threader
22. Large extension table
36.
Instruction Manual - Page 10

... should be sure they are Class I5 J.
1
2
3
4
5
6
7
8
9
10
11
12
13
14
15
16
17
18
19
8 Needles 2.
Bobbins (4 total - 1 in machine) 3. Zipper foot 11. Gathering foot 18. Rolled hem foot 19. Blind stitch foot 13. Screwdriver for most decorative sewing. Straight stitch foot 15. Side cutter
The Foot that comes on your sewing. Buttonhole foot 14.
Instruction Manual - Page 26

... thread loosely with your left hand, turn
2
hand wheel toward the back
4
of your right
hand, first lowering the needle and continuing until the
needle comes to pick...straight stitch selected, touch and release the reverse switch. Raise the presser foot lifter.
1
2. Lightly pull up the top thread, and pick up bobbin thread,
3
which will perform one of the features of the machine...
Instruction Manual - Page 30

...side Côté de dessus Cara
Top stitch too tight Fil supérieur trop tendu
Puntada superior demasiado apretada
Top stitch too loose Fil supérieur trop lâche
Puntada...bottom) is usually only desirable for straight stitch sewing. ADJUSTING TOP THREAD TENSION
0RVW RI \RXU VHZLQJ ZLOO EH GRQH ZLWK WKH WHQVLRQ FRQWURO GLDO (on top of the machine) set at "AUTO" . Push...
Instruction Manual - Page 32

...point Ajuste manual botones para largo de puntada
0DQXDODGMXVWPHQWEXWWRQV for straight stitch according to pattern number reference guide.
STITCH LENGTH AND STITCH WIDTH/NEEDLE POSITION ADJUSTMENT BUTTONS
Your sewing machine will produce your preference pushing manual adjustment buttons. To select stitch patterns, use left button for individual preference settings appears on the LCD...
Instruction Manual - Page 34

... and eliminate the problem that caused the machine
to left. Bobbin winder is not necessary to push the reverse/tacking stitch button.
Foot control plug is not lowered or raised. ÎLower buttonhole lever when sewing buttonholes. ÎRaise buttonhole lever when sewing stitch patterns.
Buttonhole lever is pulled out, while operating foot control. ÎPush...
Instruction Manual - Page 36

.../TACKING STITCH BUTTON
* Reverse stitch function for straight and zigzag stitches (ɹ ) Reverse sewing is carried out while the reverse stitch button is connected, start/stop button cannot be used. OPERATION BUTTONS
Reverse stitch button Bouton du point de marche arrière Botón de puntada hacia atrás
Programmable needle up position. The machine will stop...
Instruction Manual - Page 38

... right Vers la droite Hacia derecha
36 STRAIGHT STITCH NEEDLE POSITION
The position of the needle when sewing straight stitch may... be adjusted to determine the amount of the setting, maximum speed may be limited depending on which the speed control is set on the lower setting, the machine will not sew...
Instruction Manual - Page 44

...machine, leaving about 6" (15cm) clear.
3. NOTE: To secure the stitching and avoid raveling,
6
press the reverse stitch switch and sew a few
stitches at its highest position. SETTINGS
C
Presser foot - The numbers indicate distance from the needle at the start and end of the seam.
.((3,1*6($06675$,*+7
To keep the seam straight... - Reverse stitch button C. Pull both Metric ...
Instruction Manual - Page 46

... pipe soft furnishings, cover cord with the Stitch Width Control.
44 Push the reverse switch and the machine will sew 4 stitches in forward and then 4 stitches in reverse and continue to right of zipper foot to foot holder.
Press the foot control and the machine will sew 4 stitches in reverse and then 4 stitches in forward until the foot control is...
Instruction Manual - Page 56

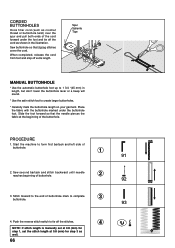
.... It is perfect IRUDWWDFKLQJÀDWHODVWLFIRURYHUFDVWLQJDQGIRUVHDPLQJDQG overcasting in the stitch pattern. It is primarily used on borders and for use in heirloom sewing. ENTREDEUX STITCH
Useful for decorative machine stitching. Helpful Hint: A slight + adjustment of the tension will increase the size of the hole when using a Wing...
Instruction Manual - Page 62

... piece of the fabric, so it may be used. Before starting to sew, check that the thread will not run out during sewing. MORE DECORATIVE STITCHES & IDEAS FOR DECORATIVE MACHINE STITCHING
SETTINGS :Presser foot - Helpful Hint: Bobbin thread should carry out a test sewing on the top side of the fabric being sewn to check the decorative...
Instruction Manual - Page 66
... under the foot. Pull out the bobbin thread underneath the fabric to prevent cutting the stitches.
64
Buttonhole foot ...alignment position Position d'alignement du pied boutonnière Posición de alineación del pie de ojaladora While holding the top thread, start the machine. Fabric marking 0DUTXHGXWLVVX 0DUFDGHPDWHULDO
0DUN 0DUTXH 0DUFD
* Sewing...
Instruction Manual - Page 68
...3/4 "(45 mm) in the illustration.
Sew buttonhole so that the needle pierces the ...stitches cover the cord.
Push the reverse stitch switch to tie off the stitches.
4
NOTE: If stitch length is manually set at 0.8 (mm) for step 1, set the stitch length at the beginning of the buttonhole.
Stitch...pull both ends of the cord forward under the buttonhole foot. Sew second bartack and stitch...
Instruction Manual - Page 70
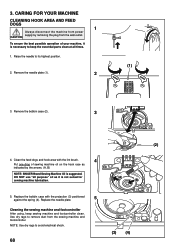
... (3) positioned against the spring (4). CARING FOR YOUR MACHINE
CLEANING HOOK AREA AND FEED DOGS
1
Always disconnect the machine from power CAUTION supply by the arrows. (A, B)
NOTE: SINGER Brand Sewing Machine Oil is not suited for sewing machine lubrication.
(2)
(A) (B)
5. Replace the needle plate.
5
Cleaning the sewing machine and footcontroller
After using, keep the essential parts...
Instruction Manual - Page 78

....
Sew. Raise needle and presser foot to wide width setting for seaming and overedging on Side Cutter and Feed Dogs after
use .
Set stitch length at medium to their highest positions. 3. Straight stitch at one time. Zigzag or overedge stitch at default setting.
10. SIDE CUTTER
NOTE: Peel off the power switch and unplug the sewing machine...
Instruction Manual - Page 80
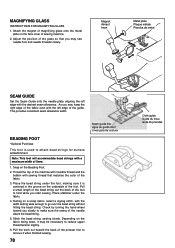
MAGNIFYING GLASS
,16758&7,216)250$*1,)
Instruction Manual - Page 82
...WKHQHHGOHEDU
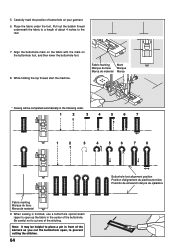
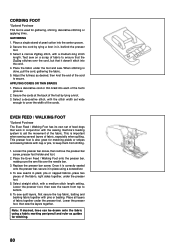
3. Select straight stitch, with pins or basting. CORDING FOOT
*Optional Purchase This foot is used for stitching.
80 Place the fabric under the presser foot.
5. To sew seams in plaid, pile or napped fabrics, place two pieces of the fabric, right sides together, under the foot and sew. Lower the presser foot, then...
Similar Questions

Singer Model S800 Stops, Beeps And Shows Error Code E2 Immediately When Trying T
Wind a bobbin
Wind a bobbin
(Posted by ezm8031 3 years ago)

I Get E7 Error Message On My Singer Model 7258 Sewing Machine. There Is No Refe
Error message E7 is up on my Singer Stylist model 7258 sewing machine. It is not working at all. I t...
Error message E7 is up on my Singer Stylist model 7258 sewing machine. It is not working at all. I t...
(Posted by ebellamybellamy9 5 years ago)

My Stitches Are Too Loose, How Do I Adjust Them? Nk
When i am sewing a straight stitch they are do loose they come right out, I have adjusted stitch siz...
When i am sewing a straight stitch they are do loose they come right out, I have adjusted stitch siz...
(Posted by reillyclan01 6 years ago)

S 800 Won't Start.
light comes on, machine gives flashing E 4 signal..won't start. I have tried all suggestions in manu...
light comes on, machine gives flashing E 4 signal..won't start. I have tried all suggestions in manu...
(Posted by jvogrammy 8 years ago)

Beeping From Singer Sewing Machine Stylist Ii 5625
My sewing machine will beep and stop sewing after three inches of sewing. I have taken it to be repa...
My sewing machine will beep and stop sewing after three inches of sewing. I have taken it to be repa...
(Posted by arusheria 9 years ago)