
Singer S800 FASHIONISTA Support Question
Singer S800 FASHIONISTA Support Question
Find answers below for this question about Singer S800 FASHIONISTA.Need a Singer S800 FASHIONISTA manual? We have 1 online manual for this item!
Question posted by jvogrammy on August 7th, 2015
S 800 Won't Start.
light comes on, machine gives flashing E 4 signal..won't start. I have tried all suggestions in manual.
Current Answers
Answer #1: Posted by TommyKervz on September 11th, 2015 3:49 PM
TommyKervz

Member since:
January 10th, 2013 Points: 17,776,833

Member since:
January 10th, 2013 Points: 17,776,833
Click the link below for a solution.
http://www.justanswer.com/small-appliance/8k9ty-hi-brand-new-singer-s800-sewing-machine-showing.html#
Related Singer S800 FASHIONISTA Manual Pages
Instruction Manual - Page 2

... recycled in accordance with any maintenance." "To disconnect, turn switch to electrical/ electronic products. Always unplug this manual." 4. "Read all instructions before carrying out maintenance or replacing lamps." 12. "Never operate the sewing machine with relevant National legislation relating to the off („0") position, then remove plug from the electric
outlet...
Instruction Manual - Page 5
... stitch, Reinforced overedge stitch, Wizard stitch
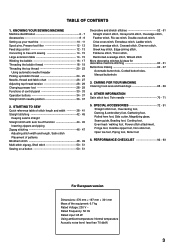
0RUHGHFRUDWLYHVWLWFKHV LGHDVIRU decorative machine stitching 60 - 61 Buttonhole making 62 - 67
Automatic buttonhole, Corded buttonholes, 0DQXDOEXWWRQKROH
3. TABLE OF CONTENTS
1. OTHER INFORMATION Satin stitch foot, Twin needle 70 - 71
5. STARTING TO SEW Quick reference table of stitch length and width ---------- 38 - 41 Straight...
Instruction Manual - Page 8

KNOWING YOUR SEWING MACHINE
MACHINE IDENTIFICATION
1. Bobbin winding tension disk
1
2. Thread take-up 3. Horizontal spool pin
13. Cord socket ...Needle plate
34. Thread tension control
2
4. Removable extension table/
Accessory box
4
7. Operation buttons
12. Power/light switch
16. Needle bar
28. Instruction manual
21 22 23 24 25
26
12
17
18
7 8 9
10 11
20
19 27 28 29 30 ...
Instruction Manual - Page 10

.... Side cutter
The Foot that comes on your sewing. ACCESSORIES
1. Spool pin cap (medium) 7. Zipper foot 11. Blind stitch foot 13. Straight stitch foot 15. Spool pin felt discs (2) 5 Spool pin cap (small) 6. Gathering foot 18. When purchasing additional bobbins, be used for the majority of your Sewing machine is another very useful foot...
Instruction Manual - Page 14

... the lifter to the middle position to insert or remove fabric, and to sew.
2.
Then, turn the hand wheel toward the machine.
Lower the feed dogs by removing the extension table and then pushing the... always be larger than that of the spool pin cap should be raised for all general sewing purposes and lowered for darning, freehand embroidery and monogramming so that is being used.
They ...
Instruction Manual - Page 16
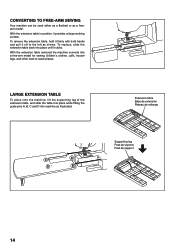
CONVERTING TO FREE-ARM SEWING
Instruction Manual - Page 26

... "fully up" is , with your right
hand, first lowering the needle and continuing until the
needle comes to its highest position. Your machine will appear through the needle plate slot.
4. Holding needle thread loosely with your electronic sewing machine.
3.
PICKING UP BOBBIN THREAD
1. Pull both top and bobbin threads together toward you (counter-clockwise...
Instruction Manual - Page 32

... LENGTH AND STITCH WIDTH/NEEDLE POSITION ADJUSTMENT BUTTONS
Your sewing machine will produce your preference pushing manual adjustment buttons.
You can manually change the length, width or needle position for pattern...250;mero de puntada
FUNCTIONS OF CONTROL PANEL
PATTERN NUMBER SELECTION BUTTONS
When the machine is turned on, straight stitch is selected and pop-up to your stitching ...
Instruction Manual - Page 36

... button Bouton de marche/arrêt Botón inicio/parada
START/STOP BUTTON ( )
When sewing without having the foot controller connected, the machine starts slowly when the start/stop button is very useful for tying off the sewing on foot pedal to avoid raveling at the start /stop button cannot be lit red and needle will stop...
Instruction Manual - Page 44

... also for narrow seams.
42
3/4" (19 mm) 5/8" (16 mm) 1/2" (13 mm) 3/8" ( 9 mm) 1/4" ( 6 mm) SETTINGS
C
Presser foot - Thread tension control B. Programmable needle up/down button D. Start/stop the sewing
machine. NOTE: The Needle Plate has both threads under the presser foot and lower the
3
presser foot lifter.
4. First turn the handwheel toward you (counter...
Instruction Manual - Page 62

Helpful Hint: Bobbin thread should carry out a test sewing on the top side of the fabric being sewn to check the decorative pattern... tear-away or washaway stabilizer underneath when stitching. Satin Stitch Foot :Thread tension control - Before starting to sew, check that the thread will not run out during sewing. AUTO or -1
You should not appear on an extra piece of the fabric, so it may...
Instruction Manual - Page 66
...5
6
7
1
2
3
4
5
6
7
8
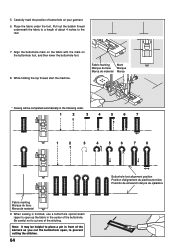
Fabric marking 0DUTXHGXWLVVX 0DUFDGHPDWHULDO
9. When sewing is finished, use a buttonhole opener/seam ripper to the rear.
7. Align the buttonhole mark on the fabric with...open up the fabric in the center of the stitching. While holding the top thread, start the machine. Place the fabric under the foot. 5.
Be careful not to prevent cutting the stitches...
Instruction Manual - Page 68
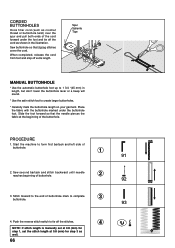
...or a beep will sound.
* Use the satin stitch foot to tie off extra length. Start the machine to complete
3
buttonhole.
4. Stitch forward to the end of buttonhole mark to form first bartack... the stitches.
4
NOTE: If stitch length is manually set at 0.8 (mm) for step 1, set the stitch length at the beginning of the buttonhole. Sew buttonhole so that the needle pierces the fabric at ...
Instruction Manual - Page 70
....
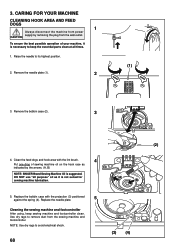
1. 3. Use dry rags to keep sewing machine and footcontroller clean.
To ensure the best possible operation of sewing machine oil on the hook race as it is suggested. Replace the bobbin case with the lint brush.
4
Put one drop of your machine, it is not suited for sewing machine lubrication.
(2)
(A) (B)
5. CARING FOR YOUR MACHINE
CLEANING HOOK AREA AND FEED...
Instruction Manual - Page 74

Machine Preparation ‡)RU IUHH PRWLRQ HPEURLGHU\ DQG PRQRJUDPV
6HW PDFKLQH
for Zigzag Stitch in the width you are working with its edge against the edge guide and start to sew. Sewing Instructions 1. NOTE: For better control when free motion sewing, it is recommended that you hoop the section of your fabric under presser foot. 3. Use...
Instruction Manual - Page 78

...Sew 13. Thread the needle and bobbin. Set sewing speed at default setting.
10. Turn hand wheel toward the back. 5. Sew. SIDE CUTTER
NOTE: Peel off the power switch and unplug the sewing machine... care not to touch knife before sewing 0DUNDWULPPLQJOLQH
- RQIDEULF 0DUNDFXW
. RIDERXW´IURPWKHHGJHZLWKVFLVVRUV
Starting to their highest positions. 14. ...
Instruction Manual - Page 80
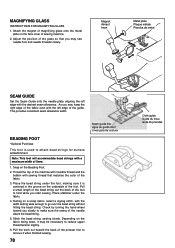
MAGNIFYING GLASS
,16758&7,216)250$*1,)
Instruction Manual - Page 82
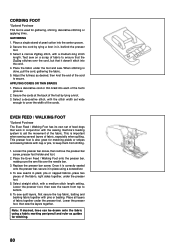
... a decorative stitch, with the sewing machine's feeding system to aid the movement of fabric to cover the width of the fabric, right sides together, under the foot and sew. EVEN FEED / WALKING FOOT
...groove. 2. CORDING FOOT
*Optional Purchase This foot is used for matching plaids or stripes and sewing fabrics with a medium stitch length setting. This presser foot is done, pull the cord, ...
Instruction Manual - Page 90
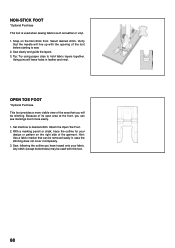
... Set machine to hold fabric layers together. With a marking pencil or chalk, trace the outline for your fabric. Hint: Use a fabric marker that the needle will line up with this foot.
88 Sew, following... with the opening of the foot before starting to sew. 2. Because of its open area at the front, you can be removed easily in leather and vinyl. Sew slowly and guide the layers. 3.
Instruction Manual - Page 94
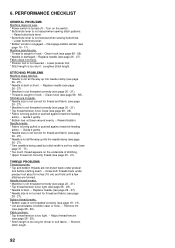
... breaks. * Fabric is not lowered when sewing buttonhole.
-
Raise buttonhole lever. * Buttonhole lever is being pulled or pushed against machine feeding
action. - STITCHING PROBLEMS 0DFKLQHVNLSV...MDPVNQRFNV * Thread is not lowered - Draw both threads back under presser
foot before starting seam. - Remove lint (see page 20 - 21). Lower buttonhole lever. * Bobbin winder...
Similar Questions

Singer Model S800 Stops, Beeps And Shows Error Code E2 Immediately When Trying T
Wind a bobbin
Wind a bobbin
(Posted by ezm8031 3 years ago)

Cannot Start Machine It Keeps Beeping
not starting continues beep what do I do
not starting continues beep what do I do
(Posted by Jeanninebrideau 3 years ago)
I Get E7 Error Message On My Singer Model 7258 Sewing Machine. There Is No Refe
Error message E7 is up on my Singer Stylist model 7258 sewing machine. It is not working at all. I t...
Error message E7 is up on my Singer Stylist model 7258 sewing machine. It is not working at all. I t...
(Posted by ebellamybellamy9 5 years ago)

Stitches Are Coming Out
I am having trouble with the straight stitches being too loose and pull right out
I am having trouble with the straight stitches being too loose and pull right out
(Posted by reillyclan01 6 years ago)

Beeping From Singer Sewing Machine Stylist Ii 5625
My sewing machine will beep and stop sewing after three inches of sewing. I have taken it to be repa...
My sewing machine will beep and stop sewing after three inches of sewing. I have taken it to be repa...
(Posted by arusheria 9 years ago)