
Singer H74 Support Question
Singer H74 Support Question
Find answers below for this question about Singer H74.Need a Singer H74 manual? We have 2 online manuals for this item!
Question posted by lauraciszewski on July 30th, 2013
Going In Reverse
when I push on the foot pedal a beating sound occurs and the machine only goes in reverse
Current Answers
Related Singer H74 Manual Pages
Instruction Manual 2 - Page 3

... presser foot or changing the light. 10. Use this manual. Use only the attachments recommended by a person responsible for household use only. Return the appliance to the nearest authorized dealer or service center for its intended use the proper needle plate, as contained in this sewing machine. Do not pull or push fabric while...
Instruction Manual 2 - Page 4
... CONNECTING THE MACHINE TO THE POWER SOURCE 9 Connecting the machine 9 WINDING ...FOOT PRESSURE 17 STARTING SEWING 18 Start/stop button 18 Foot control 18 THREAD TENSION 19 CHANGING THE PRESSER FOOT 20 PRESSER FOOT CHART 21 MATCHING NEEDLE/ FABRIC/ THREAD 22 REPLACING THE NEEDLE 23 RAISE OR LOWER FEED DOGS 23 OPERATION BUTTONS 24-26 Start/stop button 24 Thread cutter button 24 Reverse...
Instruction Manual 2 - Page 5
... patterns 68 Clearing patterns or letters 68 Recalling and sewing the memorized pattern 69 WARNING FUNCTIONS 70-71 Warning animation message display 70 Instruction animation message display 70 Warning beeping sound 71 BUZZER SOUND 72 MAINTENANCE 73-74 Cleaning the screen 73 Cleaning the sewing machine surface 73 Cleaning the hook 73-74 TROUBLE SHOOTING...
Instruction Manual 2 - Page 13
... spool pin Sewing machine dust cover
H1D0073210
020H7A0001
Extension table
H7A0754210
SINGER style 2025 twin needle
006161008
Straight Stitch Foot
P 006916008
Darning/ Embroidery foot
006016008
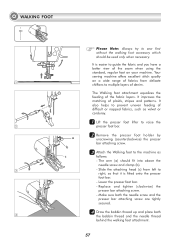
Walking foot
0061850081
Cording foot
M 006813008
Rolled hem foot
K 006900008
Gathering foot
006917008
Non-Stick Foot
006D3D0002
Roller Foot
006H5A0010
Invisible Zipper Foot
006E9R0001
Open...
Instruction Manual 2 - Page 16
...
"sewing position".
7 Hold the thread tail securely in one hand.
7
8 Press the Start/stop button or the foot control.
8
9 After the bobbin has wound a few turns stop the machine
and... position", the machine will not sew and the handwheel will not turn.
Push the bobbin winder spindle to left "sewing position".
11 WINDING THE BOBBIN
6 When the bobbin winder spindle is pushed to the right...
Instruction Manual 2 - Page 23
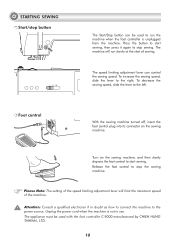
... speed limiting adjustment lever can be used to stop sewing. Attention: Consult a qualified electrician if in use. Foot control
With the sewing machine turned off, insert the foot control plug into its connector on the sewing machine, and then slowly depress the foot control to the left. To increase the sewing speed, slide the lever to the right, To...
Instruction Manual 2 - Page 29
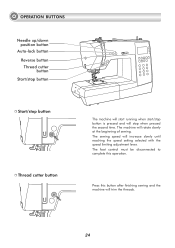
Press this operation. The foot control must be disconnected to complete this button after finishing sewing and the machine will rotate slowly at the beginning of sewing. OPERATION BUTTONS
Needle up/down position button
Auto-lock button Reverse button Thread cutter button
Start/stop button
Start/stop button Thread cutter button
The machine will start running when...
Instruction Manual 2 - Page 37
... as pant hems and cuffs.
32
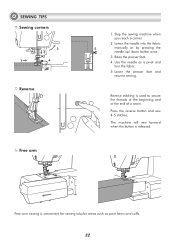
Free-arm sewing is convenient for sewing tubular areas such as a pivot and turn the fabric.
5. Lower the presser foot and resume sewing. Reverse stitching is released. Lower the needle into the fabric
5
manually or by pressing the
needle up/ down button once.
3.
Stop the sewing machine when you reach a corner.
2.
Instruction Manual 2 - Page 38
... the folded side.
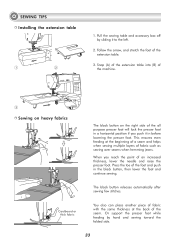
33 Snap (A) of the extension table into (B) of the machine.
3
Sewing on heavy fabrics
The black button on the right side of the foot and push in before lowering the presser foot. Cardboard or thick fabric
You also can place another piece of fabric with the same thickness at the beginning of...
Instruction Manual 2 - Page 43

... holes first, push work under the foot. Place the
button in the desired position, lower the foot.
3 Adjust the stitch width to " 2.5-4.5 "
according to the distance between the two holes of the button.
4 Turn the handwheel to check that the needle
goes cleanly into the left and right holes of the stitch. BUTTON SEWING
B-31...
Instruction Manual 2 - Page 60
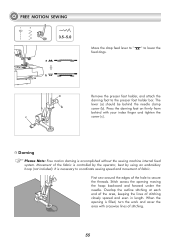
... fabric is accomplished without the sewing machine internal feed system. First sew around the edges of stitching closely spaced and even in length. " to lower the
Remove the presser foot holder, and attach the darning foot to " feed dogs. FREE MOTION SEWING
1
5
3.5~5.0
a b ba
a b
c
Move the drop feed lever to the presser foot holder bar. Darning
Please Note...
Instruction Manual 2 - Page 62
... which should fit into above the needle screw and clamp (b).
3
- It is fitted onto the presser
foot bar.
- The arm (a) should be used only when necessary.
Your
sewing machine offers excellent stitch quality
1
on a wide range of fabrics from left to
right, so that it is easier to guide the fabric and you...
Instruction Manual 2 - Page 63

... help feed difficult-to hold the fabric pieces together for sewing, which will line up with the opening of your fabric. 4. Sew slowly and guide the layers.
58 the needle should go over the stitch finger on the foot. Place fabric under and behind the foot. 2. Verify that the needle will prevent
either layer from...
Instruction Manual 2 - Page 70
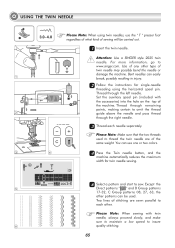
... the top of
the machine.
Thread through remaining
points, making certain to
each needle separately. Two lines of sewing will be used to thread the twin needle are sewn parallel to omit the thread
2
guide above the needle and pass thread
through the left needle. For more information, go to insure
6
quality stitching...
Instruction Manual 2 - Page 71
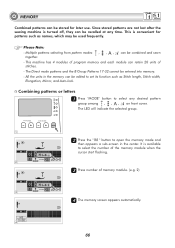
Please Note: - It is available
to select any time. This machine has 4 modules of program memory and each module can be combined and sewn
together....open the memory mode and
then appears a sub-screen in the center.
Since stored patterns are not lost after the sewing machine is convenient for later use. This is turned off, they can be recalled at any desired pattern
group among , ...
Instruction Manual 2 - Page 74
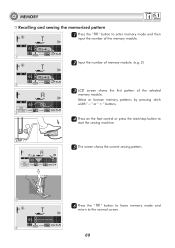
Select or browse memory patterns by pressing stitch
M
width " – " or " + " buttons.
3
44 Press on the foot control or press the start/stop button to
start the sewing machine.
4
M
55 The screen shows the current sewing pattern.
5
66 Press the "000" button to leave memory mode and
return to enter memory mode and then
input...
Instruction Manual 2 - Page 75
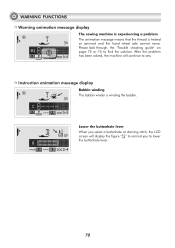
... message display
Bobbin winding The bobbin winder is twisted or jammed and the hand wheel axle cannot move.
WARNING FUNCTIONS Warning animation message display
The sewing machine is experiencing a problem The animation message means that the thread is winding the bobbin. After the problem has been solved, the...
Instruction Manual 2 - Page 76
... OFF position and then ON again.
71 Return bobbin winder shaft to left (disengaged) to allow the buttons to be sounded.
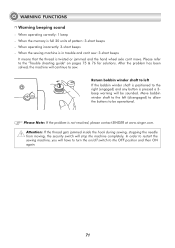
When operating incorrectly: 3-short beeps - In order to restart the sewing machine, you will have to turn the on pages 75 & 76 for solutions.
Move bobbin winder shaft to the left If...
Instruction Manual 2 - Page 78
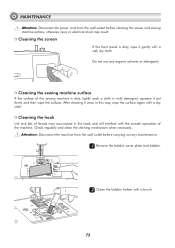
...with the smooth operation of the sewing machine is dirty, wipe it out firmly and then wipe the surface. Cleaning the sewing machine surface
If the surface of the machine. Check regularly and clean the... power cord from the wall outlet before cleaning the screen and sewing machine surface, otherwise injury or electrical shock may accumulate in the hook and will interfere with a ...
Instruction Manual 2 - Page 81
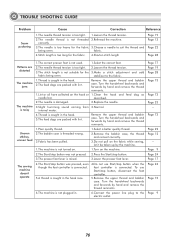
... feed dogs are distorted
The machine jams
The machine is noisy
Uneven stitches, uneven feed
The sewing machine doesn't operate
1.The correct presser foot is not used.
1.Select the correct foot.
2.The needle thread tension is too tight. 2.Loosen the thread tension.
3.The stitch length is damaged.
2.Replace the needle.
3.Slight humming sound coming from 3.Normal. stabilizer...
Similar Questions

I Get E7 Error Message On My Singer Model 7258 Sewing Machine. There Is No Refe
Error message E7 is up on my Singer Stylist model 7258 sewing machine. It is not working at all. I t...
Error message E7 is up on my Singer Stylist model 7258 sewing machine. It is not working at all. I t...
(Posted by ebellamybellamy9 5 years ago)


Beeping From Singer Sewing Machine Stylist Ii 5625
My sewing machine will beep and stop sewing after three inches of sewing. I have taken it to be repa...
My sewing machine will beep and stop sewing after three inches of sewing. I have taken it to be repa...
(Posted by arusheria 9 years ago)

Will Singer H74 Sewing Machine Go Into Sewing Machine Table
(Posted by vogelgeos 10 years ago)
