
Singer H74 Support Question
Singer H74 Support Question
Find answers below for this question about Singer H74.Need a Singer H74 manual? We have 2 online manuals for this item!
Question posted by bjmob on December 7th, 2012
Are Any Videos Available For The Singerh74?
The person who posted this question about this Singer product did not include a detailed explanation. Please use the "Request More Information" button to the right if more details would help you to answer this question.
Current Answers
Related Singer H74 Manual Pages
Instruction Manual 2 - Page 1

H74 Instruction Manual
Instruction Manual 2 - Page 3

...light. 10.
Do not allow to persons:
1. Never operate this manual. Switch the sewing machine off ("O") position, then remove plug from the electrical outlet when removing covers, lubricating, or.... Children should be supervised to the off ("O") when making any adjustments in this sewing machine. Return the appliance to break.
7. Do not unplug by the manufacturer as contained...
Instruction Manual 2 - Page 4
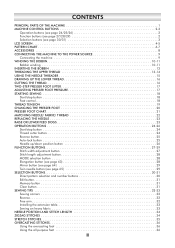
...6-7 ACCESSORIES 8 CONNECTING THE MACHINE TO THE POWER SOURCE 9 Connecting the machine 9 WINDING THE BOBBIN 10...-11 Bobbin winding 10-11 INSERTING THE BOBBIN 12 THREADING THE UPPER THREAD 13-14 USING THE NEEDLE THREADER 15 DRAWING UP THE LOWER THREAD 16 CUTTING THE THREAD 16 TWO-STEP PRESSER FOOT LIFTER 17 ADJUSTING PRESSER FOOT PRESSURE 17 STARTING SEWING...
Instruction Manual 2 - Page 5
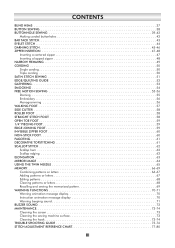
...HEMMING 49 CORDING 50 Single cording 50 Triple cording 50 SATIN STITCH SEWING 51 EDGE/QUILTING GUIDE 52 GATHERING 53 SMOCKING 54 FREE MOTION SEWING 55-56 Darning 55 Embroidery 56 Monogramming 56 WALKING FOOT 57 ...72 MAINTENANCE 73-74 Cleaning the screen 73 Cleaning the sewing machine surface 73 Cleaning the hook 73-74 TROUBLE SHOOTING GUIDE 75-76 STITCH ADJUSTMENT REFERENCE CHART ...
Instruction Manual 2 - Page 6
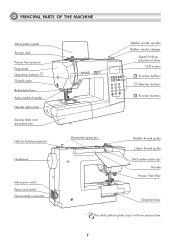
PRINCIPAL PARTS OF THE MACHINE
Stitch pattern plate Tension dial Presser foot pressure Face plate Operation buttons A Thread cutter Buttonhole lever Auto needle threader Needle plate cover
Sewing table and accessory box
Hole for Auxiliary spool pin
Handwheel
Main power switch Power cord socket Foot controller connector
Bobbin winder spindle Bobbin winder stopper...
Instruction Manual 2 - Page 7
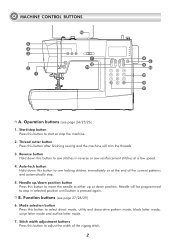
... stitches at the end of the zigzag stitch.
2
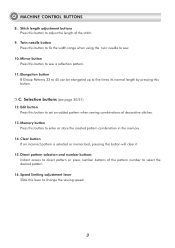
Mode selection button Press this button after finishing sewing and the machine will be programmed to sew stitches in selected position until button is pressed again. Function buttons (see page 24/25/26)
1. Reverse button Hold down this button to select direct ...
Instruction Manual 2 - Page 8
... 45 can be elongated up to sew a reflection pattern.
11. C. Mirror button Press this button to five times its normal length by pressing this button to adjust the length of the stitch.
9. Direct pattern selection and number buttons Instant access to select the desired pattern.
16. MACHINE CONTROL BUTTONS
8. Selection buttons (see...
Instruction Manual 2 - Page 13
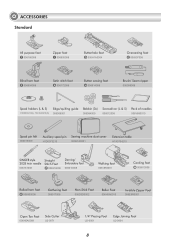
... (L & S) Edge/quilting guide Bobbin (3x) Screwdriver (L & S) Pack of needles
H1D0083210(L) TA10943210(S) 006008001
006084009
006012008
006V880010
Spool pin felt
006015009
Auxiliary spool pin Sewing machine dust cover
H1D0073210
020H7A0001
Extension table
H7A0754210
SINGER style 2025 twin needle
006161008
Straight Stitch Foot
P 006916008
Darning/ Embroidery foot
006016008
Walking foot...
Instruction Manual 2 - Page 14
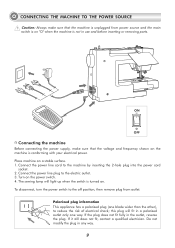
... the power switch. 4. this plug will light up when the switch is turned on the machine is conforming with your electrical power. The sewing lamp will fit in use and before inserting or removing parts. If the plug does not fit fully in any way.
9 Connect the power line ...
Instruction Manual 2 - Page 16
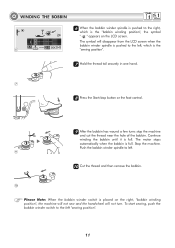
... "bobbin winding position", the symbol " " appears on the right, "bobbin winding position", the machine will not sew and the handwheel will disappear from the LCD screen when the
bobbin winder spindle is pushed to left "sewing position".
11 To start sewing, push the bobbin winder switch to the left .
9
10 Cut the thread and...
Instruction Manual 2 - Page 23
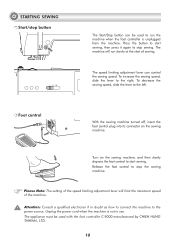
... a qualified electrician if in use. Unplug the power cord when the machine is unplugged from the machine. The speed limiting adjustment lever can be used to start sewing. Foot control
With the sewing machine turned off, insert the foot control plug into its connector on the sewing machine, and then slowly depress the foot control to start...
Instruction Manual 2 - Page 37
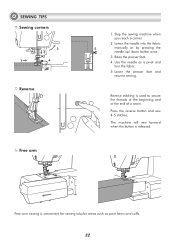
... the fabric.
5. Lower the needle into the fabric
5
manually or by pressing the
needle up/ down button once.
3. The machine will sew forward when the button is used to secure the threads at the beginning and at the end of a seam.
Stop the sewing machine when you reach a corner.
2. SEWING TIPS Sewing corners
3 2
1
4
Reverse
Free arm
1.
Instruction Manual 2 - Page 60
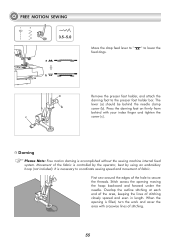
...firmly from behind the needle clamp screw (b).
It is accomplished without the sewing machine internal feed system. First sew around the edges of stitching closely spaced and even in length. "... stitching at each end of the area, keeping the lines of the hole to coordinate sewing speed and movement of fabric.
Movement of stitching.
55
Stitch across the opening is controlled...
Instruction Manual 2 - Page 62
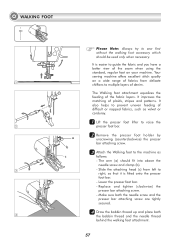
Your
sewing machine offers excellent stitch quality
1
on your machine. Slide the attaching head (c) from delicate
chiffons to multiple layers of denim. It improves the matching of the fabric layers. a b
22 Remove the presser foot holder by
unscrewing (counterclockwise) the presser
bar attaching screw.
33 Attach the Walking foot to the machine as velvet or...
Instruction Manual 2 - Page 71
...sewn
together. -
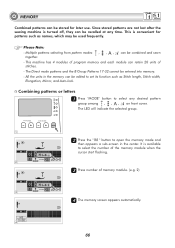
All the units in the center. Since stored patterns are not lost after the sewing machine is turned off, they can be used frequently. It is convenient for later use.
The LED ...for patterns such as Stitch length, Stitch width,
Elongation, Mirror, and Auto-lock. This is available
to select the number of the memory module when the
M
cursor start flashing.
2
33 Press ...
Instruction Manual 2 - Page 74
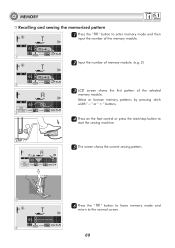
... by pressing stitch
M
width " – " or " + " buttons.
3
44 Press on the foot control or press the start/stop button to
start the sewing machine.
4
M
55 The screen shows the current sewing pattern.
5
66 Press the "000" button to leave memory mode and
return to enter memory mode and then
input the number of...
Instruction Manual 2 - Page 75
... buttonhole lever When you select a buttonhole or darning stitch, the LCD screen will continue to find the solution.
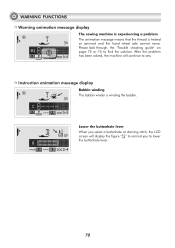
WARNING FUNCTIONS Warning animation message display
The sewing machine is experiencing a problem The animation message means that the thread is winding the bobbin. Instruction animation message display
Bobbin winding The bobbin winder is twisted...
Instruction Manual 2 - Page 76
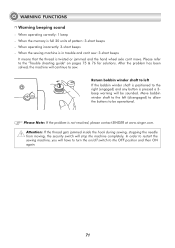
When the sewing machine is in trouble and can't sew: 3-short beeps
It means that the thread is pressed a 3beep warning will continue to turn the on pages 75 & 76 for solutions.... left If the bobbin winder shaft is positioned to the OFF position and then ON again.
71 In order to restart the sewing machine, you will stop the machine completely.
WARNING FUNCTIONS Warning beeping sound
-
Instruction Manual 2 - Page 78
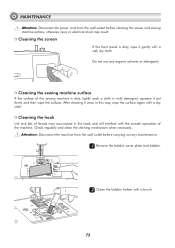
... any maintenance.
11 Remove the bobbin cover plate and bobbin.
1
22 Clean the bobbin holder with a brush.
2
73 Cleaning the sewing machine surface
If the surface of the machine. Attention: Disconnect the machine from the wall socket before carrying out any organic solvents or detergents. MAINTENANCE
Attention: Disconnect the power cord from the wall...
Instruction Manual 2 - Page 81
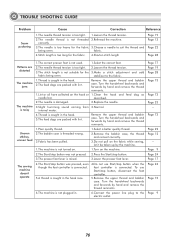
...foot controller is not turned on.
3.Do not pull on the fabric while sewing, let it be taken up by the machine.
1.Turn on the hook or 1.Clean the hook and feed dog as
...stitch length
Page 19 Page 13
Page 22
Page 28
Patterns are distorted
The machine jams
The machine is noisy
Uneven stitches, uneven feed
The sewing machine doesn't operate
1.The correct presser foot is not used.
1.Select the ...
Similar Questions

I Get E7 Error Message On My Singer Model 7258 Sewing Machine. There Is No Refe
Error message E7 is up on my Singer Stylist model 7258 sewing machine. It is not working at all. I t...
Error message E7 is up on my Singer Stylist model 7258 sewing machine. It is not working at all. I t...
(Posted by ebellamybellamy9 5 years ago)


Beeping From Singer Sewing Machine Stylist Ii 5625
My sewing machine will beep and stop sewing after three inches of sewing. I have taken it to be repa...
My sewing machine will beep and stop sewing after three inches of sewing. I have taken it to be repa...
(Posted by arusheria 9 years ago)

Will Singer H74 Sewing Machine Go Into Sewing Machine Table
(Posted by vogelgeos 10 years ago)
