Singer 9970 Support Question
Singer 9970 Support Question
Find answers below for this question about Singer 9970.Need a Singer 9970 manual? We have 1 online manual for this item!
Question posted by lizwrd6 on October 13th, 2019
Service Repair Manuak
I have the User Instruction Manual. I need the Service Repair Manual for the Singer 9970 Quantum Stylist
Current Answers
Answer #1: Posted by camrynokihiro on November 3rd, 2019 1:51 PM
camrynokihiro

Member since:
November 3rd, 2019 Points: 8,790

Member since:
November 3rd, 2019 Points: 8,790
Related Singer 9970 Manual Pages
Instruction Manual - Page 1
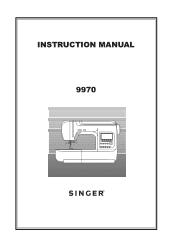
INSTRUCTION MANUAL 9970
Instruction Manual - Page 2
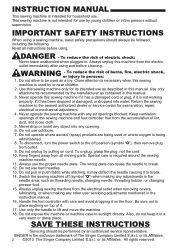
... for its intended use outdoors. 7. Return the sewing machine to the off (symbol "O") when making any object into water. Handle the foot controller with any adjustments in the instruction manual. 16.
To reduce the risk of The Singer Company Limited S.à.r.l. Never drop or insert any other user servicing adjustments mentioned in the needle area, such as...
Instruction Manual - Page 3
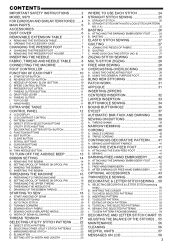
... .......... 8 CONNECTING THE MACHINE 9 FOOT CONTROLLER 9 ...SEWING 28 OVERCASTING-OVERLOCKING 29
A. TRIPLE CORDING 40
CONTINUOUS DECORATIVE PATTERN ........ 41
A. ATTACHING THE DARNING/ EMBROIDERY FOOT .......... 42 B. SELECTING DECORATIVE & LETTER STITCH (selecting mode 50
B. SHIFTING THE CURSOR 51 C. EDITING OF EACH PATTERN 52 G. CONTENTS
IMPORTANT SAFETY INSTRUCTIONS 2 MODEL 9970...
Instruction Manual - Page 4
...pin plug.
4
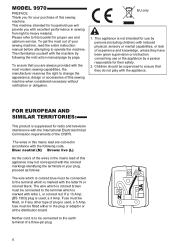
The wires in your sewing machine, read the entire instruction manual before attempting to this mains lead are ...machine by page. EU only
1.
To ensure that they have been given supervision or instruction concerning use will provide you are colored in accordance with the colored markings identifying the terminals in this booklet for use and optimum service...
Instruction Manual - Page 6
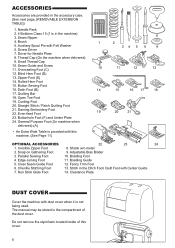
... Bias Binder
3. Parallel Sewing Foot
10. Braiding Guide
5. Non Stick Glide Foot
14. Clearance Plate
DUST COVER
Cover the machine with Felt Washer 6. ...machine. (See Page 11)
OPTIONAL ACCESSORIES
22
23
24
1. Seam Ripper
8
4. Zipper Foot (E)
14. Buttonhole Foot (F) and Under Plate
24. Clear Seam Guide Foot
12. Shank w/o metal
2. Edge Joining Foot
11. The manual...
Instruction Manual - Page 7
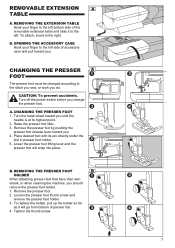
To attach, insert to the stitch you sew, or work you .
Lower the presser foot lifting lever and the
presser foot will go... toward you . 4. REMOVING THE PRESSER FOOT HOLDER
When attaching presser feet that have their own shank, or when cleaning the machine, you change the presser foot. CAUTION: To prevent accidents. Raise the presser foot lifter. 3. Place desired foot with its ...
Instruction Manual - Page 9
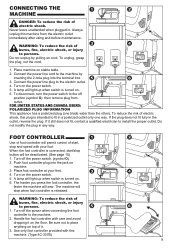
... at your foot. Turn off the power switch. (symbol O) 2. FOR UNITED STATES AND CANADA USERS: POLARIZED PLUG INFORMATION This appliance has a polarized plug (one way. If the plug does not fit... controller plug into the terminal box. 3. A lamp will sew. The harder you press the foot controller, the
faster the machine will light up when switch is connected, start , stop and speed with...
Instruction Manual - Page 10
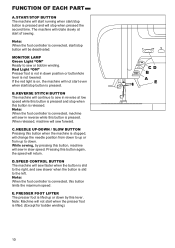
... buttonhole lever is pressed and will not start /stop when pressed the second time. If the red light is on, the machine will sew in reverse while this button when the machine is pressed.
NEEDLE UP-DOWN / SLOW BUTTON Pressing this button is stopped, will return.
Note: When the foot controller is connected...
Instruction Manual - Page 11
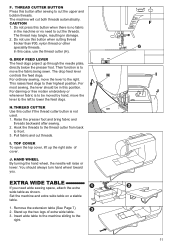
...feed dogs project up the two legs of cover. Their function is no fabric
in the machine or no need wide sewing space, attach the extra wide table as shown. The drop feed lever controls the feed ...dogs. This raises feed dogs to lower the feed dogs. For most sewing, the lever should always turn hand wheel toward you need to move the fabric being sewn. For darning or free motion embroidery or...
Instruction Manual - Page 13
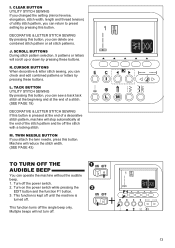
... During stitch pattern selection, 5 patterns or letters will stop automatically at the end of utility stitch pattern, you can operate the machine without the audible beep. 1. CLEAR BUTTON UTILITY STITCH SEWING If you changed the setting (mirror/reverse, elongation, stitch width, length and thread tension) of a stitch. (SEE PAGE 19)
DECORATIVE & LETTER...
Instruction Manual - Page 18
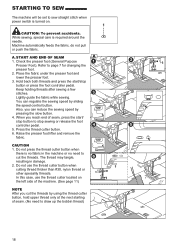
... press the foot controller pedal. Also, you reach end of seam. (No need to cut the threads by pressing the slow button. 4. Do not press the thread cutter button when
there is required around the needle. STARTING TO SEW
The machine will be set to page 7 for changing the presser foot. 2. A. Raise the...
Instruction Manual - Page 19
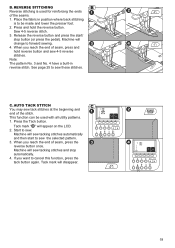
... pattern No. 3 and No. 4 have a built-in position where back stitching
is used with all utility patterns. 1. See page 25 to forward sewing. 4.
Sew 4-5 reverse stitch. 3. Machine will change to sew these stitches. When you reach the end of seam, press the reverse button once. C. Tack mark " " will disappear.
19
Tack mark will appear...
Instruction Manual - Page 20
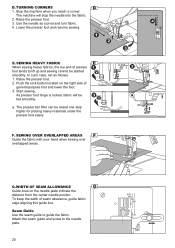
.... 1. In such case, set as a pivot and turn fabric. 4. a.
TURNING CORNERS 1.
Raise the presser foot. 2.
SEWING OVER OVERLAPPED AREAS Guide the fabric with your hand when sewing over overlapped areas. The machine will be fed smoothly. Start sewing. SEWING HEAVY FABRIC When sewing heavy fabrics, the toe end of presser foot tends to lift up and...
Instruction Manual - Page 21
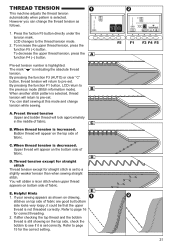
..., thread tension will return to page 15 for correct threading. 2. THREAD TENSION
This machine adjusts the thread tension automatically when pattern is increased. When thread tension is selected. ...after checking the top thread and the bobbin thread is highlighted.
However you can start sewing at this mode and change the thread tension as shown on drawing,
stitches on the...
Instruction Manual - Page 23
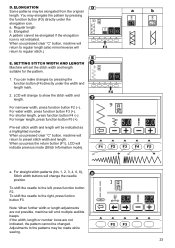
...2, 3, 4, 6, 8), Stitch width buttons will return to the patterns may be made while sewing.
23 Regular length b. For wider width, press function button F3 (+).
Adjustments to preset stitch ...the stitch width and length suitable for the pattern.
1. When you pressed clear "C" button, machine will return to regular length (also mirror/reverse will change the needle position. a. Note: ...
Instruction Manual - Page 25
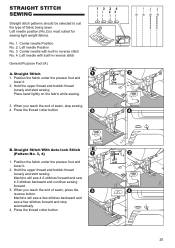
... you reach the end of seam, press the reverse button. B. Straight Stitch With Auto-lock Stitch (Pattern No. 3, 4)
1. Machine will sew a few stitches backward and sew a few stitches forward and stop sewing. 4. Machine will sew 4-5 stitches forward and sew 4-5 stitches backward and continue sewing forward.
3. Straight Stitch 1. When you reach the end of fabric being sewn. STRAIGHT STITCH...
Instruction Manual - Page 26
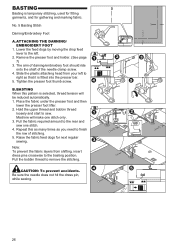
...need to right so that it is temporary stitching, used for fitting garments, and for next regular sewing. Raise the fabric feed dogs for gathering and marking fabric. Be sure the needle does not hit the dress pin, while sewing...Pull the bobbin thread to sew.
Place the fabric under the presser foot and then
lower the presser foot lifter. 2.
B. Machine will be reduced automatically....
Instruction Manual - Page 39
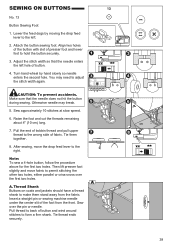
...to adjust the stitch width again. Sew over the first two holes. Otherwise needle may need to the wrong side of button.
4. Insert a straight pin or sewing machine needle under the center slit of... button with slot of button and wind around stitches to hold the button securely.
3. Note: To sew a 4-hole button, follow the procedure above for the first two holes.
Tie thread ends securely....
Instruction Manual - Page 46
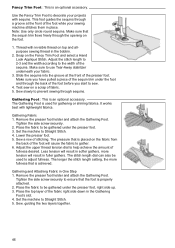
... be gathered under the foot and through a groove at the front of the foot while your projects with lightweight fabrics. Sew, guiding the two layers together.
46 Set the machine to decorate your sewing machine stitches them in fuller gathers. Lower the presser foot. 5. Remove the presser foot holder and attach the Gathering Foot...
Instruction Manual - Page 54
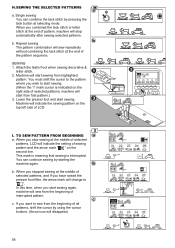
... combining the tack stitch at the end of interrupted pattern.
SEWING 1. Machine will indicate the sewing pattern on the top left side of sewing pattern and the arrow mark " " on the right side of selected patterns, machine will disappear)
54 Machine will start sewing. When you stop sewing at the middle of selected patterns, and If you have...
Similar Questions

Classes On How To Use Singer 9970 Sewing Machine
I bought the sewing machine during the pandemic and would like to learn how to use it- functions, st...
I bought the sewing machine during the pandemic and would like to learn how to use it- functions, st...
(Posted by Connienm 1 year ago)

I Get E7 Error Message On My Singer Model 7258 Sewing Machine. There Is No Refe
Error message E7 is up on my Singer Stylist model 7258 sewing machine. It is not working at all. I t...
Error message E7 is up on my Singer Stylist model 7258 sewing machine. It is not working at all. I t...
(Posted by ebellamybellamy9 5 years ago)

Why Won't My Machine Sew, Checked Bobbin And Retreaded. Has Power Just Will Not
the machine has power and threade correctly and bobbin is in right. It did freeze on me when sewing....
the machine has power and threade correctly and bobbin is in right. It did freeze on me when sewing....
(Posted by alewis41 7 years ago)
9970 Beeps 3 Times And Won't Sew
I have a 9970. The needle broke, I have replaced it and made sure nothing is caught in the bobbin ar...
I have a 9970. The needle broke, I have replaced it and made sure nothing is caught in the bobbin ar...
(Posted by Gawlynn 8 years ago)

Beeping From Singer Sewing Machine Stylist Ii 5625
My sewing machine will beep and stop sewing after three inches of sewing. I have taken it to be repa...
My sewing machine will beep and stop sewing after three inches of sewing. I have taken it to be repa...
(Posted by arusheria 9 years ago)