Singer 9970 Support Question
Singer 9970 Support Question
Find answers below for this question about Singer 9970.Need a Singer 9970 manual? We have 1 online manual for this item!
Question posted by Gawlynn on May 14th, 2015
9970 Beeps 3 Times And Won't Sew
I have a 9970. The needle broke, I have replaced it and made sure nothing is caught in the bobbin area. Now the needle is all the way to the left, it does not change positions when I change stitches and it beeps 3 times and will not sew when I push start. Any suggestions
Current Answers
Answer #1: Posted by waelsaidani1 on May 15th, 2015 7:05 AM
waelsaidani1

Member since:
May 12th, 2013 Points: 19,501,777

Member since:
May 12th, 2013 Points: 19,501,777
Hello follow troubleshooting instructions here: https://www.youtube.com/watch?v=O7N4XaIV6ms
Related Singer 9970 Manual Pages
Instruction Manual - Page 2
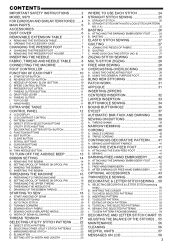
... manual. 16. IMPORTANT SAFETY INSTRUCTIONS
When using and before using. To unplug, grasp the plug, not the cord. 10. Close attention is necessary when this machine from all instructions before cleaning.
SINGER is used as threading needle, changing needle, threading bobbin, or changing presser foot. 15. Special care is required around the sewing machine needle. 11.
Instruction Manual - Page 3
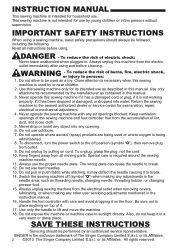
...BUTTON 10 B. PRESSER FOOT LIFTER 10 F. UTILITY STITCH BUTTON 12 F. REMOVING THE BOBBIN 14 B. PREPARING TO THREAD MACHINE 16 B. THREADING THE NEEDLE EYE 17 E. DRAWING UP THE BOBBIN THREAD 17
STARTING TO SEW 18
A. SEWING OVER OVERLAPPED AREAS 20 G. TO DELETE PATTERN 51 F. SEWING THE SELECTED PATTERNS 54 I . DIRECT STITCH SELECTION BUTTONS 12 E. SETTING SPOOL OF THREAD...
Instruction Manual - Page 4
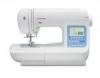
... accordance with the machine by following code. MODEL 9970
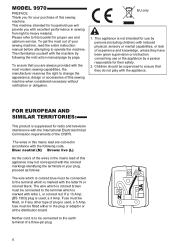
PREFACE Thank you ...change the appearance, design or accessories of this mains lead are colored in your plug, proceed as follows:
The wire which is used , a 3 Amp. The wires in sewing from light to the terminal which is colored brown must be supervised to ensure that you with excellent performance in this sewing machine...
Instruction Manual - Page 7
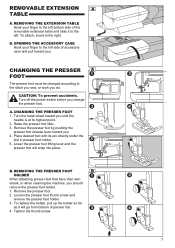
... that have their own shank, or when cleaning the machine, you change the presser foot. Tighten the thumb screw.
7 B....replace the holder, pull up the holder as far
as it to the right. Remove the presser foot by pushing the
presser foot release lever toward you until the
needle... stitch you sew, or work you . CHANGING THE PRESSER FOOT
The presser foot must be changed according to the left ...
Instruction Manual - Page 10
... /stop when pressed the second time.
Note: When the foot controller is not lowered.
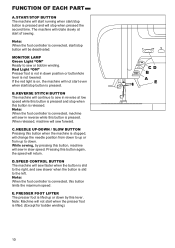
NEEDLE UP-DOWN / SLOW BUTTON Pressing this button is on, the machine will sew in reverse at start /stop when this button when the machine is stopped, will sew in down position or buttonhole lever is connected, machine will change the needle position from down . Note: When...
Instruction Manual - Page 13
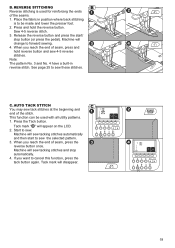
... will stop automatically at the end of utility stitch pattern, you can sew a back tack stitch at the beginning and at the end of a stitch. (SEE PAGE 19)
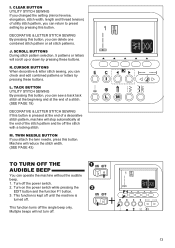
DECORATIVE & LETTER STITCH SEWING If this button. TACK BUTTON UTILITY STITCH SEWING By pressing this button, you can operate the machine without the audible beep. 1. Machine will not turn off .
Turn off the...
Instruction Manual - Page 19
... presser foot. 2.
Machine will change to sew. REVERSE STITCHING Reverse stitching is to sew the selected pattern. 3. Press the Tack button. Start to forward sewing. 4. If you reach the end of seam, press the reverse button once. Place the fabric in reverse stitch. Sew 4-5 reverse stitch. 3. Note: The pattern No. 3 and No. 4 have a built-in position where back stitching
is used...
Instruction Manual - Page 20
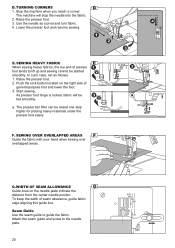
... can be fed smoothly. SEWING OVER OVERLAPPED AREAS Guide the fabric with your hand when sewing over overlapped areas.
As presser foot hinge is locked, fabric will stop the needle into the fabric. 2. Raise the presser foot. 3. To keep the width of presser foot tends to guide the fabric. Stop the machine when you reach a corner...
Instruction Manual - Page 23
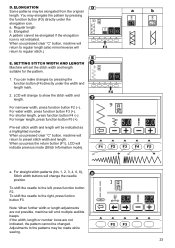
... funtion button F3. D. SETTING STITCH WIDTH AND LENGTH Machine will be made while sewing.
23 You can make changes by pressing the function button (F3) directly under the width and length mark.
2.
To shift the needle to the left, press function button F2. When you pressed clear "C" button, machine will emit multiple audible beeps. a. Elongated A pattern cannot be...
Instruction Manual - Page 25
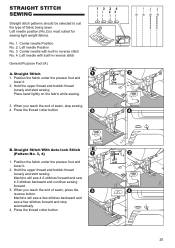
... needle Position No. 2. Left needle Position No. 3. Center needle with built-in reverse stitch No. 4. When you reach the end of fabric being sewn.
B. Hold the upper thread and bobbin thread loosely and start sewing. Machine will sew a few stitches backward and sew a few stitches forward and stop sewing. 4. Machine will sew 4-5 stitches forward and sew 4-5 stitches backward...
Instruction Manual - Page 26
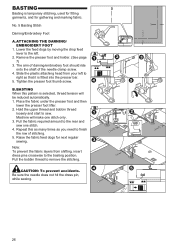
... fabric under the presser foot and then
lower the presser foot lifter. 2. Hold the upper thread and bobbin thread
loosely and start to the left to the rear and sew one stitch only. 3. Be sure the needle does not hit the dress pin, while sewing.
26 Lower the feed dogs by moving the drop feed lever to...
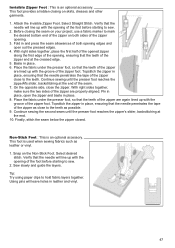
Instruction Manual - Page 32
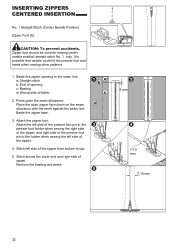
...left side of the presser foot pin to top.
5. Stitch left side of the zipper from bottom to the holder when sewing the left side of the presser foot pin to the presser foot holder when sewing...basting and press.
5 mm
7-10 mm
7-10 mm
32 Zipper foot should be used for sewing center needle position straight stitch No. 1 only. Baste the zipper opening c: Basting d: Wrong side of zipper. Press ...
Instruction Manual - Page 33
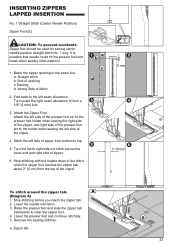
... foot pin to the holder when sewing the left side of the zipper.
5 mm 7-10 mm
To stitch around the zipper tab: (Diagram A) 1. Remove the basting stitches. It is possible that needle could hit the presser foot and break when sewing other patterns.
1. a. Zipper foot should be used for sewing center needle position straight stitch No. 1 only. Attach the Zipper...
Instruction Manual - Page 34

... fabrics, it is suggested that the center line mark is not positioned all the way forward.
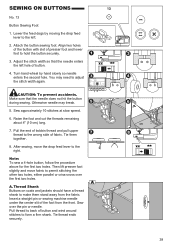
6. Decorative Buttonhole 114. Stretch Buttonhole 115. Mark position and length of buttonhole foot and bring upper and bobbin threads to sew. a = Length of buttonholes.
104.
This machine can sew 13 types of button + thickness
3. Round Ended Buttonhole (Wide) for heavy weight...
Instruction Manual - Page 38

... lifter to the left.
3.
Position fabric under presser foot so that will stop automatically when the pattern is not positioned correctly.
5. Lower the buttonhole lever completely. Machine will be subject to the length of buttonhole foot and bring upper and bobbin threads to remove the fabric.
1
2
3
4
1
2
38 Adjust slide on the thick area. Pass upper thread...
Instruction Manual - Page 39
... adjust the stitch width again. Sew over the first two holes. Adjust the stitch width so that the needle does not hit the button during sewing. Make sure that the needle enters the left .
2. Pull thread to back of fabric. After sewing, move fabric to the left hole of the foot from the fabric. Insert a straight pin or sewing machine needle under the...
Instruction Manual - Page 46
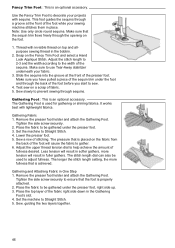
... lightweight fabrics. Make sure to gather. 6. Slide the sequins into the groove at the front of the foot while your sewing machine stitches them in softer gathers, more fullness that is an optional accessory. Gathering Foot : This is placed on the fabric from
the back of the sequins.
Set the machine to the width of...
Instruction Manual - Page 47
...fabric marker to hold fabric layers together. Select desired stitch. Attach the Invisible Zipper Foot. Verify that the teeth of the zipper close to sew.
2. Fold in place, ensuring that the teeth of... sure the two sides of the seam. 7. Sew slowly and guide the layers. Non-Stick Foot : This is an optional accessory. Place the fabric under the presser foot, so that the needle ...
Instruction Manual - Page 54
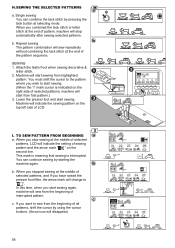
... the top left side of pattern, machine will disappear)
54 Machine will start from the beginning of the pattern sequence.
Single sewing You can continue sewing by pressing the tack button at the middle of selected
patterns, LCD will change to start sewing. When you stop automatically after sewing selected patterns. Attach the Satin Foot when sewing decorative &
letter stitch...
Instruction Manual - Page 58
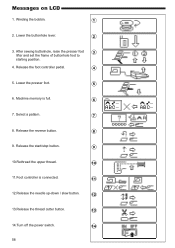
... Winding the bobbin.
1
2. After sewing buttonhole, raise the presser foot
3
lifter and set the frame of buttonhole foot to
starting position.
4. Release the reverse button.
8
9. Release the start/stop button.
9
10.Rethread the upper thread.
10
11.Foot controller is full.
6
7. Lower the buttonhole lever.
2
3. Machine memory is connected.
11
12.Release the needle up...
Similar Questions

Classes On How To Use Singer 9970 Sewing Machine
I bought the sewing machine during the pandemic and would like to learn how to use it- functions, st...
I bought the sewing machine during the pandemic and would like to learn how to use it- functions, st...
(Posted by Connienm 1 year ago)

I Have A M3500 Singer Sewing Machine .got Tread Tangled In The Bobbin Area .just
(Posted by guitijoon 2 years ago)

Singer7470 Making A Beeping Sound And Not Working
hi my singer 7470 which i just recieved is making a beeping sound every time i press the pedal and i...
hi my singer 7470 which i just recieved is making a beeping sound every time i press the pedal and i...
(Posted by jamespyper 3 years ago)

Singer 9970 Not Sewing Correctly On Bottom Thread
stop stitches look great but bottom thread shows top top thread loops
stop stitches look great but bottom thread shows top top thread loops
(Posted by patejbja 4 years ago)

Why Won't My Machine Sew, Checked Bobbin And Retreaded. Has Power Just Will Not
the machine has power and threade correctly and bobbin is in right. It did freeze on me when sewing....
the machine has power and threade correctly and bobbin is in right. It did freeze on me when sewing....
(Posted by alewis41 7 years ago)