Singer 9970 Support Question
Singer 9970 Support Question
Find answers below for this question about Singer 9970.Need a Singer 9970 manual? We have 1 online manual for this item!
Question posted by loripursey on September 6th, 2020
How Do I Adjust The Stitch Length
I need a longer stitch length. the stitches are so short they are causing the material to bunch up. How do I fix this problem
Current Answers
Answer #1: Posted by Odin on September 6th, 2020 9:41 AM
Odin

Member since:
April 10th, 2010 Points: 41,236,670

Member since:
April 10th, 2010 Points: 41,236,670
See par. 4 of section B at https://www.manualslib.com/manual/562110/Singer-9970.html?page=22#manual.
If the issue persists or if you require further advice--or if the instructions don't seem to apply--you'll have to consult the company; use the contact information at https://www.contacthelp.com/singer/customer-service.
Hope this is useful. Please don't forget to click the Accept This Answer button if you do accept it. My aim is to provide reliable helpful answers, not just a lot of them. See https://www.helpowl.com/profile/Odin.
Related Singer 9970 Manual Pages
Instruction Manual - Page 2
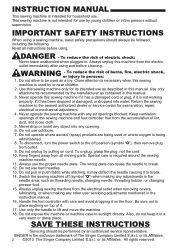
...stitching. Do not expose the machine or machine case to be used as threading needle, changing needle, threading bobbin, or changing presser foot. 15. IMPORTANT SAFETY INSTRUCTIONS
When using a sewing machine... plate can cause the needle to break. 14. Handle the foot controller with any adjustments in the instruction manual. 16. DANGER - Always unplug this sewing machine is used or...
Instruction Manual - Page 3
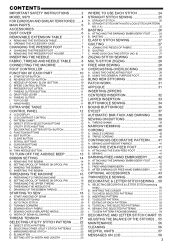
...SEWING 49 DECORATIVE & LETTER STITCH SEWING ... 50
A. SHIFTING THE CURSOR 51 C. TO CHECK SELECTED PATTERNS 51 D. TO SEW PATTERN FROM BEGINNING 54
DECORATIVE AND LETTER STITCH CHART 55 ADJUSTING THE BALANCE OF THE STITCHES...BUTTON 11 G. SETTING STITCH WIDTH AND LENGTH 23
WHERE TO USE EACH STITCH 24 STRAIGHT STITCH SEWING 25
A. DARNING 42 C. UTILITY STITCH BUTTON 12 F. ...
Instruction Manual - Page 4
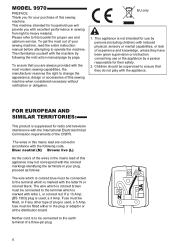
... not intended for use or the appliance by a person responsible for your sewing machine, read the entire instruction manual before attempting to heavy material. MODEL 9970
PREFACE Thank you are colored in accordance with excellent performance in sewing from light to operate the machine. EU only
1.
Blue: neutral (N) Brown: live (L)
As the colors of the wires...
Instruction Manual - Page 6
...
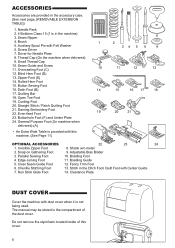
8. Snap on Gathering Foot
9. Clear Seam Guide Foot
12.
Seam Guide and Screw 11. Adjustable Bias Binder
3. Braiding Foot
4. Fancy Trim Foot
6. Do not remove the styrofoam located inside of...
16 17
18
17. Straight Stitch / Patch Quilting Foot
21. Seam Ripper
8
4. Small Thread Cap
10. Button Sewing Foot
16. General Purpose Foot (On machine when
delivered) (A)
• ...
Instruction Manual - Page 11
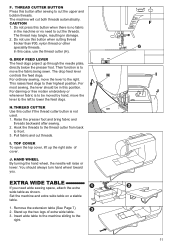
... lever to front. 3.
Do not use the thread cutter (H). Remove the extension table (See Page 7) 2. Their function is no need wide sewing space, attach the extra wide table as shown. F. Set the machine and extra wide table on a stable table.
1.
THREAD CUTTER BUTTON Press this position. For darning or free motion embroidery or...
Instruction Manual - Page 13
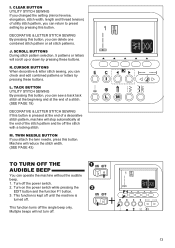
... end of the stitch pattern and tie off the stitch with a locking stitch.
L. Turn off the single beep only. CLEAR BUTTON UTILITY STITCH SEWING If you changed the setting (mirror/reverse, elongation, stitch width, length and thread tension) of a stitch. (SEE PAGE 19)
DECORATIVE & LETTER STITCH SEWING If this button. This function is kept off until the machine is pressed at...
Instruction Manual - Page 18
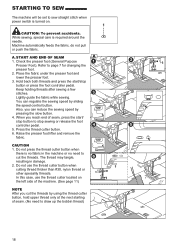
... threads. The thread may tangle, resulting in the machine or no fabric in damage. 2. STARTING TO SEW
The machine will be set to sew straight stitch when power switch is required around the needle. While sewing, special care is turned on the left side of seam. (No need to cut the threads by using the thread cutter...
Instruction Manual - Page 19
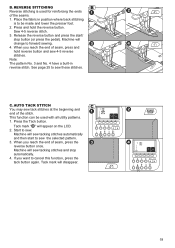
... stop button (or press the pedal). Place the fabric in reverse stitch. C. B. Sew 4-5 reverse stitch. 3. Machine will sew tacking stitches automatically and then start /
stop automatically. 4. See page 25 to sew.
Press and hold reverse button and sew 4-5 reverse stitches. AUTO TACK STITCH You may sew tack stitches at the beginning and end of seam, press the reverse button once...
Instruction Manual - Page 23
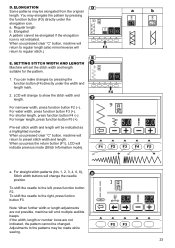
... to show the stitch width and length. SETTING STITCH WIDTH AND LENGTH Machine will set stitch width and length will return to the patterns may elongate the pattern by pressing the function button (F4) directly under the elongation icon.
To shift the needle to the right, press funtion button F3. Note: When further width or length adjustments are not...
Instruction Manual - Page 25
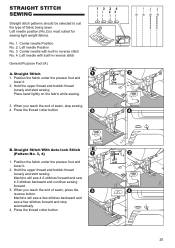
... and lower it . 2. Machine will sew 4-5 stitches forward and sew 4-5 stitches backward and continue sewing forward.
3. No. 1.
Hold the upper thread and bobbin thread loosely and start sewing. Left needle position (No.2) is most suited for sewing light weight fabrics.
Press the thread cutter button. Machine will sew a few stitches backward and sew a few stitches forward and stop...
Instruction Manual - Page 26
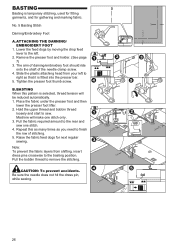
... times as you need to finish the row of the needle clamp screw.
4. Machine will be reduced automatically. 1. Repeat this pattern is selected, thread tension will make one stitch. 4. Raise the... dress pins crosswise to the rear and sew one stitch only. 3. B. Hold the upper thread and bobbin thread
loosely and start to remove the stitching.
BASTING
Basting is fitted into the presser...
Instruction Manual - Page 34

...button does not fit on the base, adjust slide on the base. Lower the foot while pulling the frame of the buttonhole foot.
Lower the buttonhole lever completely. Note: Machine will not start the machine.
34 This machine can sew 13 types of button + thickness
3. ...107. Decorative Buttonhole 114. Pass upper thread through the hole of the buttonhole may be adjusted with stitch length control.
1.
Instruction Manual - Page 37
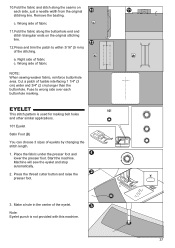
... sew the eyelet and stop automatically.
2. Wrong side of fabric c. EYELET
This stitch pattern is not provided with this machine.
37 Make a hole in the center of fusible interfacing 1 1/4" (3 cm) wider and 3/4" (2 cm) longer than the buttonhole. Cut a patch of the eyelet. Start the machine. a. Fuse to within 3/16" (5 mm) of eyelets by changing the stitch length...
Instruction Manual - Page 38

... to the length of buttonhole foot and bring upper and bobbin threads to sew if buttonhole lever is not lowered properly or buttonhole foot is finished.
7.
Machine will be subject... to reinforce areas that the starting point is on the thick area.
Buttonhole Foot (F)
1. Adjust...
Instruction Manual - Page 39
... shank. Otherwise needle may need to make them together.
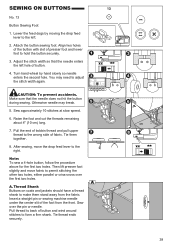
8. Raise the foot and cut the threads remaining about 4" (10 cm) long.
7. After sewing, move fabric to the ... SEWING ON BUTTONS
No. 13
Button Sewing Foot
1. Thread Shank Buttons on coats and jackets should have a thread shank to adjust the stitch width again. CAUTION: To prevent accidents. Insert a straight pin or sewing machine ...
Instruction Manual - Page 41

... fitted into the presser bar. 4. Experiment with fabric scraps until you may adjust the length and width of very difficult fabrics. Use this foot also for continuous decorative stitch patterns. Remove the presser foot and holder. (See page
7) 2. SEWING LIGHTWEIGHT FABRICS When sewing lightweight fabrics, it is suggested that you use stabilizer on the
shaft...
Instruction Manual - Page 43

... it down under the groove as needed. 7. Place the edge to fit the bias tape. 4. Sew slowly, keeping the fabric to a 45 degree angle. Adjustable Bias Binder, Braiding Foot, Chenille Stitching Foot, Edge Joining Foot, Fancy Trim Foot, Gathering Foot, Non-Stick Foot, Seam Guide Foot and Stitch in width.
1. Machine Preparation 1. Cut the end of...
Instruction Manual - Page 46
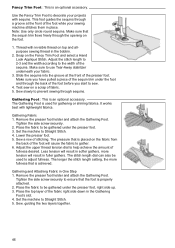
... the bobbin.
2. Place the fabric to be used for gathering or shirring fabrics. The longer the stitch length setting, the more tension will cause the fabric to sew.
4. Place the fabric to adjust fullness. Adjust the upper thread tension dial to Straight Stitch. 4. Test sew on top and allpurpose sewing thread in One Step 1. Note: Use only circle round sequins.
Instruction Manual - Page 54
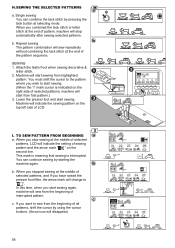
... by using the cursor buttons. (Arrow icon will sew from first pattern.) 3. I " mark cursor is interrupted. TO SEW PATTERN FROM BEGINNING a. Machine will indicate the sewing pattern on the second line. c. b. You can combine the tack stitch by starting the machine again.
Attach the Satin Foot when sewing decorative &
letter stitch. 2. H.SEWING THE SELECTED PATTERNS
a. When you want to...
Instruction Manual - Page 57
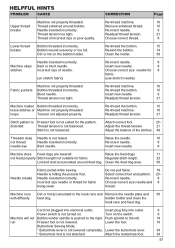
...not attached. Clean the holder.
50
Machine skips stitches
Needle inserted incorrectly. Turn on stretch fabric)
Re-insert needle.
8
Insert new needle.
8
Choose correct size needle for the pattern.
Machine will not run
Cord not plugged into outlet. Regulate stitch length.
23
Lint and dust accumulated around bobbin. Buttonhole Sewing Mode;
* Buttonhole lever is not turned...
Similar Questions

Classes On How To Use Singer 9970 Sewing Machine
I bought the sewing machine during the pandemic and would like to learn how to use it- functions, st...
I bought the sewing machine during the pandemic and would like to learn how to use it- functions, st...
(Posted by Connienm 1 year ago)

I Get E7 Error Message On My Singer Model 7258 Sewing Machine. There Is No Refe
Error message E7 is up on my Singer Stylist model 7258 sewing machine. It is not working at all. I t...
Error message E7 is up on my Singer Stylist model 7258 sewing machine. It is not working at all. I t...
(Posted by ebellamybellamy9 5 years ago)

Why Won't My Machine Sew, Checked Bobbin And Retreaded. Has Power Just Will Not
the machine has power and threade correctly and bobbin is in right. It did freeze on me when sewing....
the machine has power and threade correctly and bobbin is in right. It did freeze on me when sewing....
(Posted by alewis41 7 years ago)

Beeping From Singer Sewing Machine Stylist Ii 5625
My sewing machine will beep and stop sewing after three inches of sewing. I have taken it to be repa...
My sewing machine will beep and stop sewing after three inches of sewing. I have taken it to be repa...
(Posted by arusheria 9 years ago)
I Would Like To Know If My Singer 9970 Can Adjust The Size Of Lettering
I would like to know if my Singer 9970 can adjust the size of lettering. I can't seem to find in th...
I would like to know if my Singer 9970 can adjust the size of lettering. I can't seem to find in th...
(Posted by tressieca 10 years ago)