Get support for Singer 5511 SCHOLASTIC

Singer 5511 SCHOLASTIC Support Question

Singer 5511 SCHOLASTIC Support Question

Find answers below for this question about Singer 5511 SCHOLASTIC.
Need a Singer 5511 SCHOLASTIC manual? We have 1 online manual for this item!
Question posted by msdebra3 on September 23rd, 2019

Jammed Sewing Machine

How can i unjam my machine the manual wheel will not turn foward or backward

Current Answers

Answer #1: Posted by Odin on September 23rd, 2019 5:29 PM
This answer was accepted by the poster of the original question.
Odin

Member since:
April 10th, 2010

Points: 41,236,710
1,110
points
Remove the upper thread and bobbin case, turn the handwheel backwards and forwards by hand, and remove the thread causing the jam. If the issue persists or if you require further advice, you'll have to consult the manufacturer: use the contact information at https://www.contacthelp.com/singer/customer-service.


Hope this is useful. Please don't forget to click the Accept This Answer button if you do accept it. My aim is to provide reliable helpful answers, not just a lot of them. See https://www.helpowl.com/profile/Odin.

Related Singer 5511 SCHOLASTIC Manual Pages

Instruction Manual - Page 2

.... 5. WARNING - Special care is 75dB(A). 17. Switch the sewing machine off ("O") when making any other user servicing adjustments mentioned in the instruction manual. 11. Always unplug sewing machine from the electrical outlet when removing covers, lubricating, or when making any air openings blocked. To disconnect, turn off ("O") position, then remove plug from the electric outlet...
Instruction Manual - Page 6

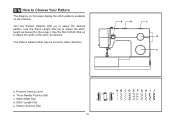
... 8 Accessories ...10 Threading the Machine Winding the Bobbin ...12 Inserting the Bobbin ...14 Threading the Upper Thread ...16 Raising the Bobbin Thread ...18 Thread Tension...20 Sewing How to Choose Your Pattern ...22...Hem ...32 Buttonholes ...34 Left and Right Side Balance for Buttonhole ...36 Sewing on Buttons ...38 General Information Installing the Removable Extension Table...40 Attaching the...
Instruction Manual - Page 9

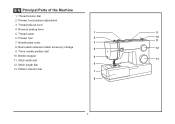
EN Principal Parts of the Machine 1. Reverse sewing lever 5. Thread cutter 1 9 6. Needle plate cover 3 8. Three needle position dial 10. Stitch length dial 6 13. Pattern selector dial 7 8 2 Thread take-up lever 4. Bobbin stopper 5 11. ...
Instruction Manual - Page 11

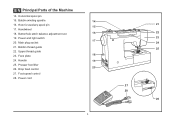
... 23 24 25 27 28 26 Handwheel 18. Foot speed control 28. Bobbin thread guide 22. Main plug socket 21. EN Principal Parts of the Machine 14. Face plate 18 24. Bobbin winding spindle 14 16. Drop feed control 27. Horizontal spool pin 15. Hole for auxiliary spool pin 15 17...
Instruction Manual - Page 13

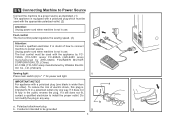
...Sewing light 1 Press main switch (A) to be grounded 2 6 A 3 Do not modify the plug in use . Conductor intended to " l " for power and light. If it does not fit fully in the outlet, reverse the plug. a b a. To reduce the risk of how to connect machine...appropriate polarized outlet. (2) Attention: Unplug power cord when machine is wider than the other). If it still does ...
Instruction Manual - Page 15

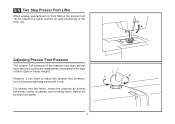
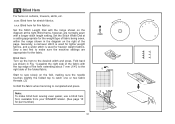
... raised to a higher position for heavy fabric, tighten by turning it clockwise. 8 For sewing very thin fabric, loosen the pressure by turning the screw counter clockwise, and for easy positioning of the work. (A) A Adjusting Presser Foot Pressure The presser foot pressure of the machine has been pre-set and requires no particular readjustment according...
Instruction Manual - Page 17

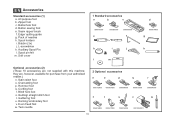
...006172008 006907008 006900008 006813008 006904008 s t u v w 006916008 006917008 006016008 0061850081 10 Zipper foot c. Button sewing foot e. Darning/ embroidery foot v. they are not supplied with this machine; Edge/ quilting guide g. Soft cover 1 Standard accessories a b c 006918008 e 006905008 006909008 f h i j l m d 006914008 g k Optional accessories...
Instruction Manual - Page 19

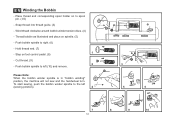
... illustrated and place on to the left (10) and remove. Please Note: When the bobbin winder spindle is in "bobbin winding" position, the machine will not sew and the handwheel turn. Place thread and corresponding spool holder on spindle. (5) - Push bobbin spindle to right. (6) - Wind thread clockwise around bobbin winder tension discs. (4) - Push...
Instruction Manual - Page 23

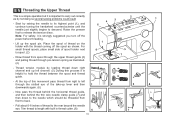
...For safety, it is important to carry out correctly as by not doing so several sewing problems could result. - For small thread spools, place small side of thread on ... from front to descend. Thread tension module by raising the needle to its highest point (1), and continue turning the handwheel counterclockwise until the needle just slightly begins to back. - Pull about 6-8 inches of the ...
Instruction Manual - Page 27

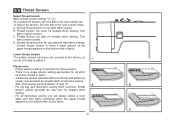
... dial to the next number up. Thread tension too loose for straight stitch sewing. Turn dial to adjust it. 1 Please note: - Correct thread tension is no single tension setting appropriate for all decorative sewing you do not need to higher number. There is when a small amount of the upper thread appears on the...
Instruction Manual - Page 29

... Use the Stitch Length Dial (d) to adjust the width of the stitch as desired for the project. The Pattern Selector Dial may be turned in either direction. Three Needle Position Dial c. Stitch Length Dial e. Reverse Sewing Lever b. Stitch Width Dial d. Use the Stitch Width Dial (c) to adjust the stitch length as desired...
Instruction Manual - Page 31

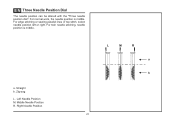
... needle position is middle. a. Zig-zag L. Middle Needle Position R. For twin needle stitching, needle position is middle. Right Needle Position 24 L M R a b For edge stitching or sewing parallel lines of top stitch, select needle position left or right. EN Three Needle Position Dial The needle position can be altered with the "Three...
Instruction Manual - Page 33

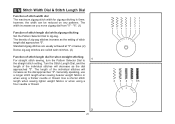
.... (2) Dense zig-zag stitches are called satin stitches. (2) Function of stitch width dial The maximum zigzag stitch width for when straight stitching For straight stitch sewing, turn the Pattern Selector Dial to zig-zag. EN Stitch Width Dial & Stitch Length Dial Function of stitch length dial for zigzag stitching is 6mm; Use...
Instruction Manual - Page 35

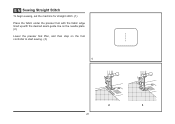
EN Sewing Straight Stitch To begin sewing, set the machine for straight stitch. (1) Place the fabric under the presser foot with the fabric edge lined up with the desired seam guide line on the needle plate. (2) Lower the presser foot lifter, and then step on the foot controller to start sewing. (3) 1 2 3 28
Instruction Manual - Page 37

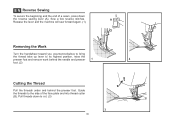
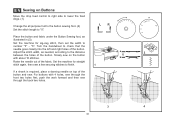
... behind the presser foot. Pull threads down the reverse sewing lever (A). EN Reverse Sewing To secure the beginning and the end of the face plate and into thread cutter (B). Sew a few reverse stitches. A Release the lever and the machine will sew forward again. (1) Removing the Work Turn the handwheel toward you (counterclockwise) to bring the thread...
Instruction Manual - Page 39

... and press. 2 Note: To make sure the machine settings are normally sewn with the top edge of the hem extending about 7 mm (1/4") to make blind hem sewing even easier, use a blind hem foot, available ... with a longer stitch length setting. Set the Stitch Width Dial at the right. Blind Hem: Turn up the hem to catch one or two fabric threads. (2) Unfold the fabric when hemming is ...
Instruction Manual - Page 41

... The width however may need to be sure that the needle is advisable to sew the buttonhole. Always test sew a buttonhole on fabric (a). 3. Follow the 4-step sequence changing from both ends .... Note: Density varies according to obtain correct buttonhole length; It is raised before turning the Pattern Selector Dial to another with starting marking on the buttonhole foot aligns with...
Instruction Manual - Page 45

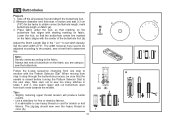
... the feed dogs. (1) Change the all purpose foot to the button sewing foot. (2) Set the stitch length to number "3" - "6". Raise the needle out of the button. Turn the handwheel to the distance between the holes of the button and sew. Set the machine for zig-zag stitch, then set the width to "0". For buttons...
Instruction Manual - Page 51

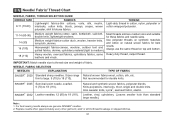
..., lightweight woolens. results. SINGER® 2045 Semi-ball point needle, scarfed. 9 (70) to 18 (110). Knits-polyesters, interlocks, tricot, single and double knits. For best sewing results always use the same thread on natural woven fabrics for double knits.
Instruction Manual - Page 60

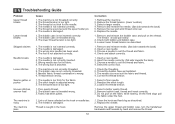
... upper thread and bobbin case, turn the handwheel backwards and forwards by hand and remove... case is noisy The machine jams 1. Thread tension wrong. 1. The machine is not correctly threaded.... 3. Remove and reinsert the needle. (flat side towards the back) 2. Insert the needle correctly. (flat side towards the back) 3. Do not pull on the fabric while sewing...

Similar Questions

Where Do I Get Instructions For Useing My Cutting Too.
I bought the cutting too with the machine but have no instructions for using it. I have a singer 551...
(Posted by msbingo 10 years ago)
Machine Will Not Turn On
Was Sewing and machine turned off and it will not turn on.
(Posted by Jjcielo 10 years ago)
How To Thread The Serger On A 5511 Singer Sewing Machine
cannot find information on how to thread the serger that ispart of the sewing machine
(Posted by Anonymous-93910 11 years ago)
Ask a New Question
Use the box below to post a new question about this Singer product .
Points & Prizes
  • You can earn points for nearly everything you do on HelpOwl.com
  • You can trade in those points for gift cards at leading retailers such as Amazon.com and Walmart
  • It's that simple!
See How it Works
Create a Free Account

Singer Manuals

Find free Singer 5511 SCHOLASTIC manuals and user guides available at ManualOwl.com. Try out our unique manual viewer allowing you to interact with manuals from directly within your browser!

Singer Reviews

View thousands of Singer user reviews and customer ratings available at ReviewOwl.com.

Contact Information

Complete Singer customer service contact information including steps to reach representatives, hours of operation, customer support links and more from ContactHelp.com.

Scoreboard Ratings

See detailed Singer customer service rankings, employee comments and much more from our sister site.