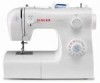
Singer 2259 Tradition Support Question
Singer 2259 Tradition Support Question
Find answers below for this question about Singer 2259 Tradition.Need a Singer 2259 Tradition manual? We have 1 online manual for this item!
Question posted by robinmyoung on April 3rd, 2014
Hand Wheel On New Machine Will Not Turn (stuck) New Machine Has Not Been Used.
The person who posted this question about this Singer product did not include a detailed explanation. Please use the "Request More Information" button to the right if more details would help you to answer this question.
Current Answers
Related Singer 2259 Tradition Manual Pages
Instruction Manual - Page 2
... fabric while stitching. Do not operate where aerosol spray products are being used as contained in this sewing machine. Please turn all controls to ensure that is not operating properly. 18. Do not allow to be supervised to the off the machine or unplug when the machine is fixed with any object into water. To disconnect...
Instruction Manual - Page 3

... you first use your sewing machine, you are always provided with the most modern sewing capabilities, the manufacturer reserves the right to change the appearance, design or accessories of this instruction book, step by step, seated
at your machine. GB
Congratulations
As the owner of a new Singer sewing machine, you are sewing on one
of the easiest to use sewing machines ever...
Instruction Manual - Page 4
... Source ...4 Two Step Presser Foot Lifter...5 Accessories ...6
Threading the Machine Winding the Bobbin ...7 Inserting the Bobbin ...8 Thread Tension ...9 Threading the Upper Thread ...10 Raising the Bobbin Thread...11
Sewing How to Choose Your Pattern...12 Stitch Length Dial ...13 Sewing Straight Stitch ...14 Reverse Sewing/Removing the Work/Cutting the Thread...15 Choosing Stretch...
Instruction Manual - Page 5
Thread cutter
1
8
4. Presser foot
5. Reverse sewing lever
3
8. Needle plate
2
6. Stitch length dial
4
10
10. Bobbin stopper
9. Pattern selector dial
5
6
2 Removable extension table/ accessory storage
9
7. Thread tension dial
2. Thread take-up lever
7
3. GB Principal Parts of the Machine
1.
Instruction Manual - Page 6
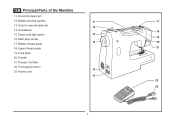
GB Principal Parts of the Machine
11. Upper thread guide
21
19. Bobbin thread guide
18. Foot speed control 15
23. Handle
21. Power cord 16
22
23
3 Handwheel
18
15. ...
Instruction Manual - Page 7
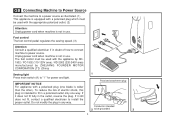
... electric shock, this plug is intended to fit in use . Foot control The foot control pedal regulates the sewing speed. (3)
Attention: Consult a qualified electrician if in any way.
1
Polarized attachment plug
Conductor intended
2 to be grounded
4
A 3 GB Connecting Machine to Power Source
Connect the machine to a power source as illustrated. (1) This appliance is equipped...
Instruction Manual - Page 9
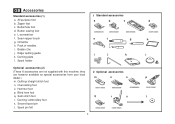
GB Accessories
Standard accessories (1) a. Button sewing foot e. Oil bottle h. they are not supplied with this machine; Hemmer foot p. Satin stitch foot r. All purpose foot b. Pack of needles i. Bobbin (3x) j. Overcasting foot o. Edge/ quilting guide k. Spool holder
1 Standard accessories
a
b
c
006806008
006905008
e
f
006909008
g
i
j
k
...
Instruction Manual - Page 10
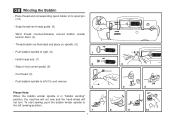
... to spool pin. (1/2)
- Push bobbin spindle to the left (10) and remove.
4
Please Note: When the bobbin winder spindle is in "bobbin winding" position, the machine will not sew and the hand wheel will not turn. Thread bobbin as illustrated and place on foot control pedal. (8)
- Hold thread end. (7) 2
- Step on spindle. (5)
- To start...
Instruction Manual - Page 11
...slit and under the finger. (4) Leave a 6 inch tail of thread.
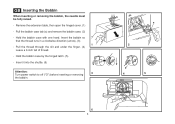
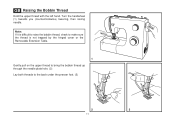
- Hold the bobbin case with one hand. GB Inserting the Bobbin
When inserting or removing the bobbin, the needle must be fully raised.
- Insert the...Hold the bobbin case by the hinged latch. (5)
- Insert it into the shuttle. (6)
Attention: Turn power switch to off ("O") before inserting or removing
3
the bobbin.
6
8
a
2
4
5
Instruction Manual - Page 12
... appears on the side of the bobbin case. Correct thread tension is usually only desirable for straight stitch
sewing.
- GB Thread Tension
Upper thread tension (1) Basic thread tension setting: "4" To increase the tension, turn the small screw on the bottom side of fabric.
If the tension is correct, the thread will drop...
Instruction Manual - Page 13
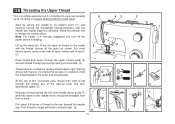
... pin. Trim thread to left through pre-tension spring as by not doing so several sewing problems could result.
- Start by leading thread down to the needle which should be...from front to descend. Thread tension module by raising the needle to its highest point (1), and continue turning the handwheel counterclockwise until the needle just slightly begins to back.
- At the top of the ...
Instruction Manual - Page 14
Turn the handwheel (1) towards you (counterclockwise) lowering, then raising needle. GB Raising the Bobbin Thread
Hold the upper thread with the left hand. Note: If it is difficult to raise the bobbin thread, check to make sure the thread is not trapped by the hinged cover or the ...
Instruction Manual - Page 15

...either direction. Stitch Length Dial c.
Pattern Selector Dial
12
a
b
c
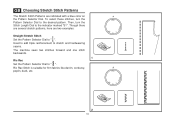
S1 GB How to sew these stretch patterns is a stretch stitch pattern, and information on how to Choose Your Pattern
... page displays the stitch patterns available on the machine.
To select the patterns indicated with the black color, turn the Pattern Selector Dial. (c) Then, use the Stitch Length Dial (b) to adjust the ...
Instruction Manual - Page 17

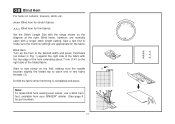
GB Sewing Straight Stitch
To begin sewing, set the machine for straight stitch in either center or right needle position. (1)
1
Place the fabric under the presser foot with the fabric edge lined up with the desired seam guide line on the needle plate. (2)
Lower the presser foot lifter, and then step on the foot controller to start sewing. (3)
2
3
14
Instruction Manual - Page 18
...
B
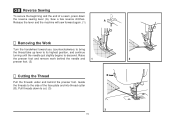
Pull the threads under and behind the presser foot. GB Reverse Sewing
To secure the beginning and the end of the face plate and into thread cutter (B). Sew a few reverse stitches. Release the lever and the machine will sew forward again. (1)
A
Removing the Work
Turn the handwheel toward you (counterclockwise) to bring
the thread take...
Instruction Manual - Page 19
... is suitable for firm fabrics like denim, corduroy, poplin, duck, etc.
2
16 Used to add triple reinforcement to stretch and hardwearing seams. The machine sews two stitches forward and one stitch backwards.
1 Ric Rac Set the Pattern Selector Dial ...
Straight Stretch Stitch Set the Pattern Selector Dial to " ". Then, turn the Pattern Selector Dial to the desired pattern. To select these stitches...
Instruction Manual - Page 20
... edge of the hem extending about 7 mm (1/4") to make blind hem sewing even easier, use a blind hem
2
foot, available from your SINGER® retailer. (See page 6
for the fabric.
Note: To make sure the machine settings are appropriate for part number)
17
Sew a test first to the right side of the fabric with a longer...
Instruction Manual - Page 27
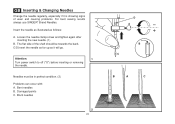
Loosen the needle clamp screw and tighten again after inserting the new needle. (1)
B. The flat side of wear and causing problems. For best sewing results always use SINGER® Brand Needles. Attention:
1
Turn power switch to off ("O") before inserting or removing
the needle. Bent needles B.
GB Inserting & Changing Needles
Change the needle regularly, especially if...
Instruction Manual - Page 28
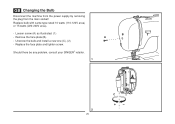
Loosen screw (A) as illustrated. (1) -
Remove the face plate (B). - Replace the face plate and tighten screw. Unscrew the bulb and install a new one (C). (2) - B A
Should there be any problem, consult your SINGER® retailer. 1
C
2
25 Replace bulb with same type rated 10 watts (110-120V area) or 15 ...
Instruction Manual - Page 29
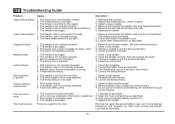
...used . 4. Only use good quality sewing machine oil.
4. Remove the upper thread and bobbin case, turn the handwheel backwards and forwards by the machine.
1. Rethread the machine... The needle size must be drawn through
by hand and remove the thread. The thread is too...used .
3. The foot is not inserted correctly. 5. Choose a needle to suit the thread and fabric. 4. Insert a new...
Similar Questions

Hand Wheel Will Not Turn. Get A Code C4, Checked Bobbin And Band, They Are Ok.
(Posted by nbarbarine 3 years ago)

The Hand Wheel Is Very Tight How Do I Realease It
hand wheel is too tight how do I loosen i
hand wheel is too tight how do I loosen i
(Posted by Lewismonti 4 years ago)
How Do I Fix The Sewing Machine When It Has E1 On The Machine
my machine has an error code on the screen it reads E1 how do I fix it
my machine has an error code on the screen it reads E1 how do I fix it
(Posted by sabp45 8 years ago)

Hand Wheel Stuck
I have just pulled out my 2 year old singer 5500/5400 for the 4th time and the hand wheel is stuck. ...
I have just pulled out my 2 year old singer 5500/5400 for the 4th time and the hand wheel is stuck. ...
(Posted by kjlavell 9 years ago)

Hand Wheel Won't Turn And Makes A Loud Clicking Noise.
I just received my new singer h74 today and afete setting it up I was testing different tensions. Al...
I just received my new singer h74 today and afete setting it up I was testing different tensions. Al...
(Posted by Lbrobinson83 10 years ago)