Singer 5511 SCHOLASTIC Support Question
Singer 5511 SCHOLASTIC Support Question
Find answers below for this question about Singer 5511 SCHOLASTIC.Need a Singer 5511 SCHOLASTIC manual? We have 1 online manual for this item!
Question posted by msbingo on June 9th, 2013
Where Do I Get Instructions For Useing My Cutting Too.
I bought the cutting too with the machine but have no instructions for using it. I have a singer 5511 sewing machine
Current Answers
Related Singer 5511 SCHOLASTIC Manual Pages
Instruction Manual - Page 2
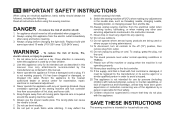
... care is not operating properly. 18. To disconnect, turn off the machine or unplug when the machine is required around the sewing machine needle. 6. SAVE THESE INSTRUCTIONS
This sewing machine is being used or where oxygen is intended for their safety. 21. EN IMPORTANT SAFETY INSTRUCTIONS
When using an electrical appliance, basic safety should never be left unattended when plugged...
Instruction Manual - Page 6
...
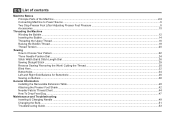
Threading the Machine Winding the Bobbin ...12 Inserting the Bobbin ...14 Threading the Upper Thread ...16 Raising the Bobbin Thread ...18 Thread Tension...20
Sewing How to Choose Your Pattern ...22 Three Needle Position Dial...24 Stitch Width Dial & Stitch Length Dial ...26 Sewing Straight Stitch ...28 Reverse Sewing/ Removing the Work/ Cutting the Thread...
Instruction Manual - Page 9
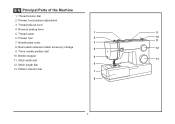
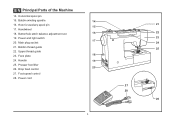
...table/ accessory storage
4
12
9. Thread take-up lever
4. Bobbin stopper
5
11. Reverse sewing lever
5. Presser foot
2
10
11
7. Stitch width dial
13
12. Pattern selector dial 7
8
2 Three needle position dial
10. Presser foot pressure adjustment
3. Stitch length dial
6
13. EN Principal Parts of the Machine
1. Thread tension dial
2. Thread cutter
1
9
6.
Instruction Manual - Page 11
... feed control
27. Presser foot lifter 20
26. Buttonhole stitch balance adjustment slot
16
19. Handle
19
25. Handwheel
18. EN Principal Parts of the Machine
14. Horizontal spool pin
15. Bobbin winding spindle
14
16. Bobbin thread guide
22.
Instruction Manual - Page 13
Co., Ltd. (Vietnam)
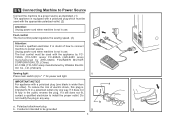
Sewing light
1
Press main switch (A) to install the proper outlet. To reduce the risk of how to connect machine to power source. The foot control must be used with the appliance by FC1902A (110-120V area)/ FC-2902A (220-240V area) manufactured by ZHEJIANG FOUNDER MOTOR CORPORATION LTD. (China) 4C-316Q...
Instruction Manual - Page 15
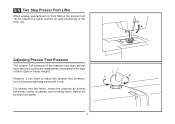
.... (A)
A
Adjusting Presser Foot Pressure
The presser foot pressure of the machine has been pre-set and requires no particular readjustment according to adjust the presser foot pressure, turn the presser adjusting screw with a coin. EN Two Step Presser Foot Lifter
When sewing several layers or thick fabrics, the presser foot can be...
Instruction Manual - Page 17
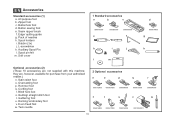
Buttonhole foot d. Button sewing foot e. Spool pin felt m. Satin stitch foot o. Gathering foot u. Spool holders i. Auxiliary Spool Pin l. Hemmer foot q. Even Feed...006813008
006904008
s
t
u
v
w
006916008 006917008
006016008
0061850081
10 All purpose foot b. Pack of needles h. they are not supplied with this machine; Cording foot r. Blind hem foot s. L-screwdriver k.
Instruction Manual - Page 19

...).
4
3
5
6
7
8
9
10
12 Push bobbin spindle to right. (6)
- Please Note:
When the bobbin winder spindle is in "bobbin winding"
position, the machine will not sew and the handwheel turn. Thread bobbin as illustrated and place on spindle. (5)
-
Wind thread clockwise around bobbin winder tension discs. (4)
- Hold thread end. (7) 1
- Cut thread. (9) 2
- EN Winding the Bobbin
-
Instruction Manual - Page 23
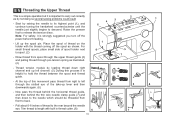
... to release the tension discs.
Pull about 6-8 inches of thread on the holder with built in thread cutter. (8)
5
16
2
3
4
6
7
8 Start by not doing so several sewing problems could result.
- Raise the presser foot to the rear beyond the needle
eye. Thread tension module by leading thread down to the needle which...
Instruction Manual - Page 29
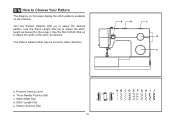
... Stitch Length Dial (d) to adjust the width of the stitch as desired for the project. Stitch Width Dial d. Pattern Selector Dial
ABCDE FGH I J
3
4
2
1
22
Use the Stitch Width Dial (c) to adjust the stitch length as desired. a
b
c d e
a. Stitch Length Dial e. Three Needle Position Dial c. Turn the Pattern Selector Dial (e) to Choose ...
Instruction Manual - Page 33

... setting of stitch length dial while zig-zag stitching Set the Pattern Selector Dial to
1
the straight stitch setting. Generally speaking, use
a longer stitch length when sewing heavier weight fabrics or
when using a
finer needle or thread.
4 3 2 1 0.5
2
26 The width increases as the dial approaches "4". Standard zigzag stitches are usually achieved at "3" or...
Instruction Manual - Page 35

EN Sewing Straight Stitch
To begin sewing, set the machine for straight stitch. (1) Place the fabric under the presser foot with the fabric edge lined up with the desired seam guide line on the needle plate. (2) Lower the presser foot lifter, and then step on the foot controller to start sewing. (3)
1
2
3
28
Instruction Manual - Page 37
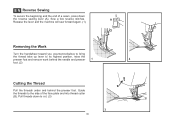
Pull threads down
the reverse sewing lever (A).
A
Release the lever and the machine will sew forward again. (1)
Removing the Work
Turn the handwheel toward you (counterclockwise) to bring
the thread take up lever to cut. (3)
30
B 3 Guide the threads to the side of a seam, press down to its highest position, raise the
presser foot and...
Instruction Manual - Page 39

....
2 Note: To make blind hem sewing even easier, use a blind hem foot, available from your SINGER® retailer. (See page 10 for the fabric. M
Set the Stitch Length Dial with the range shown on the
diagram at
a setting appropriate for stretch fabrics. Sew a test first to make sure the machine settings are normally sewn
with...
Instruction Manual - Page 41
... for stretch or knit
fabrics.
When moving from step to step through the buttonhole process, be adjusted according to the project, sew a test first to the next step. Use seam ripper and cut buttonhole open from one step to the fabric. Tips: -
Slightly reducing upper thread tension will produce better
results. - The zig...
Instruction Manual - Page 45
....
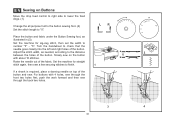
1
If a shank is required, place a darning needle on the button with 4 holes, sew through the front two holes first, push the work forward and then sew through the back two holes.
3
4
38 Turn the handwheel to number "3" - Set the machine for zig-zag stitch, then set the width to check that the needle...
Instruction Manual - Page 49
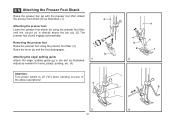
... presser foot
Raise the presser foot using the presser foot lifter, until the cut-out (c) is directly above operations!
b
Attaching the edge/ quilting guide
Attach the edge/ quilting guide (g) in the slot as illustrated.
1
Adjust as illustrated. (1)
a
Attaching the presser foot
Lower the presser foot shank (b) using the presser foot lifter. (3)
Raise the...
Instruction Manual - Page 51
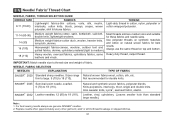
...SINGER® 2020 Standard sharp needles. SINGER® 2045 Semi-ball point needle, scarfed. 9 (70) to thread size and weight of fabric.
Leather, vinyl, upholstery. (Leaves smaller hole than standard large needle.)
Note : 1. For best sewing results always use...jerseys, crepes, woven polyester, shirt & blouse fabrics. Always use genuine SINGER® needles. 2. Also sweater knits, Lycra®, ...
Instruction Manual - Page 56
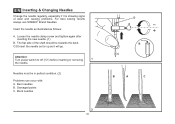
... needle clamp screw and tighten again after inserting the new needle. (1)
B. Blunt needles
2
49
D A
B C
B
A
C The flat side of wear and causing problems. For best sewing results always use SINGER® Brand Needles.
Needles must be towards the back. C/D.Insert the needle as far up as follows:
A.
Bent needles B. Attention:
Turn power switch to...
Instruction Manual - Page 60
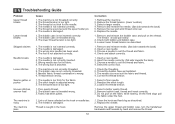
... correctly.
1. Poor quality thread. 2. Lint or oil have collected on the fabric while sewing, let the feed dogs pull
the fabric under the foot.
1. Thread is not threaded correctly... The thread tension is threaded wrong. 3. The needle is not correctly threaded. 2. The machine is not inserted correctly. 2. Thread the bobbin case as described. 2. Readjust the stitch ...used. 4.
Similar Questions

Classes On How To Use Singer 9970 Sewing Machine
I bought the sewing machine during the pandemic and would like to learn how to use it- functions, st...
I bought the sewing machine during the pandemic and would like to learn how to use it- functions, st...
(Posted by Connienm 1 year ago)

Jammed Sewing Machine
How can i unjam my machine the manual wheel will not turn foward or backward
How can i unjam my machine the manual wheel will not turn foward or backward
(Posted by msdebra3 4 years ago)

How Do I Set Up The Machine To Use The Buttonhole Fot For The Singer Scholastic
singer scholastic sewing machine model 5523
singer scholastic sewing machine model 5523
(Posted by sharitaylor91 8 years ago)

What's The Price For A New 5511
I was wondering how much a new 5511 is
I was wondering how much a new 5511 is
(Posted by Jacqualynnelaursen 8 years ago)

How To Thread The Serger On A 5511
Singer Sewing Machine
cannot find information on how to thread the serger that ispart of the sewing machine
cannot find information on how to thread the serger that ispart of the sewing machine
(Posted by Anonymous-93910 11 years ago)