
Sharp LC-20VM2 Support Question
Sharp LC-20VM2 Support Question
Find answers below for this question about Sharp LC-20VM2.Need a Sharp LC-20VM2 manual? We have 1 online manual for this item!
Question posted by Nydgonz on June 16th, 2013
Where Can I Get Power Cord For Sharp Lc-20vm2 Monitor?
The person who posted this question about this Sharp product did not include a detailed explanation. Please use the "Request More Information" button to the right if more details would help you to answer this question.
Current Answers
Related Sharp LC-20VM2 Manual Pages
Operation Manual - Page 4
... if improperly handled. This product is operated.
2.
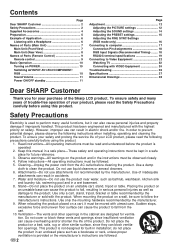
Cleaning-Unplug the power cord from the cart. 10. Attachments-Do not use can cause overheating .... Water and moisture-Do not use liquid cleaners or aerosol cleaners. 6. US 2 Contents
Page
Dear SHARP Customer 2 Safety Precautions 2 Supplied Accessories 4 Preparation 5 Example of Application 6
Listening with a Headphone ...
Operation Manual - Page 5
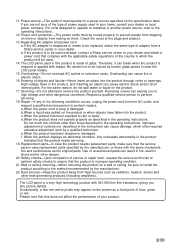
..., refer to rain or water. Power cord protection-The power cords must operate on a power source specified on the screen as the original parts. The LCD panel used in this does not affect the performance of the following conditions occurs, unplug the power cord from a Sharp service center or your product.
3 US a.When the power cord or plug is a very high...
Operation Manual - Page 6
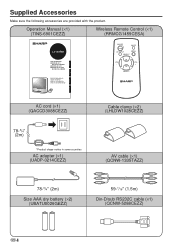
...;1) (RRMCG1459CESA)
LC-20VM2
LCD AV MONITOR MONITEUR AV À
CRISTAUX LIQUIDES MONITOR AV LCD MONITOR AV DE TELA
DE CRISTAL LÍQUIDO
OPERATION MANUAL MODE D'EMPLOI MANUAL DE MANEJO MANUAL DE OPERAÇÃO
ESPAÑOL
FRANÇAIS
ENGLISH
ON/OFF
MUTE
AV INPUT
MENU
SELECT
VOL -
VOL +
SELECT
PORTUGUÊS
AC cord (×...
Operation Manual - Page 7
.... • The batteries supplied with the product may have a shorter life expectancy due to operate monitor functions, replace the batteries in the remote control.
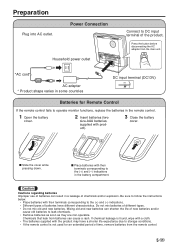
1 Open the battery
cover.
2 Insert batteries ... the AC adapter from the main unit.
*AC cord
AC adapter * Product shape varies in some countries
DC input terminal (DC13V)
POWER INPUT DC13V
Batteries for Remote Control
If the remote ...
Operation Manual - Page 8
... the headphone jack located on the bottom of Application
Listening with a click. MENU
-
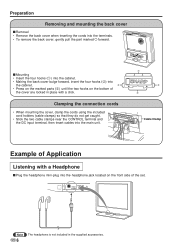
Clamping the connection cords
• When mounting the cover, clamp the cords using the included cord holders (cable clamps) so that they do not get caught.
• Stick the two cable clamps near the CONTROL terminal and the DC input...
Operation Manual - Page 9
...)
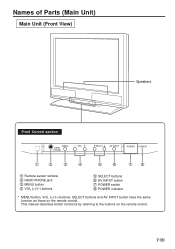
Main Unit (Front View)
Speakers
Front Control section
MENU HEAD PHONE
− VOL +
SELECT
AV INPUT
POWER POWER
1
2
3
4
5
6
78
1 Remote sensor window 2 HEAD PHONE jack 3 MENU button 4 VOL (+)/(-) buttons
5 SELECT buttons 6 AV INPUT button 7 POWER switch 8 POWER indicator
* MENU button, VOL (+)/(-) buttons, SELECT buttons and AV INPUT button have the same function as those...
Operation Manual - Page 10

... / SECAM
AV INPUT 1
AV INPUT 2 / AV OUT
AUDIO VIDEO S-VIDEO
R
L
AUDIO VIDEO RL
NTSC / PAL
COMPONENT(INPUT)
VIDEO
AUDIO
Y PB(CB) PR(CR) R
L
3
4 56
78
9
0
POWER INPUT DC13V
q
1 RGB input terminal 2 AUDIO input terminal 3 CONTROL terminal 4 AUDIO input terminal (AV INPUT 1) 5 VIDEO input terminal (AV INPUT 1) 6 S-VIDEO input terminal (AV INPUT...
Operation Manual - Page 11
...SELECT
VOL - Front Control section
MENU HEAD PHONE
− VOL +
SELECT
AV INPUT
POWER POWER
ON/OFF
MUTE
AV INPUT
MENU
SELECT
VOL -
VOL +
SELECT
ON/OFF
MUTE
AV...button
SELECT buttons
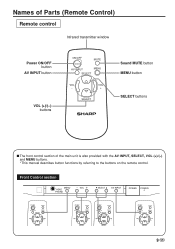
s The front control section of Parts (Remote Control)
Remote control
Infrared transmitter window
Power ON/OFF button
AV INPUT button
VOL (+)/(-) buttons
ON/OFF
MUTE
AV INPUT
MENU
SELECT
VOL -...
Operation Manual - Page 12

... x COMPONENT: Video equipment connected to the AV2 input terminals. Note The contents displayed on the monitor.
The
screen displays AV1, AV2, COMPONENT or RGB at the upper right corner on the screen...the front side of main unit
MENU HEAD PHONE
− VOL +
SELECT
AV INPUT
POWER POWER
Power
Press indicator
Switching AV INPUT AV1/AV2/COMPONENT/RGB
ON/OFF
MUTE
AV INPUT
MENU
SELECT...
Operation Manual - Page 13

... level.
VOL +
SELECT
s Press VOL (+) to decrease sound volume.
Screen display flashes. s To turn the sound back to turn the monitor back on, press Power ON/OFF again. The segment of indicator decreases. The Power indicator will turn red. Sound Volume
ON/OFF
MUTE
AV INPUT
MENU
SELECT
VOL - VOL +
SELECT
11 US
Operation Manual - Page 14
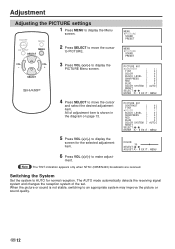
... and changes the reception system of adjustment item is not stable, switching to PICTURE.
PICTURE AV1
CONTRAST
[ ‰]
TINT
[ ‰]
COLOR
[ ‰]
BLACK LEVEL [ ‰]
SHARPNESS
[ ‰]
RED
[ ‰]
BLUE
[ ‰]
COLOR SYSTEM [ AUTO]
RESET
SELECT: •
ENTER :( • ) EXIT: MENU
4 Press SELECT to move the cursor
to an appropriate system...
Operation Manual - Page 15
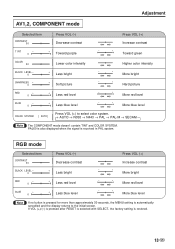
...
- ‰
Press VOL (-) Decrease contrast + Toward purple
Press VOL (+)
Increase contrast
-
+
Toward green
COLOR 3‰
Lower color intensity
Higher color intensity
BLACK LEVEL - ‰
SHARPNESS - ‰
RED
-
‰
+ Less bright + Soft picture + Less red level
-
+
More bright
-
+
Hard picture
-
+
More red level
BLUE
- ‰
+ Less blue level
-
+
More blue...
Operation Manual - Page 17

... the AV OUT terminal for
image orientation
special uses. ABC ABC
RIGHT/LEFT
[NORMAL] Normal horizontal [MIRROR] Mirror image → To display mirror images for monitoring.
5 After changing PRESET items, press MENU to the initial
screen.
15 US
Selected item
Factory setting
Setting change the settings by the user.
1 Press MENU...
Operation Manual - Page 19

... Connection Cable
s Align the pins of this unit and those of the RGB connection cable used as the monitor of computer and display mode.
This unit can be used to computer
This LCD AV monitor can be used with the screws located at both ends.
17 US AUDIO INPUT
RGB INPUT (VGA60Hz...
Operation Manual - Page 21
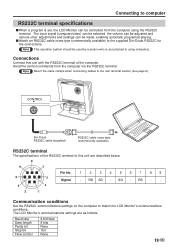
... playing. Note Mount the cable clamps when connecting cables to match the LCD Monitor's communications conditions. Connecting to computer
RS232C terminal specifications
s When a program is... Data length Parity bit Stop bit Flow control
9,600 bps 8 bits None 1bit None
19 US
The LCD Monitor's communications settings are described below.
8
9
7
Pin No.
1
2
34
5
67
89
6
3
...
Operation Manual - Page 22

... mode to AV1.
Note
When using the computer control function of the LCD Monitor, the LCD Monitor operating status cannot be read to the computer. Command format
C1 C2 C3 ... the command without displaying the On-screen Display. Computer I VED_ _ _ 1
LCD Monitor OK
ME S Y _ _ _ 2
CONTROL CONTENTS
POWER OFF POWER ON AV1 AV2 COMPONENT RGB INPUT CHECK AUTO PAL SECAM NTSC 4.43 NTSC 3.58 PAL...
Operation Manual - Page 23

...(0 ~ 60) AV1 BLACK LEVEL(-30 ~ +30) AV1 COLOR(0 ~ 60) AV1 TINT(-30 ~ +30) AV1 SHARPNESS(-30 ~ +30) AV1 RED(-30 ~ +30) AV1 BLUE(-30 ~ +30) AV1 DISPLAY AV1 RESET AV2 CONTRAST(0...AV2 RESET COMPONENT CONTRAST(0 ~ 60) COMPONENT BLACK LEVEL(-30 ~ +30) COMPONENT COLOR(-30 ~ +30) COMPONENT SHARPNESS(-30 ~ +30) COMPONENT RED(-30 ~ +30) COMPONENT BLUE(-30 ~ +30) COMPONENT DISPLAY COMPONENT RESET VOLUME(0...
Operation Manual - Page 24

... room antenna terminal. Note Refer to the manual how to connect these tuner to Video Equipment
Watching TV
s To view a TV broadcast on the LCD monitor, the set-top box must be used with a TV tuner, satellite tuner or VCR.
Via TV
AUDIO
R
L
VIDEO
Via Satellite TV, Pay TV
AUDIO
R
L
VIDEO...
Operation Manual - Page 28
....
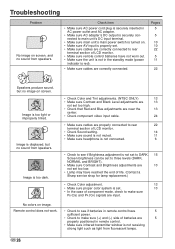
Troubleshooting
Problem
No image on image. Check item
• Make sure AC power cord plug is securely inserted in AC power outlet and AC adapter.
• Make sure AC adapter's DC output is securely connected to make sure (+) and (-) side of LCD monitor. • Make sure remote control batteries have not worn out. •...
Operation Manual - Page 29
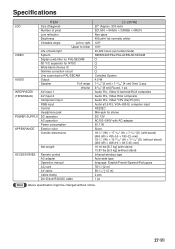
Specifications
LCD
VIDEO
AUDIO INTERFACES (TERMINALS) POWER SUPPLY APPEARANCE
ITEM
Size (Diagonal)
Number of pixel...
RGB input
Control
Headphone jack
DC operation
AC operation
Power consumption
Exterior color
Outside dimensions
Net weight
ACCESSORIES
Remote control AC adapter Operation manual AC cord AV cable Cable clamp Din-D/sub RS232C cable
LC-20VM2 20" (Approx. 500 mm) 921,600 = ...
Similar Questions

Power Cord For Lc-20b2ua Tv Where Can I Buy This Power Cable
(Posted by tonysilva5419 3 years ago)

Power Cord?
I inherited this LC-20s4us and it has no power cord. I cannot even find a place on the back where on...
I inherited this LC-20s4us and it has no power cord. I cannot even find a place on the back where on...
(Posted by alisonsterken 9 years ago)

I Need To Buy A Power Cord For Model Lc22sv2u Where Can I Purchase One?
(Posted by Patriciaralon 11 years ago)

Need Power Cord Do U Have It ...lc-15b4u-s
Power cord for lC-15b4u-s
Power cord for lC-15b4u-s
(Posted by Renebklyn 11 years ago)

Suppliers Of Power Cords
I need a new power cord for my LC 26GA5U TV. Please direct me to any US suppliers (who can ship over...
I need a new power cord for my LC 26GA5U TV. Please direct me to any US suppliers (who can ship over...
(Posted by annie3332 12 years ago)