Ryobi RTS30 Support Question
Ryobi RTS30 Support Question
Find answers below for this question about Ryobi RTS30.Need a Ryobi RTS30 manual? We have 4 online manuals for this item!
Question posted by lkurpis on September 4th, 2011
How To Find Assembly Instructions In English
The person who posted this question about this Ryobi product did not include a detailed explanation. Please use the "Request More Information" button to the right if more details would help you to answer this question.
Current Answers
Related Ryobi RTS30 Manual Pages
English Manual - Page 2

...; General Safety Rules...3-4 Specific Safety Rules...4-5 Symbols...6-7 Electrical...8 Glossary of Terms...9 Features...10-13 Tools Needed ...13 Loose Parts...14 Assembly...15-19 Operation...19-34 Adjustments...35-37 Maintenance...38 Troubleshooting...39-40 Parts Ordering/Service...
English Manual - Page 3

.... Wear hearing protection during extended periods of wood on .
SECURE WORK. GENERAL SAFETY RULES
WARNING:
Read and understand all times.
MAINTAIN TOOLS WITH CARE. Follow instructions for an extension cord 25 feet or less in working order.
KEEP BLADES CLEAN, SHARP, and with grounded surfaces. Do not let visitors...
English Manual - Page 4

...of personal injury. Have defective switches replaced by a qualified electrician. Keep TOOL dry, clean, and free from lumber before cutting. Never touch blade or...-hole electrical receptacle. CHECK WITH A QUALIFIED ELECTRICIAN or service personnel if the grounding instructions are tired. Do not attempt to prevent the push stick from the rotating blade. ...
English Manual - Page 5

... risk.
AVOID AWKWARD OPERATIONS AND HAND POSITIONS where a sudden slip could cause your exposure to these chemicals are specially designed to instructions on how often you do this tool, loan them
frequently and use either hand for which means using only your body in line with the path of the saw...
English Manual - Page 7

... death or serious injury. SAVE THESE INSTRUCTIONS
7 WARNING:
Indicates a potentially hazardous situation, which , if not avoided, will result in property damage.
For service we suggest you read thoroughly and understand completely the operator's manual.
Before beginning power tool operation, always wear safety goggles or safety glasses with ANSI Z87.1.
When servicing, use...
English Manual - Page 8
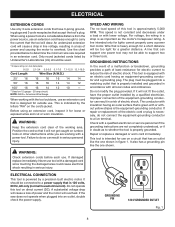
... terminal. Position the cord so that it will not fit the outlet, have 3-prong grounding plugs and 3-pole receptacles that accept the tool's plug. Grounding Instructions
In the event of a malfunction or breakdown, grounding provides a path of this tool on 12 gauge - 20 amp circuit. For voltage, the wiring in accordance with the...
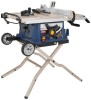
English Manual - Page 10

... knob
anti-kickback pawls
BLADE GUARD
RIP FENCE
table extension
SCALE
MITER FENCE miter scale
STORAGE BRACKET(S)
BEVEL INDICATOR
LOCKING lever
TABLE TILT HANDLE
SWITCH ASSEMBLY
BEVEL LOCKING
LEVER
HEIGHT/bevel ADJUSTING HANDWHEEL
FRONT RAIL
BEVEL SCALE
leg stand
Fig. 2
10 Blade Diameter 10 in .
Rating 120 V, AC only, 60 Hz...
English Manual - Page 11
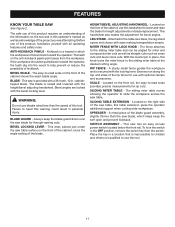
... with a 36-tooth, 10 in personal injury.
SLIDING TABLE EXTENSION - SWITCH ASSEMBLY - This saw table surface on the tool and in place, this knob locks the miter fence to the sliding miter table...gives the operator additional support when cutting wide workpieces. A metal piece of the blade guard assembly, slightly thinner than the speed of this operator's manual as well as cross cuts and...
English Manual - Page 12

... cuts, bevel cuts, and compound cuts. This action will prevent the tool from the switch and store in the Operation section of the cabinet.
Detailed instructions are provided in a safe, secure location. The rip fence is not in contact with a switch assembly that has a built-in serious personal injury.
TO lock your workpiece...
English Manual - Page 13
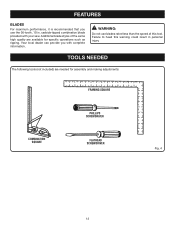
... included) are available for assembly and making adjustments:
Framing Square
COMBINATION SQUARE
Phillips Screwdriver
Flathead Screwdriver
Fig. 4
13 FEATURES
BLADES
For maximum performance, it is recommended that you with your saw.
Failure to heed this tool. Your local dealer can provide you use blades rated less than the speed of the same...
English Manual - Page 15
...the
box. Do not reach over or across the blade.
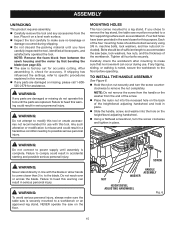
ASSEMBLY
UNPACKING
This product requires assembly. Carefully remove the tool and any accessories from between the saw's housing and the ... The saw must be bolted securely using 3/8 in place.
After assembling it on a level work surface. Inspect the tool carefully to make sure the table saw on the height/bevel adjusting...
English Manual - Page 18

...; Mount the miter fence to the scale on
the side of the fence opposite the locator pin. Retighten the lock knob.
Do not overtighten. Assembly
TO check SAW BLADE installation
See Figure 12.
TO INSTALL miter FENCE
See Figure 13. Remove the miter fence from the miter fence storage...
English Manual - Page 19

...blade prior to : To Check, and Align the Spreader, Saw Blade, and Blade Guard Assembly in alignment. anti-kickback pawls
spreader
WING NUT
MOUNTING PLATE
Fig. 14 DUST CHUTE
ELBOW
...NOTE: Blade alignment with side shields when operating tools. Remember that the saw . Lower the blade. Install the blade guard assembly to inflict severe injury. WARNING:
Always wear safety...
English Manual - Page 20
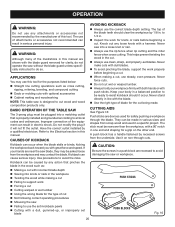
... the cut , use steady, even pressure. Use precautions to the Electrical section in this tool. Never saw or workpiece. Never force cuts.
Do not cut Failing... following correct operating procedures Misusing the saw without the blade guard unless specifically instructed to support work properly before beginning a cut wood and wood composition products only. The...
English Manual - Page 29

...before removing the workpiece. PLACE LEFT HAND ON WORKPIECE AND
Miter fence HERE
CROSS CUT
WARNING:
Make sure the blade guard assembly is recommended that you place the piece to a complete stop before turning
on the saw. To turn the ...the miter fence in personal injury. NOTE: It is installed and working properly to heed this tool.
Failure to avoid possible serious injury.
English Manual - Page 30

... cut on scrap wood. The use a push stick. WARNING:
Make sure the blade guard assembly is installed and working properly to a complete stop before removing the workpiece.
BLADE
RIP CUT
...fence ANGLED
HEIGHT/BEVEL ADJUSTING HANDWHEEL
Fig. 38
30 WARNING:
Make sure the blade guard assembly is installed and working properly to avoid possible serious injury.
Remove the rip fence...
English Manual - Page 34

...dado blades, make a bevel dado cut.
Unplug the saw. Remove the blade guard assembly and the saw is required for the desired width of the spreader. An optional dado throat plate (part ... washer are used.
Install dado throat plate. Push the lever to width of this tool. Rotate the height/ bevel adjusting handwheel until the bevel indicator shows a 30° angle. ...
English Manual - Page 35

... Fig. 48
Also, over the hex nut.
Do not overtighten. Check all items are needed. To replace the blade with an accessory blade, follow the instructions provided with a framing square and make sure the tool is unplugged from the blade and that all clearances for making finish cuts in good workpieces.
English Manual - Page 38
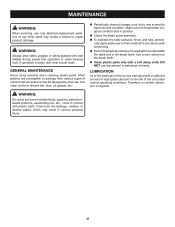
...a resin solvent on the blade teeth.
Clean plastic parts only with side shields during power tool operation or when blowing dust. Therefore, no further lubrication is dusty, also wear a dust mask. ...sure the throat plate is in good condition and in position.
Check the blade guard assembly.
To maintain the table surfaces, fence, and rails, periodically apply paste wax to ...
Repair Sheet - Page 11

.... May Be Purchased Locally
11
Always mention the model number in . NO. ANY REPAIR TO THIS TOOL REQUIRES DIELECTRIC TESTING TO INSURE CUSTOMER SAFETY AND TO COMPLY WITH COMPANY REQUIREMENTS.
* Standard Hardware Item - A134010104 MOTOR ASSEMBLY (INC. TABLE SAW - PAN HD.)...4
4 0121010231 BRUSH TUBE 2 5 0502025007 BRUSH (7 x 17 x 19/17 2 6 0121010238 BRUSH CAP...
Similar Questions

Riving Knife Issue's
I am having issue's with my tile binding up on the riving knife. I have tried adjusting it by loosen...
I am having issue's with my tile binding up on the riving knife. I have tried adjusting it by loosen...
(Posted by Anonymous-165466 5 years ago)

How To Replace The Bevel Lock Washer On A Ryobi Rts30
(Posted by mike1QWJani 10 years ago)

I Need The Manual For The Router Table, Not The Router Itself. Can't Find That!
Need parts list and assembly instructions for the router TABLE shown in the Ryobi R163RTA 'Combo', w...
Need parts list and assembly instructions for the router TABLE shown in the Ryobi R163RTA 'Combo', w...
(Posted by JulietBrown 10 years ago)

Install Kick Back Pawls Rts30
cant figure out how to put on this kickback pawls on table sawrts30
cant figure out how to put on this kickback pawls on table sawrts30
(Posted by fibb420 12 years ago)

Ryobi Rts30 Dado Throat Plate And Dado Blade
I am looking for the correct dado throat plate and dado saw blades for my Ryobi RTS30 10" table saw....
I am looking for the correct dado throat plate and dado saw blades for my Ryobi RTS30 10" table saw....
(Posted by daleemcmillan 12 years ago)