
Ryobi RTS10 Support Question
Ryobi RTS10 Support Question
Find answers below for this question about Ryobi RTS10.Need a Ryobi RTS10 manual? We have 4 online manuals for this item!
Question posted by nsmerk on December 29th, 2015
Ryobi Rts10 Riving Lever Won't Lock
The riving knife lever on Ryobi RTS10 won't lock. Is there anything that shows the assembly of this part so I can figure out why?
Current Answers
Answer #1: Posted by TommyKervz on December 29th, 2015 12:38 PM
TommyKervz

Member since:
January 10th, 2013 Points: 17,776,813

Member since:
January 10th, 2013 Points: 17,776,813
See the repair sheet on the link below.
Related Ryobi RTS10 Manual Pages
English Manual - Page 2

... Electrical...8 Glossary of Terms...9 Features...10-12 Tools Needed...13 Loose Parts...14-15 Assembly...16-19 Operation...20-29 Adjustments...30-31 Maintenance... proof of purchase and return all defects in workmanship or materials in your RYOBI® power tool for a period of two years from misuse, abuse, neglect, alteration,...
English Manual - Page 5
...A push stick is pushed all through sawing. b) Use saw blade guard and spreader/riving knife for every operation for safe use either the rip fence or miter fence to position and guide...ripping work before disconnecting it, to avoid accidental starting when reconnecting to power supply.
THIS TOOL should have a straight edge to guide along the fence. IF THE POWER SUPPLY CORD ...
English Manual - Page 7
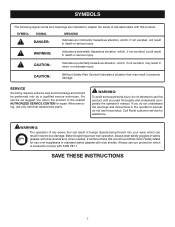
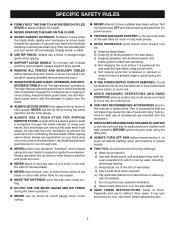
... you do not use eye protection which is marked to comply with side shields. Call Ryobi customer service for repair. SYMBOL SIGNAL
MEANING
DANGER:
Indicates an imminently hazardous situation, which ...
The following signal words and meanings are intended to explain the levels of any power tool can result in minor or moderate injury.
Always use this product until you return the...
English Manual - Page 9

... the workpiece by the blade.
Workpiece or Material The item on which a blade or cutting tool is not properly supported. GLOSSARY OF TERMS
Anti-Kickback Pawls (radial arm and table saws) ... holes accurately.
Ripping or Rip Cut A cutting operation along the length of the workpiece. Riving Knife/Spreader/Splitter (table saws) A metal piece, slightly thinner than at either end of the...
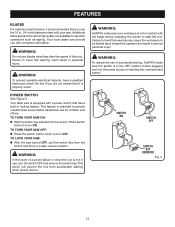
English Manual - Page 10

... .
x 16 in . Cutting Depth at 0 3 in . Input 120 V, AC only, 60 Hz, 13 A No Load Speed 4,800 r/min. (RPM)
spreader
BLADE GUARD ASSEMBLY
BLADE
RIP FENCE
ANTI-KICKBACK PAWLS
MITER GAUGE
FRONT RAIL
LOCKING LEver
BEVEL LOCKING
LEVER
BLADE ADJUSTING
HANDLE
BEVEL INDICATOR
SWITCH assembly
trigger Lock
Fig. 2 10 Cutting Depth at 45 2-5/8 in . Blade Arbor 5/8 in .
English Manual - Page 11

...Figure 2.
Bevel angles are attempting. Failure to help prevent or reduce the possibility of the cabinet. This handle is thrown back toward the operator. RIP FENCE - The saw table shows the distance between the rip fence and the blade. Their teeth point away from the switch. Kickback is adjusted with a bevel locking lever...tool. WARNING:
Do not use the tool... guard assembly includes ...
English Manual - Page 12
... KEY
removed
Fig. 3
12 Your local dealer can provide you with the blade before plugging tool into the switch, lift the switch
button to prevent unauthorized and possible hazardous use by children and... in., 24-tooth blade provided with a power switch that has a built-in locking feature. POWER SWITCH
See Figure 3. Failure to heed this warning may cause the workpiece to be kicked back toward...
English Manual - Page 17

...20 x 1-5/8 in.)
4 hex nuts (1/4-20)
Note: This hardware was in the pack with hardware for assembling the leg stand and leveling feet.
Place the leg stand on the TABLE saw must be mounted...in . TO Install the locking handle
See Figure 9. Slide the locking handle over the bolt and insert into the hole in the blade adjusting handle.
Place the lock nut behind the blade ...
English Manual - Page 18
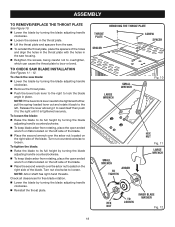
... handle
clockwise.
Remove the throat plate. Push the bevel lock lever to the right to lock the blade
angle in the saw housing.
Retighten the screws, being... turning the blade adjusting handle clockwise.
Reinstall the throat plate. ASSEMBLY
TO remove/replace the THROAT PLATE
See Figure 10. Lower the blade by turning the blade adjusting handle
clockwise...
English Manual - Page 22

... for information on page 26. The end is angled, with a C-clamp. HOW TO MAKE A FEATHERBOARD
See Figure 17.
Select a solid, knot-free piece of lumber approximately 3/4 in . wide and 18 in . Miter one... the featherboard to the edge of the blade.
featherboard
push stick
push block
Bevel Locking
Lever
"c" clampS
Fig. 18
3-5/8 in. 3/4 in.
1/4 in. 1/8 in. 18 in.
30°
1-13/16 in...
English Manual - Page 23

... points (gullets) are higher than the workpiece by turning the handle clockwise. If it needs to be in the locked position as shown in . Then release bevel lock lever and allow it by approximately 1/8 in figure 20. NOTE: Prior to its original position. If the bevel indicator is not at zero when the saw...
English Manual - Page 24
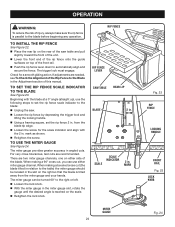
... top of the front rail. Push the rip fence lever down to the Blade
See Figure 23. TO INSTall the Rip Fence
See Figure 22. Place the rear lip on the rear of... reached on either miter gauge channel. The miter gauge can use the miter gauge
See Figure 24.
The trigger lock must engage. Scale
Scale indicator
2 in.
If adjustments are recommended. For very close ...
English Manual - Page 27

... WARNING:
Make sure the blade guard assembly is at the desired angle.
Set the blade to the correct depth for the workpiece and retighten the bevel locking lever.
Set the miter gauge at... make a bevel rip cut
See Figure 30.
Remove the miter gauge by depressing the lock and lifting the locking handle.
Turn the bevel locking lever to the left of the blade ...
English Manual - Page 28
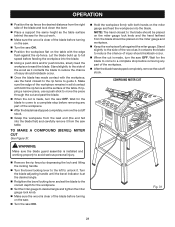
... Retighten the bevel locking lever and set the ...Figure 31.
Hold the workpiece firmly with the edge flush against the miter gauge.
COMPOUND MITER cut
WARNING:
Make sure the blade guard assembly is installed and working properly to avoid serious personal injury.
Remove the rip fence by depressing the lock and lifting the locking handle.
Turn the bevel locking lever...
English Manual - Page 31

... on the indicator with the 45° mark on the bevel scale. ADJUSTMENTS
To sEt the 90° Positive Stop
See Figure 34. Unlock the bevel locking lever. Relock the bevel locking lever.
Reset the bevel indicator to the maximum height by turning the blade adjusting handle counterclockwise.
Raise the blade to 45° by...
English Manual - Page 32
...condition.
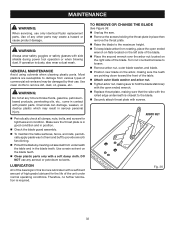
To remove or change the blade
See Figure 36. Unplug the saw. ... the bearings in position.
Check the blade guard assembly. To maintain the table surfaces, fence, and...Securely attach throat plate with side shields during power tool operation or when blowing dust. GENERAL MAINTENANCE
Avoid ... Ryobi replacement parts.
Therefore, no further lubrication is dusty,...
English Manual - Page 34

...; crystalline silica from these exposures varies, depending on how often you have purchased your tool, should a need ever exist for repair parts or service, simply contact your exposure to... parts, always give the following information:
• MODEL NUMBER • SERIAL NUMBER
BTS12S
RYOBI® is a registered trademark of these chemicals are specially designed to these chemicals: work...
Repair Sheet - Page 5
... (LARGE 1
39 0201010904 HEX KEY (M5 1
40 0101210208 GUARD (BAFFLE PLATE 1
41 089015001005 BEVEL LOCK LEVER 1
42 0101140904 SPRING 1
43 411062004 NUT (M4, CHEESE HD 2
44 410542005 SCREW (m4 X 15 mm 2
45 089015001702 BEVEL LOCK LEVER ASSEMBLY (INC. NUMBER
DESCRIPTION
QTY. RYOBI Table Saw - MODEL NUMBER BTS12S
The model number will be found on a plate attached...
Repair Sheet - Page 7

... HOUSING 1 22 420110004 NEEDLE BEARING 3 23 A101010501 JACKSHAFT ASSEMBLY (ARBOR 1 987000372 OPERATOR'S MANUAL 1
9-30-08 (REV:00)
RYOBI Table Saw - NUMBER
DESCRIPTION
QTY.
1 0101210210 LOWER BLADE GUARD 1 2 451020004 WIRE CONNECTOR 2 3 0101140703 MOTOR CORD 1 4 451010001 STRAIN RELIEF 1 5 412042001 EXTERNAL TOOTH LOCK WASHER 2 6 410252001 SCREW w/WASHER (M4 x 12 mm...
Repair Sheet - Page 8

...8 3
2
PARTS LIST For FIGURE D
Key Part
Key Part
No. No. RYOBI TABLE SAW - MODEL NO.
KEY NOS. 2-11 1 2 0152010211 FOOT PAD 4 3 0101140318 LEG 4
4 0101140317 LOWER SIDE BRACE 2 5 0101140316 LOWER BRACE 2 6 0101140315 UPPER SIDE BRACE 2
7 0101140314 UPPER BRACE 2
8 410032709 CARRIAGE BOLT (5/16 x 5/8 in 16
9 411062702 HEX LOCK NUT (5/16-18)........ 16...
Similar Questions

Riving Knife Issue's
I am having issue's with my tile binding up on the riving knife. I have tried adjusting it by loosen...
I am having issue's with my tile binding up on the riving knife. I have tried adjusting it by loosen...
(Posted by Anonymous-165466 4 years ago)

Dado Blade Insert For A Ryobi Rts10 Table Saw
Where can I purchase a dado blade insert for my Ryobi RTS10 10" table saw? I am having difficulty fi...
Where can I purchase a dado blade insert for my Ryobi RTS10 10" table saw? I am having difficulty fi...
(Posted by bstilton 9 years ago)

Rts10 Dado Throat Cover
I need a dado throat cover for a Ryobi RTS10 table saw
I need a dado throat cover for a Ryobi RTS10 table saw
(Posted by mattharbaugh 10 years ago)

Rts10/bts16
Is the motor on the RTS10, the same motor as is on the BTS16?
Is the motor on the RTS10, the same motor as is on the BTS16?
(Posted by kesev 11 years ago)
Cam Washer (plastic) Piece Behind Bevel Lock Lever Broke.
Literally just unboxed this rts20 set it up. Went to move the blade to (0) Degree and Cam washer (pl...
Literally just unboxed this rts20 set it up. Went to move the blade to (0) Degree and Cam washer (pl...
(Posted by Jlughart 12 years ago)