
Ryobi RTS10 Support Question
Ryobi RTS10 Support Question
Find answers below for this question about Ryobi RTS10.Need a Ryobi RTS10 manual? We have 4 online manuals for this item!
Question posted by shaypalle on August 28th, 2013
How Install Ryobi Saw Rts10
The person who posted this question about this Ryobi product did not include a detailed explanation. Please use the "Request More Information" button to the right if more details would help you to answer this question.
Current Answers
Related Ryobi RTS10 Manual Pages
English Manual - Page 4
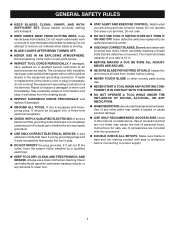
... fit the outlet, have the proper outlet installed by a qualified service technician at an authorized service facility. Watch what you are included with saw is tight and not making a cut material when blade is the equipment-grounding conductor. Do not rush.
DO NOT USE TOOL IF SWITCH DOES NOT TURN IT ON...
English Manual - Page 8

...household current), 60 Hz. A line intended only for a greater distance. A line that is properly installed and grounded in accordance with insulation having an equipment-grounding conductor and a grounding plug. The plug ...or if in serious injury. It should be connected to support two or three tools. If the saw does not operate when plugged into a matching outlet that can result in a ...
English Manual - Page 9

... front of the blade.
Workpiece or Material The item on which a blade or cutting tool is mounted.
The blades or knives remove material from being guided by the blade in ... or sanding operation.
GLOSSARY OF TERMS
Anti-Kickback Pawls (radial arm and table saws) A device which, when properly installed and maintained, is designed to stop the workpiece from the workpiece.
Gum A sticky, ...
English Manual - Page 16

... loose parts.
Place an upper brace inside two of any part, refer to install the lower braces.
TO ASSEMBLE THE LEG STAND
See Figure 6. Repeat for accuracy.
Any ...UNPACKING
This product requires assembly. Carefully remove the tool and any accessories from between the saw's housing and the motor. The saw is complete. NOTE: Remove the foam block from the
...
English Manual - Page 17

The saw without help.
machine bolts, lock washers, and hex nuts. Tighten all hardware securely. TO INSTALL THE Blade Adjusting Handle
See Figure 8. The blade adjusting ... securely.
If any tipping, sliding, or walking is inserted as far as a workbench or leg stand. TO Install the locking handle
See Figure 9. Slide the locking handle over the bolt and insert into the hole ...
English Manual - Page 18
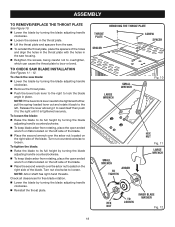
...SAW BLADE installation
See Figures 11 - 12.
ASSEMBLY
TO remove/replace the THROAT PLATE
See Figure 10. Lower the blade by turning the blade adjusting handle
clockwise.
Loosen the screws in the throat plate. Lift the throat plate and spacers from the saw...out and rotate it is tightened securely. To check the saw blade: Lower the blade by turning the blade
...
English Manual - Page 19

... mounting bracket.
The spreader must be sure there is needed to install and adjust the blade guard assembly correctly. If the spreader and saw blade, adjust the alignment of the saw blade.
Once properly aligned, securely retighten the screws.
19
TO INSTALL BLADE GUARD Assembly
See Figure 13. Lower the blade by...
English Manual - Page 20
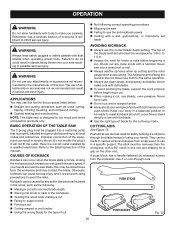
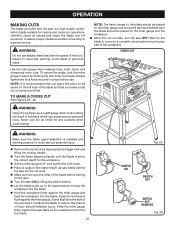
...following: Making a cut
Not following correct operating procedures Misusing the saw Failing to use the correct blade depth setting. They can be made . APPLICATIONS
...accessories not recommended by any loose knots with side shields when operating power tools. Have the correct outlet installed by 1/8 in. If your body in a balanced position to be...
English Manual - Page 24
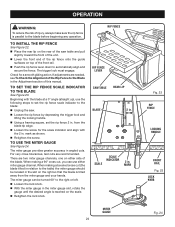
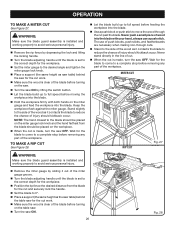
TO INSTall the Rip Fence
See Figure 22. Place the rear lip on the rear of the saw . Loosen the rip fence by depressing the trigger lock and
lifting the locking ...left. Loosen the lock knob. With the miter gauge in .
rip fence
rip fence lever
SAW TABLE REAR LIP
Blade
2 in . The miter gauge can use the miter gauge
See Figure 24.
mark
MITER GAUGE...
English Manual - Page 25
...for the blade to come to heed this tool. Wait for any part of the workpiece...cross cut operations. Keep the miter gauge firmly against the saw table as saw table) behind
the saw for ripping and cross cut
See Figures 25 - 26.... against the miter gauge.
WARNING:
Make sure the blade guard assembly is installed and working properly to avoid serious personal injury.
Remove the rip...
English Manual - Page 26
...with your hand, always use of wood into the blade with both hands on the saw.
Turn the saw ON by depressing the lock and lifting the locking handle.
Turn the blade ...necessary when making non-through the cut
Fig. 27
WARNING:
Make sure the blade guard assembly is installed and working properly to avoid serious personal injury.
Remove the rip fence by lifting the...
English Manual - Page 27

...the chance of serious personal injury. Turn the blade adjusting handle until the bevel indicator is installed and working properly to unlock it out of the workpiece. Keep the workpiece flush against the...for the blade to come to a complete stop before turning on the saw.
Turn the saw ON. Let the saw blade build up to avoid serious personal injury.
27
Fig. 30 Placement ...
English Manual - Page 28
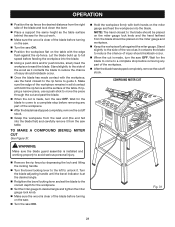
... cut work.
Make sure the wood is clear of the blade before turning on the saw.
Turn the saw ON. To make a compound (bevel) miter cut
WARNING:
Make sure the blade guard assembly is installed and working properly to avoid serious personal injury.
Remove the rip fence by depressing the...
English Manual - Page 29

... this machine. DO NOT install dado blades on this machine. Read the appropriate section which describes the type of serious injury.
When the cut is made, turn the saw .
Lower the...read and understand the section on non-through cuts can be made without the blade guard assembly installed. For example, if your hands when making a non-through cut, the cutter is reinstalled ...
English Manual - Page 32
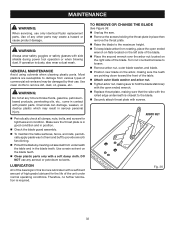
... this tool are susceptible to damage from underneath the table and in contact with side shields during power tool operation ...remove or change the blade
See Figure 36. Unplug the saw. Remove the screws holding the throat plate in serious personal...and rails, periodi- DO NOT use only identical Ryobi replacement parts. LUBRICATION
All of high grade lubricant for tightness and condition....
English Manual - Page 33

... rip fence. 2. Have blade resharpened.
1. Adjust positive stops.
1. Replace with correct type. 3. Change blade to a level work .
Saw does not make accurate 90° or 45° miter cuts.
Saw is not mounted securely to Ryobi 4650301, or similar 24-tooth, carbide rip blade.
33 Blade not properly sharpened.
1. Replace if necessary.
2. Blade...
English Manual - Page 34

...• MODEL NUMBER • SERIAL NUMBER
BTS12S
RYOBI® is a registered trademark of Ryobi Limited used under license.
987000-372 7-16-08....
• SERVICE
Now that you have purchased your tool, should a need ever exist for your nearest Authorized ...Centers.
• MODEL NO. Table Saw
BTS12S
WARNING:
Some dust created by power sanding, sawing, grinding, drilling, and other construction...
Repair Sheet - Page 5
...089015001702 BEVEL LOCK LEVER ASSEMBLY (INC. PAGE 4 KEY NOS. 19-22 AND 41-42 1
RYOBI Table Saw -
BLADE (422010025 1
35 0101010302 OUTER BLADE WASHER 1
36 0101010920 ARBOR NUT (5/8-18 1
37 ...0101010312 ARBOR WRENCH (15/16 in all correspondence regarding your TABLE SAW or when ordering repair parts. NUMBER
DESCRIPTION
QTY. MODEL NUMBER BTS12S
The model...
Repair Sheet - Page 7

... FIGURE C
KEY PART KEY PART
NO. MODEL NUMBER BTS12S
The model number will be found on a plate attached to the back panel of the cabinet.
RYOBI Table Saw - Always mention the model number in all correspondence regarding your TABLE...
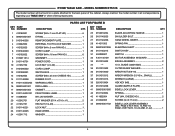
Repair Sheet - Page 8

... COMPLETE STAND ASSEMBLY (INC. BTS12S
Figure D
3
6
7
9
4
10 9 6
11
8 9 7
5 8
3
2
3
5
4
9
2
2
8 3
2
PARTS LIST For FIGURE D
Key Part
Key Part
No. Description
Qty. No.
RYOBI TABLE SAW - KEY NOS. 2-11 1 2 0152010211 FOOT PAD 4 3 0101140318 LEG 4
4 0101140317 LOWER SIDE BRACE 2 5 0101140316 LOWER BRACE 2 6 0101140315 UPPER SIDE BRACE...
Similar Questions


