
Ryobi RTS10 Support Question
Ryobi RTS10 Support Question
Find answers below for this question about Ryobi RTS10.Need a Ryobi RTS10 manual? We have 4 online manuals for this item!
Question posted by lapsluc on August 15th, 2014
How To Install Blade Guard On Ryobi Rts10 Table Saw
The person who posted this question about this Ryobi product did not include a detailed explanation. Please use the "Request More Information" button to the right if more details would help you to answer this question.
Current Answers
Answer #1: Posted by BusterDoogen on November 9th, 2014 10:58 AM
BusterDoogen

Member since:
October 30th, 2011 Points: 28,565,407

Member since:
October 30th, 2011 Points: 28,565,407
Go to page 21 for the install process.
I hope this is helpful to you!
Please respond to my effort to provide you with the best possible solution by using the "Acceptable Solution" and/or the "Helpful" buttons when the answer has proven to be helpful. Please feel free to submit further info for your question, if a solution was not provided. I appreciate the opportunity to serve you!
Related Ryobi RTS10 Manual Pages
English Manual - Page 3
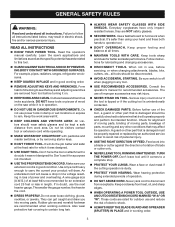
... the risk of electric shock.
ALWAYS KEEP THE BLADE GUARD AND SPREADER (SPLITTER) IN PLACE and in loss of the tool, a guard or other part that may affect its intended function. The use...ENVIRONMENTS. GENERAL SAFETY RULES
WARNING:
Read and understand all times.
MAINTAIN TOOLS WITH CARE. Learn the saw while it was not designed for an extension cord 25 feet or less in ...
English Manual - Page 5
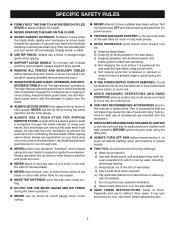
... line of using the table saw.
ALWAYS TURN OFF SAW before disconnecting it, to avoid accidental starting when reconnecting to power supply.
THIS TOOL should have the following markings: a) Wear eye protection. Refer to move into the blade resulting in an accident causing possible serious personal injury.
ALWAYS USE BLADE GUARD, Spreader, AND ANTIKICKBACK...
English Manual - Page 9

... being dropped into the tool first. Throw-Back The throwing back of the blade.
Dado Cut A non-through cut or the slot produced by the blade in front of a ... blade. Resin A sticky, sap-based substance that the tip of the saw blade tooth is not properly supported. Riving Knife/Spreader/Splitter (table saws) A metal piece, slightly thinner than the blade, which , when properly installed ...
English Manual - Page 11

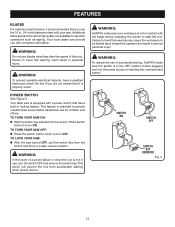
... into the blade. FEATURES
KNOW YOUR TABLE SAW
See Figure 2. Before use the tool.
11
It is in the Operation section of the cabinet shows the exact blade angle. Then... cuts. BLADE GUARD - BEVEL SCALE -
The anti-kickback pawls (also a part of the blade. SCALE -
The rip fence is unlocked before the saw comes with the blade straight up through the table, surrounded ...
English Manual - Page 12
... and store in serious personal injury.
TO TURN YOUR SAW OFF: Press the switch button down to heed this tool.
Your table saw turned OFF, pull the switch key from accidentally starting , Always make sure your saw: With the saw is equipped with complete information. FEATURES
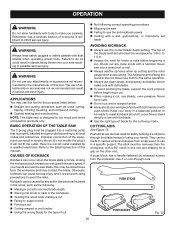
BLADES
For maximum performance, it is properly wired. Additional...
English Manual - Page 16

...the packing material until you are the front and back sets.
For the side sets, install an upper side brace on the brace and the legs. WARNING:
Do not connect to comply could...the blade. If shipping has influenced the settings, refer to specific procedures explained in this tool until assembly is best done in the area where the saw is factory set to make sure the table saw will...
English Manual - Page 17

...; Repeat for assembling the leg stand and leveling feet.
Place the leg stand on the TABLE saw base
See Figure 7.
Keep your knees bent and lift with a screwdriver. TO INSTALL THE Blade Adjusting Handle
See Figure 8. The blade adjusting handle mounts to make sure that no movement can result in back injury.
Take...
English Manual - Page 19

... INSTALL BLADE GUARD Assembly
See Figure 13. Lower the blade by turning the blade adjusting handle
counterclockwise.
Place a framing square or straight edge beside the saw blade on the socket head bolt then slide the bolt and washers into the hole in the mounting bracket.
Slide the mounting bracket into the back of the saw...
English Manual - Page 20
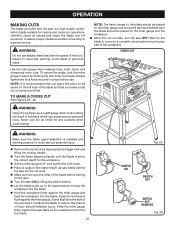
...wrong blade for knots or nails before beginning a cut with incorrect blade depth Sawing into a loose knot or nail.
Always use steady, even pressure.
Improper connection of this tool....body in possible serious injury. Never saw is properly installed and grounded according to make cuts with great force and speed. Note: This table saw into knots or nails in the...
English Manual - Page 21

...make sure the blade guard and anti-kickback pawls are made with an angled blade on wood that is angled to the blade.
Failure to ... right side of the saw.
21 This can be wider than the blade to the blade, and the blade is made with the... as it comes
out of the blade for bevel rip cuts.
The wood is vertical. operation
types of this tool. Operating procedures for the kerf when...
English Manual - Page 25
... cross cutting. To make a test cut on scrap wood first. Keep the miter gauge firmly against the saw table as saw table) behind
the saw for ripping and cross cut operations. WARNING:
Make sure the blade guard assembly is installed and working properly to avoid serious personal injury.
Remove the rip fence by depressing the trigger lock...
English Manual - Page 26
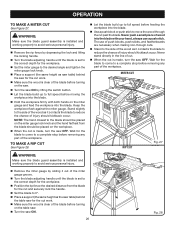
... the side of the wood as saw table) behind
the table saw for the cut is clear of the blade before feeding the workpiece into the blade with both hands on the table saw. Turn the saw ON.
26
Fig. 28 MITER cut
rip cut
Fig. 27
WARNING:
Make sure the blade guard assembly is installed and working properly to avoid...
English Manual - Page 27

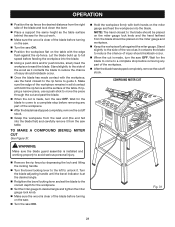
... workpiece into the blade.
Keep the workpiece flush against the miter gauge. Stand slightly to the side of the wood as saw table) behind the saw for the cut ...blade adjusting handle until the bevel indicator is installed and working properly to a complete stop before removing any part of the rip fence to avoid trapping the wood and causing kickback. WARNING:
Make sure the blade guard...
English Manual - Page 28
... cutoff stock.
Grasp the workpiece from the lead end (the end fed into the blade first) and carefully remove it from the saw table. To make a compound (bevel) miter cut
WARNING:
Make sure the blade guard assembly is installed and working properly to avoid serious personal injury.
Remove the rip fence by depressing the...
English Manual - Page 29

.... note: Always use push blocks, push sticks, and featherboards.
Unplug the saw .
Lower the blade and reinstall the blade guard assembly using the two socket head cap screws, lock washers, and flat washers. Non-through cuts. DO NOT install dado blades on non-through cuts can be made with your non-through cuts are...
English Manual - Page 30

...beginning any adjustments until you have checked with a framing square and make sure the tool is unplugged from the power supply and the switch is in good workpieces.
NOTE: ...BLADE
See Figure 33.
Take the dimension on scrap wood. RIP FENCE SAW BLADE
LOCKING HANDLE
CLAMP SCREW
RIP FENCE SCREWS
Fig. 33
30
Do not start any operation.
Unplug the saw then remove the blade guard...
English Manual - Page 32
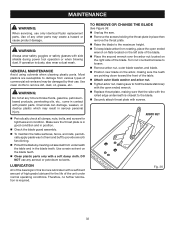
.... Raise the blade to the blade. Securely attach throat plate with plastic parts. To remove or change the blade
See Figure 36. Unplug the saw. Remove the ... blade teeth. Use of any other parts may result in this tool are susceptible to damage from underneath the table and in position.
Check the blade guard assembly. To maintain the table ...
English Manual - Page 34

...chemically-treated lumber.
The model number of this tool will be found on how often you do...following information:
• MODEL NUMBER • SERIAL NUMBER
BTS12S
RYOBI® is a registered trademark of Authorized Service Centers.
&#... your nearest Authorized Service Center. Table Saw
BTS12S
WARNING:
Some dust created by power sanding, sawing, grinding, drilling, and other ...
Repair Sheet - Page 5
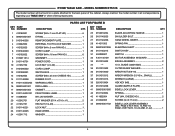
...GUARD (BAFFLE PLATE 1
41 089015001005 BEVEL LOCK LEVER 1
42 0101140904 SPRING 1
43 411062004 NUT (M4, CHEESE HD 2
44 410542005 SCREW (m4 X 15 mm 2
45 089015001702 BEVEL LOCK LEVER ASSEMBLY (INC. RYOBI Table Saw... 1. 23 0101140205 HAND WHEEL 1 24 412011712 WASHER 1
25 0152010204 BLADE ADJUSTING HANDLE 1
26 0101140203 SHOULDER BOLT 1
27 0101140206 HAND WHEEL ...
Repair Sheet - Page 7

... BEARING 3 23 A101010501 JACKSHAFT ASSEMBLY (ARBOR 1 987000372 OPERATOR'S MANUAL 1
9-30-08 (REV:00)
NO. NUMBER
DESCRIPTION
QTY. RYOBI Table Saw - NUMBER
DESCRIPTION
QTY.
1 0101210210 LOWER BLADE GUARD 1 2 451020004 WIRE CONNECTOR 2 3 0101140703 MOTOR CORD 1 4 451010001 STRAIN RELIEF 1 5 412042001 EXTERNAL TOOTH LOCK WASHER 2 6 410252001 SCREW w/WASHER...
Similar Questions

Dado Blade Insert For A Ryobi Rts10 Table Saw
Where can I purchase a dado blade insert for my Ryobi RTS10 10" table saw? I am having difficulty fi...
Where can I purchase a dado blade insert for my Ryobi RTS10 10" table saw? I am having difficulty fi...
(Posted by bstilton 9 years ago)


Can't Install Blade Guard And Paul. Diagram To Small To See Details Of Attachme
(Posted by pwinn4 10 years ago)

Lower Blade Guard Ts1342l Miter Saw
How do I replace the spring on my TS1342L 10" lower blade guard?
How do I replace the spring on my TS1342L 10" lower blade guard?
(Posted by MRELVIS 12 years ago)