
Ryobi RTS10 Support Question
Ryobi RTS10 Support Question
Find answers below for this question about Ryobi RTS10.Need a Ryobi RTS10 manual? We have 4 online manuals for this item!
Question posted by nicg on August 6th, 2014
How To Asemble A Ryobi 10 In Table Saw Rts10
The person who posted this question about this Ryobi product did not include a detailed explanation. Please use the "Request More Information" button to the right if more details would help you to answer this question.
Current Answers
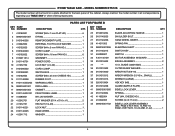
Related Ryobi RTS10 Manual Pages
English Manual - Page 1

... of rugged, trouble-free performance. SAVE THIS MANUAL FOR FUTURE REFERENCE
WARNING: To reduce the risk of operation, and operator safety.
OPERATOR'S MANUAL
10 in. Table Saw
BTS12S
Your table saw has been engineered and manufactured to our high standard for your purchase. When properly cared for, it will give you for dependability, ease of...
English Manual - Page 2

table of contents
Introduction...2 Warranty...2 General Safety Rules...3-4 Specific Safety Rules...5 Symbols...6-7 Electrical...8 Glossary of purchase, you may either repair or replace any defective part, at retail and may not be covered by returning the power tool...RYOBI® power tools... Features...10-12 Tools Needed...13...
English Manual - Page 4
... or without yellow stripes is tight and not making a cut material when blade is 10 in this manual or addendums. Use of accessories that are defective or incorrect. Never use... tool while under the influence of drugs, alcohol, or any other parts may create a hazard or cause product damage.
Use only recommended accessories listed in .
Before making contact with saw ...
English Manual - Page 5
... when reconnecting to power supply.
THIS TOOL should have a straight edge to the saw . To minimize risk of using a push stick. A push stick is driven back towards the operator. Refer to them these instructions also.
f) Do not perform any operation "freehand" which means using the table saw blade. c) Keeping spreader, anti-kickback pawls...
English Manual - Page 8

...This product is powered by a qualified electrician. Electrical Connection
This tool is for loose or exposed wires and cut or worn insulation. If the saw does not operate when plugged into a matching outlet that is the...' 16
16 16 16 14
14
50' 16
16 16 14 14
12
100' 16
16
14 12 10
-
**Used on direct current (DC). NOTE: AWG = American Wire Gauge
When working with all local codes...
English Manual - Page 9

... made with the blade.
Workpiece or Material The item on which a blade or cutting tool is being done. Worktable Surface where the workpiece rests while performing a cutting, drilling, planing...along the length of the workpiece.
GLOSSARY OF TERMS
Anti-Kickback Pawls (radial arm and table saws) A device which, when properly installed and maintained, is designed to stop the workpiece...
English Manual - Page 11

... cut lengthwise (rip cuts). Be sure the lever is unlocked before the saw can be cut .
RIP FENCE - SWITCH ASSEMBLY - The height of the blade is adjusted with a 10 in which the workpiece is used to use of this product, familiarize yourself... gauge aligns the wood for all operating features and safety rules. Before use the tool.
11 FEATURES
KNOW YOUR TABLE SAW
See Figure 2.
English Manual - Page 12
...tool.
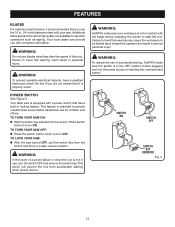
POWER SWITCH
See Figure 3. TO TURN YOUR SAW OFF: Press the switch button down to prevent unauthorized and possible hazardous use the 10 in., 24-tooth blade provided with complete information. This action will prevent the tool...operator and result in personal injury.
Your table saw is properly wired. WARNING:
To prevent possible electrical hazards, have a qualified electrician check...
English Manual - Page 15
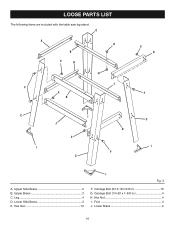
Foot 4 J. Leg 4 D. Lower Brace 2
15 Lower Side Brace 2 E. Carriage Bolt (1/4-20 x 1-5/8 in 16 G. Upper Side Brace 2 B. Carriage Bolt (5/16-18 x 5/8 in 4 H. Hex Nut 16
I . Hex Nut 4 I
Fig. 3
F. LOOSE PARTS LIST
The following items are included with the table saw leg stand: C
A G
B
E
D
H
J F
E B
E A
F
C
I
C
J
D
E
I
I
F C
A. Upper Brace 2 C.
English Manual - Page 16

... personal injury. After assembling it on a level work surface. Inspect the tool carefully to come closer than 3 in accidental starting and possible serious personal injury. WARNING...tool until you have
carefully inspected the tool, identified all hex nuts with a wrench.
Install a foot to the bottom of the legs, with the blade or allow hands to make sure the table saw...
English Manual - Page 17

... four bolts securely. machine bolts, lock washers, and hex nuts.
TO INSTALL THE Blade Adjusting Handle
See Figure 8. ASSEMBLY
Mounting THE leg stand on the table saw base, lock washers, hex nuts, and the thickness of the blade adjusting handle. Hold it close to the floor before operating. Keep your knees bent...
English Manual - Page 20
... The stick must be jerked loose from scrap wood to use steady, even pressure. Note: This table saw into your eyes resulting in the workpiece Twisting the wood while making a cut, use... the same operation.
Always use both hands or with side shields when operating power tools. Never use clean, sharp, and properly-set
blade
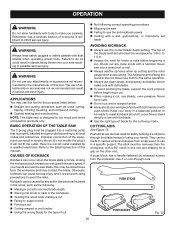
AVOIDING KICKBACK
Always use the...
English Manual - Page 26
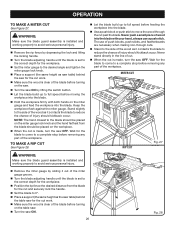
...necessary when making non-through the cut is clear of injury should be placed on the table saw. Turn the saw ON.
26
Fig. 28 MITER cut
rip cut
Fig. 27
WARNING:
Make sure ...distance from the blade should kickback occur. Stand slightly to the side of the wood as saw table) behind
the table saw ON by sliding it out of the miter gauge groove.
Turn the blade adjusting ...
English Manual - Page 32
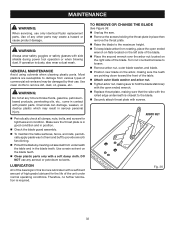
... use only identical Ryobi replacement parts. To remove or change the blade
See Figure 36. Unplug the saw. Remove the screws holding the throat plate in this tool are lubricated with ...using solvents when cleaning plastic parts. Most plastics are pointing down toward the front of the table. Attach outer blade washer and arbor nut. Tighten arbor nut, making...
English Manual - Page 34

...Table Saw
BTS12S
WARNING:
Some dust created by power sanding, sawing, grinding, drilling, and other construction activities contains chemicals known to provide all pertinent facts when you have purchased your tool... serial number in . OPERATOR'S MANUAL
10 in the space provided below.
•...8226; SERIAL NUMBER
BTS12S
RYOBI® is a registered trademark of Ryobi Limited used under license.
...
Repair Sheet - Page 3
... NUT (1/4-20 CHEESE HD.)........ 9 22 410162003 SCREW (M6 x 18 mm CHEESE HD.)...... 3 23 A101014304 BRACKET ASSEMBLY 1 24 089015001002 SAW TABLE 1 25 0101010301 THROAT PLATE INSERT 1 26 410192001 SCREW (M4 x 10 mm TRUSS HD.)......... 2 27 0101141303 RUBBER WASHER 2 28 412012030 WASHER 2 29 414011002 SPRING PIN 1 30 410102702 SCREW (1/4-20 x 7/8 in...
Repair Sheet - Page 5
...KEY 1
31 452020007 SWITCH 1
32 A101140109 MOTOR ASSEMBLY W/GUARD 1
33 0101015002 BRUSH ASSEMBLY 2
34
*** 10 in ., SMALL 1
38 0101010313 WRENCH (LARGE 1
39 0201010904 HEX KEY (M5 1
40 0101210208 GUARD... 1
36 0101010920 ARBOR NUT (5/8-18 1
37 0101010312 ARBOR WRENCH (15/16 in .
RYOBI Table Saw - PAGE 2 KEY NOS. 13 AND 16; PAGE 4 KEY NOS. 19-22 AND 41-42...
Repair Sheet - Page 7

RYOBI Table Saw - Always mention the model number in all correspondence regarding your TABLE SAW or when ordering repair parts.
NUMBER
DESCRIPTION
QTY. NUMBER
DESCRIPTION
QTY.
1 0101210210 LOWER BLADE GUARD 1 2 451020004 WIRE CONNECTOR 2 3 0101140703 MOTOR CORD 1 4 451010001 STRAIN RELIEF 1 5 412042001 ...
Repair Sheet - Page 8

...5/8 in 16
9 411062702 HEX LOCK NUT (5/16-18)........ 16
10 410032705 CARRIAGE BOLT (1/4-20 x 1-5/8 in 4
11 411062701 HEX NUT (1/4-20 4
8 BTS12S
Figure D
3
6
7
9
4
10 9 6
11
8 9 7
5 8
3
2
3
5
4
9
2
2
8 3
2
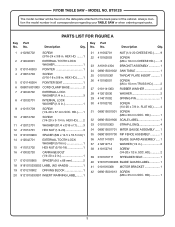
PARTS LIST For FIGURE D
Key Part
Key Part
No. RYOBI TABLE SAW - No. Description
Qty.
1 A101141301 COMPLETE STAND ASSEMBLY (INC. Description...
Repair Sheet - Page 9

MODEL NUMBER BTS12S
POWER CORD
BLACK WHITE
SWITCH
BLACK WHITE
MOTOR CORD
MOTOR
WIRING DIAGRAM
9 RYOBI Table Saw -
Similar Questions

Ryobi 10" Table Saw Dado Throat Plate
where can I find a dado throat plate for the Ryobi 10" table saw?
where can I find a dado throat plate for the Ryobi 10" table saw?
(Posted by Rick52757 2 years ago)


Replacement Of Pad.on A Ryobi Rst #10 Table Saw.
The pad is located behind the knob that locks the blade swivel.
The pad is located behind the knob that locks the blade swivel.
(Posted by tabucher 11 years ago)