Ryobi DP102L Support Question
Ryobi DP102L Support Question
Find answers below for this question about Ryobi DP102L.Need a Ryobi DP102L manual? We have 4 online manuals for this item!
Question posted by stantonal64 on December 27th, 2013
Positioning Of Laser
The X is too far back on the table. How can I adjust that?
Current Answers
Answer #1: Posted by hzplj9 on December 29th, 2013 1:53 PM
hzplj9

Member since:
June 25th, 2012 Points: 4,875,690

Member since:
June 25th, 2012 Points: 4,875,690
You can adjust the laser by reading page 15 of the installation manual downloadable from the Helpowl site via this link.
http://www.manualowl.com/m/Ryobi/DP102L/Manual/202282?page=1
Related Ryobi DP102L Manual Pages
English Manual - Page 1
... user must read and understand the operator's manual before using
this product. WARNING: To reduce the risk of operation, and operator safety.
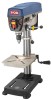
DRILL PRESS
DP102l
Your drill press has been engineered and manufactured to our high standard for your purchase. Thank you years of rugged, trouble-free performance. SAVE THIS...
English Manual - Page 2
......10-11 Tools Needed...11 Loose Parts...12 Assembly...13-17 Operation...18-20 Adjustments...21-22 ... in a reasonable time, but, in the design of purchase. One World Technologies, Inc. TABLE OF CONTENTS
Introduction...2 Warranty...2 General Safety Rules...3-4 ...
English Manual - Page 5
...or turning power ON.
ADJUST THE TABLE OR DEPTH STOP TO AVOID DRILLING INTO THE TABLE. WARNING:
Some dust created by ... AND WORKPIECE MATERIAL.
BE SURE DRILL BIT OR CUTTING TOOL IS SECURELY LOCKED IN THE CHUCK.
BE SURE CHUCK ...column and head and table support collars are not suitable for laser use.
NEVER PLACE YOUR FINGERS IN A POSITION WHERE THEY COULD CONTACT...
English Manual - Page 8
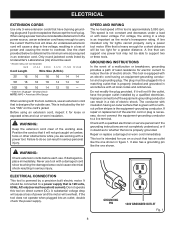
... an electric cord having an outer surface that has an outlet like the one power tool may not be connected to reduce the risk of least resistance for loose or exposed wires and cut or worn insulation. Position the cord so that is not constant and decreases under a load or with the...
English Manual - Page 9
...supported.
Ripping or Rip Cut A cutting operation along the length of adjustable blades. As it securely against the table or fence during any angle other than 90°.
Resin A sticky... reduce the thickness of the workpiece pushed into the blade or being dropped into the tool first.
Worktable Surface where the workpiece rests while performing a cutting, drilling, planing, or...
English Manual - Page 10
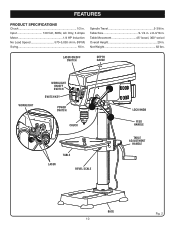
.../off switch
depth gauge
worklight
worklight on/off switch
switch key
power switch
chuck
table
laser
bevel scale
lock knob
feed handle
table adjustment
handle
base 10
Fig. 2 FEATURES
product specifications
Chuck 1/2 in . Spindle Travel 2-3/8 in . x 8-3/16 in . Input 120 Volt, 60Hz, AC Only, 3 Amps Motor 1/4 HP Induction No ...
English Manual - Page 11
...™ laser
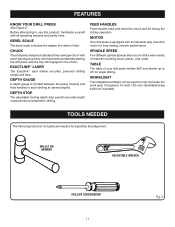
The Exactline™ laser makes accurate...TOOLS NEEDED
The following tools (not included) are needed for angle drilling. Before attempting to help illuminate the work area.
Motor
Your drill press is tilted. table
The table...adjustable locking depth stop permits accurate depth measurement and repetitive drilling.
bevel scale
The bevel scale indicates the degree the table...
English Manual - Page 12

... 1 Base 1 Hex Key (3 mm, 4 mm, and 5 mm 3 Hex Bolts (M8 4 Feed Handles 3 Table Adjustment Handle 1
Table Lock Handle 1 AA Batteries 2 Chuck 1 Chuck Key 1 Worm Gear 1 Operator's Manual (not shown 1
aa batteries chuck KEY
table assembly
chuck
worm gear
head assembly
table lock handle
table adjustment
handle
feed handles
hex key
column ASSEMBLY
hex bolts 12
base
Fig. 4
English Manual - Page 14

... with the set aside.
Locate the worm gear and feed the D-shaft through the hole in the table assembly.
Install table adjustment handle over the column until the bottom of the gear rack is positioned in the base collar and against the column.
Slide the column collar, bevel-side down, over...
English Manual - Page 15
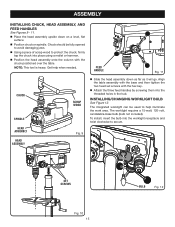
...the chuck into place using a mallet or hammer.
Position the head assembly onto the column with the hex key.
&#... head assembly down on a level, flat surface.
Position chuck on spindle. Installing/changing worklight bulb
See Figure 12. ... down as far as it will go.
Fig. 9
head assembly
set screws with the chuck positioned over the table.
Align the table assembly with ...
English Manual - Page 16
... as necessary.
Check the table assembly to assure smooth movement up and down ...with lock washers and hex nuts (not included). assembly
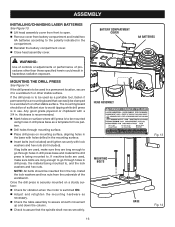
Installing/changing laser batteries
See Figure 13.
Lift head assembly cover from ... where drill press is switched ON.
Adjust and retighten the mounting hardware as a portable tool, fasten it to a workbench or other stable ...
English Manual - Page 17

...
See Figure 15. Retighten the set screw LASER
ADJUSTMENT knob
Fig. 15
17 laser housing
set screws to the table.
Turn on the laser and verify the laser lines align with the "X" on the workpiece.
If the laser lines do not align, loosen the set screws on a piece of scrap wood.
Insert a small drill...
English Manual - Page 18

...key.
TO lock THE DRILL PRESS: Place the switch in the OFF ( O ) position. Remove the switch key from accidentally starting when power returns.
APPLICATIONS
You may cause the ...not use any attachments or accessories not recommended by children and others. Failure to heed this tool for the purposes listed below: Drilling in wood Drilling in ceramics, ...
English Manual - Page 19
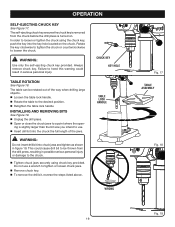
... . Insert drill bit into the chuck the full length of the way when drilling large objects. Loosen the table lock handle. Rotate the table to the desired position. Retighten the table lock handle
installing and removing bits
See Figure 19. ■ Unplug the drill press. Open or close...
English Manual - Page 21
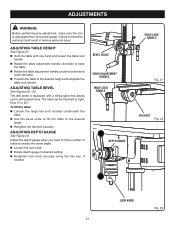
...
See Figure 23. adjusting Table bevel
See Figures 22 - 23.
adjustments
WARNING:
Before performing any adjustment, make sure the tool is equipped with one hand and loosen the table lock
handle. Rotate the table adjustment handle clockwise to raise
the table. Rotate the table adjustment handle counterclockwise to
lower the table. Position the table to drill...
English Manual - Page 23
... of automotivetype paste wax to the table and column to maintain but must be tightly secured on...hex key.
Tighten each of the drill press. batteries
Check the laser batteries regularly to maximum depth and oil moderately once every three months...adjustment. head assembly and motor housing
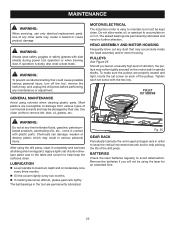
Frequently blow out any dust that could cause possible serious personal injury, turn off the tool...
English Manual - Page 26
... plate attached to provide all pertinent facts when you have purchased your tool, should a need ever exist for repair parts or service, simply ... always give the following information:
• MODEL NUMBER
DP102L
• SERIAL NUMBER
Ryobi® is a registered trademark of Authorized Service Centers.
• MODEL NO. DRILL PRESS
DP102l
• SERVICE
Now that you call 1-800-525-...
Repair Sheet - Page 3
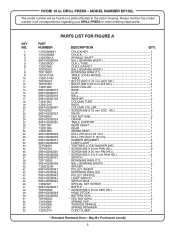
... mention the model number in . MODEL NUMBER DP102L
The model number will be found on a plate ...
* HEX NUT (M8 3
089140200024 CRANK 1
089140200025 TABLE SUPPORT 1
13201007 GEAR SHAFT 1
13201006 GEAR 1
13201008...
089140200030 ROLL PIN (D2.5 X 16 mm 1
089140200031 RUBBER GROMMET 2
089140200032 LASER LIGHT 2
TDP08001 TOOTHED LOCK WASHER (M5 2
TDP07001
* SCREW (M5 X...
Repair Sheet - Page 4
...* SCREW (M8 X 60 mm HEX SOC. HD 1
089140200070 MOTOR ADJUST PLATE 1
089140200071
* SCREW (M6 X 5 mm HEX SOCKET 1
... 1
089140200076 DEPTH STOP RING 1
089140200103 MOTOR (INC. MODEL NUMBER DP102L
The model number will be found on a plate attached to the ...) INDICATOR 1
089140200904 WARNING LABEL 1
089140200905 LASER WARNING LABEL-1 1
089140200906 DATA LABEL 1
...
Repair Sheet - Page 5
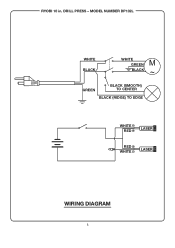
DRILL PRESS - MODEL NUMBER DP102L
WHITE BLACK
M WHITE GREEN ~ BLACK
GREEN
BLACK (SMOOTH) TO CENTER
BLACK (RIDGE) TO EDGE
WHITE RED
LASER
RED WHITE
LASER
WIRING DIAGRAM
RYOBI 10 in.
Similar Questions


Ryobi 10" Table Saw Dado Throat Plate
where can I find a dado throat plate for the Ryobi 10" table saw?
where can I find a dado throat plate for the Ryobi 10" table saw?
(Posted by Rick52757 2 years ago)

How To Replace A Depth Stop Ring On The Dp102l What Parts Are Needed
I bought a DP102L at a auction but the entire depth stop feature was missing what parts do I need to...
I bought a DP102L at a auction but the entire depth stop feature was missing what parts do I need to...
(Posted by rjbsilverking 10 years ago)

Where Are The Positive Stops Inside The Cabinet? Need To Make Adjustments For
I need to make adjustments for a 90 degree cut.
I need to make adjustments for a 90 degree cut.
(Posted by rnicot 10 years ago)

Dp102l Quit Working
Using a 4 1/2 inch bimetal hole saw to drill thru a side panel of my PC case using the speed setting...
Using a 4 1/2 inch bimetal hole saw to drill thru a side panel of my PC case using the speed setting...
(Posted by chief4070 12 years ago)