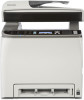
Ricoh Aficio SP C242SF Support Question
Ricoh Aficio SP C242SF Support Question
Find answers below for this question about Ricoh Aficio SP C242SF.Need a Ricoh Aficio SP C242SF manual? We have 1 online manual for this item!
Question posted by jgaynor03 on January 6th, 2016
Option To Print In Black Only On Sp252sf Printer
Can I set the Ricoh SP252SF colour laser to print as black as default only switching to colour when specifically required.
Current Answers
Answer #1: Posted by TechSupport101 on January 6th, 2016 5:03 AM
TechSupport101

Member since:
May 24th, 2013 Points: 12,171,305

Member since:
May 24th, 2013 Points: 12,171,305
Hi. Yes you can, simply follow the steps here http://support.ricoh.com/bb_v1oi/pub_e/oi_view/0001036/0001036377/view/ps3/int/0119.htm
Related Ricoh Aficio SP C242SF Manual Pages
User Manual - Page 5
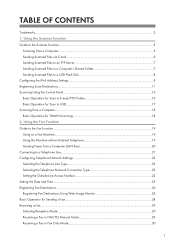
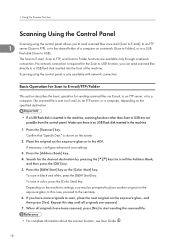
......6 Sending Scanned Files to an FTP Server...7 Sending Scanned Files to a Computer's Shared Folder 7 Sending Scanned Files to a USB Flash Disk 8 Configuring the IPv4 Address Settings...9 Registering Scan Destinations...11 Scanning Using the Control Panel...16 Basic Operation for Scan to E-mail/FTP/Folder 16 Basic Operation for Scan to USB...
User Manual - Page 9
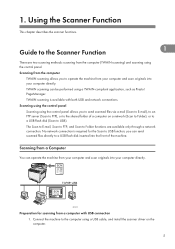
... machine. CES185
Preparation for the Scan to the computer using a TWAIN-compliant application, such as Presto! Connect the machine to USB function; TWAIN scanning is required for scanning from your computer and scan originals into the front of a computer on the computer.
5
Using the Scanner Function
This chapter describes the scanner...
User Manual - Page 10
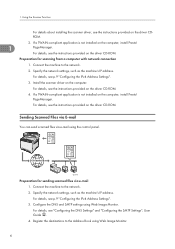
... Connect the machine to the network. 2. For details, see "Configuring the DNS Settings" and "Configuring the SMTP Settings", User Guide . 4.
If a TWAIN-compliant application is not installed on the computer... TWAIN-compliant application is not installed on the driver CDROM.
2. Specify the network settings, such as the machine's IP address. For details, see the instructions provided on ...
User Manual - Page 11
... destinations to the network. 2.
For details, see p.9 "Configuring the IPv4 Address Settings". 3.
CES190
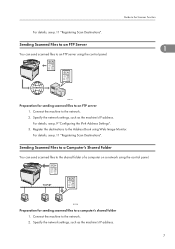
Preparation for sending scanned files to an FTP server using the control panel...to the shared folder of a computer on a network using the control panel. Specify the network settings, such as the machine's IP address. For details, see p.11 "Registering Scan Destinations". Sending...
User Manual - Page 12
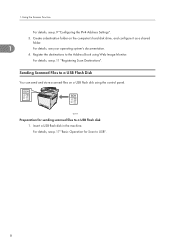
1. Register the destinations to a USB flash disk 1. For details, see p.9 "Configuring the IPv4 Address Settings".
3.
Sending Scanned Files to a USB Flash Disk
You can send and store scanned files on the computer's hard disk drive, and configure it as a shared ...
User Manual - Page 13
...Settings
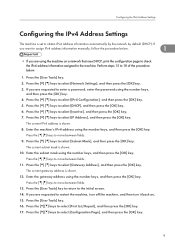
Configuring the IPv4 Address Settings
The machine is set to select [Network Settings], and then press the [OK] key. 3. Press the [ ] [ ] keys to obtain IPv4 address information automatically by the network by default...], and then press the [OK] key. 5. Press the [ ] [ ] keys to select [Print List/Report], and then press the [OK] key. 17.
If you are requested to the machine....
User Manual - Page 14

1. The configuration page is printed. The IPv4 address setting will appear under "TCP/IP" on the configuration page.
1
10 Press [Yes] in the confirmation screen. Using the Scanner Function
18.
User Manual - Page 15
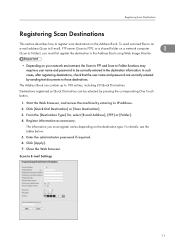
... or [Scan Destination]. 3. For details, see the tables below. 5. Enter the administrator password if required. 6.
The information you must register varies depending on the destination type. Click [Apply]. 7.
Destinations...the Scan to FTP and Scan to Folder functions may require a user name and password to those destinations. Registering Scan Destinations
Registering Scan Destinations
This ...
User Manual - Page 16
...
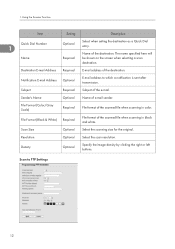
File format of the scanned file when scanning in black and white. Notification E-mail Address Optional
E-mail address to FTP Settings
12
Using the Scanner Function
Item
Setting
Description
Quick Dial Number
1
Name
Optional Required
Select when setting the destination as a Quick Dial entry.
Subject
Required Subject of e-mail sender.
Scan to which a notification is...
User Manual - Page 17
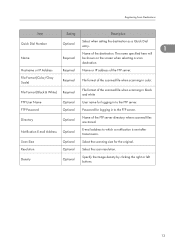
... Select the scan resolution. File Format (Black & White) Required
File format of the destination.
Density
Optional
Specify the image density by clicking the right or left buttons.
13
Directory
Optional
Name of the FTP server.
Registering Scan Destinations
Item
Setting
Description
Quick Dial Number Name
Optional
Select when setting the destination as a Quick Dial entry...
User Manual - Page 18
... for logging in color.
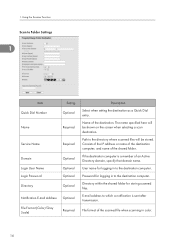
14 E-mail address to Folder Settings
1
Item Quick Dial Number
Name
Setting Optional
Required
Service Name
Required
Domain Login User Name Login Password Directory
Optional Optional Optional Optional
Notification E-mail Address Optional
File Format (Color/Gray Scale)
Required
Description
Select when setting the destination as a Quick Dial entry.
Consists of...
User Manual - Page 19
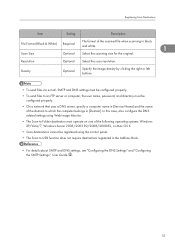
... destinations registered in the Address Book.
• For details about SMTP and DNS settings, see "Configuring the DNS Settings" and "Configuring the SMTP Settings", User Guide .
15
Resolution
Optional Select the scan resolution.
Registering Scan Destinations
Item
Setting
Description
File Format (Black & White) Required
File format of the domain to which the computer belongs in...
User Manual - Page 20
... on the specified destination.
• If a USB flash disk is required for the desired destination by pressing the [ ][ ] keys to USB...Specify Dest." Press the [Address Book] key. 4. To scan in black and white, press the [B&W Start] key.
you to send scanned ... or the [Color Start] key. If necessary, configure advanced scan settings.
3. Search for the Scan to USB function; 1. Using the ...
User Manual - Page 21
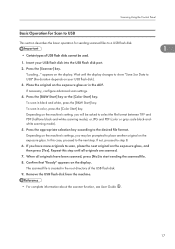
... of the USB flash disk. 9. Insert your USB flash disk). 3. "Loading..." Place the original on the exposure glass or in black and white, press the [B&W Start] key. Depending on the machine's setting, you may be prompted to USB" (the duration depends on the exposure glass. Press the appropriate selection key according to...
User Manual - Page 23

... voice calls.
19 Register the destinations to the telephone line. Guide to a Telephone Line". 2.
2. For details, see p.26 "Registering Fax Destinations". For details, see p.25 "Setting the Date and Time". 4. Using the Machine with an External Telephone
You can use this machine as a fax machine.
2
Using as a fax machine 1.
For details...
User Manual - Page 24

Connect an external telephone to another fax machine, without printing the document.
• This function is supported by Windows XP/Vista/7, and Windows Server 2003/2003 R2/2008/2008 R2. 2. Select the fax reception mode. ...
User Manual - Page 31
... Forwarding Destination E-mail Address
Optional
E-mail address of the destination of the Internet Fax.
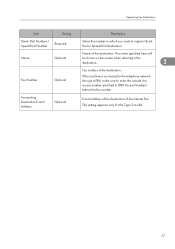
If the machine is connected to the telephone network through a PBX, make sure to register Quick Dial or Speed Dial destination. Registering Fax Destinations
Item
Setting
Description
Quick Dial Number / Speed Dial Number
Required
Select the number to which...
User Manual - Page 33
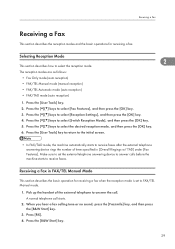
...and the basic operations for receiving a fax when the reception mode is set the external telephone answering device to answer calls before the machine starts to answer the call starts....device rings the number of the external telephone to receive faxes. Press the [ ][ ] keys to select [Switch Reception Mode], and then press the [OK] key. 5. Press the [ ][ ] keys to select [Reception Settings...
User Manual - Page 34
...the handset but the time specified in [RX Mode Auto Switch Time] passes before pressing the [Clear/Stop] key.
If a fax calling tone is set to receive the fax automatically.
2. If the incoming ...then press the [Clear/Stop] key. When there is an incoming call, the external telephone answering device rings the number of time specified in fax mode, pressing the [Clear/Stop] key will not...
User Manual - Page 35
The external telephone answering device records messages.
2
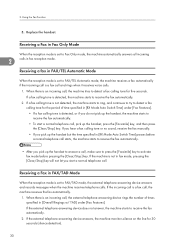
31 Receiving a Fax
• If a fax calling tone or no sound is detected, the machine starts to receive the fax automatically.
• If a voice is detected, a normal telephone call starts.
Similar Questions

How To Print Labels From Automatic Document Feeder In Ricoh Aficio Sp C242sf
(Posted by patriha 9 years ago)

Aficio Mp C2051 Set Default Scan Settings To Scan Black And White
Aficio MP C2051how so i set default scan settings to scan black and white
Aficio MP C2051how so i set default scan settings to scan black and white
(Posted by myates16443 9 years ago)

How To Print Envelopes On The Ricoh Aficio Sp C242sf
(Posted by carolvincen 9 years ago)
