Ricoh Aficio MP C400 Support Question
Ricoh Aficio MP C400 Support Question
Find answers below for this question about Ricoh Aficio MP C400.Need a Ricoh Aficio MP C400 manual? We have 1 online manual for this item!
Question posted by documentation on November 22nd, 2013
How Do I Set Up A Permanent File Name To The Scanner Function?
I already have four files on there but its been so long that i forget how I put them in there.
Current Answers
Related Ricoh Aficio MP C400 Manual Pages
Quick Start Guide - Page 2
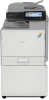
... from the glass and requesting multiple copies, press the # key after feeding your last original to collate document (if not highlighted) Enter any additional copy settings
Place Originals in feeder. Copying Documents
Remove paperclips, staples or other loose objects before placing originals in the document Feeder
Press original document type, i.e. Text...
Quick Start Guide - Page 3
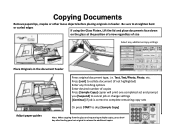
... batch, pressing start each time a new page or pages
is complete.
6. Enter your job is added and continue until all the pages for your job settings including the desired number of copies. 4. Place the first part of the originals in the document feeder exceeds the feeder capacity, or you need to...
Quick Start Guide - Page 4
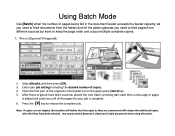
... orientation and the other tray loaded with the device the machine will output the document in sequential order. ROTATE SORT- Use [Sort] when placing multiple page document to keep jobs separated .
To use this option from the finishing mode or from the next set. Sort/Stack & Rotate Sort Output
SORT Rotate/Sort...
Quick Start Guide - Page 8
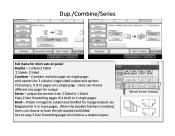
... for 4 page output) use Magazine for 5 or more pages. When the booklet finisher is installed, Users can choose different size pager for output. Default Screen Settings Series - Dup./Combine/Series
Full menu for short cuts on a single page.
Use to 2 single pages.
Quick Start Guide - Page 10
Press [OK]
Enter desired sets
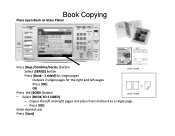
Press [Start] Copies the left pages
Press [OK]
OR
Press the [BOOK ]button • Select [BOOK TO 2 SIDED]
Book 2-Sided
- Book Copying
Place open Book ...
Quick Start Guide - Page 13

Select the reproduction ratio, if necessary.
3. Press [Create Margin]. • 2. Create Margin
• Reduces the image to 93% of its original size and places the reduced image at the center By combining it with the Reduce / Enlarge functions, you can further increase a margin. Press START Great for creating copy edge for stapling or hole punching.
• 1.
Quick Start Guide - Page 17
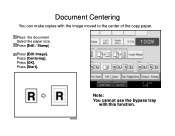
Note: You cannot use the bypass tray
with the image moved to the center of the copy paper. Press [Edit Image]. Press [Start]. Press [Centering]. Press [OK].
Place the document Select the paper size. Press [Edit / Stamp]. Document Centering
You can make copies with this function.
Quick Start Guide - Page 19
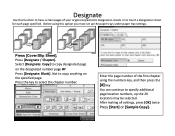
...for each page specified. Press [Start] or [Sample Copy]. Designate
Use this option you must set up the 20 locations may be selected.
Press [Designate / Chapter]. Not to specify additional page ... paper tray settings. You can continue to copy anything on the designated number page or
Press [Designate: Blank]. Enter the page number of the first chapter using this function to have ...
Quick Start Guide - Page 20
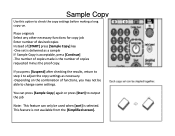
...key -One set is delivered as necessary. -Depending on the combination of functions, you press [Suspend] after checking the results, return to step 1 to adjust the copy settings as a sample...[Start] to output the job
Note: This feature can only be able to check the copy settings before making a long copy run.
This feature is selected.
requested minus the proof copy. If you may not be ...
Quick Start Guide - Page 26
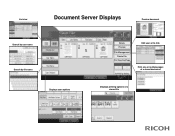
List view
Document Server Displays
Preview document
Search by user name Search by file name Displays scan options
Details Preview File Management Delete File Print Specified Page
To Printing Screen
Edit user & file Info
Print one or multiple pages of a stored document
Displays printing options of a stored file
Quick Start Guide - Page 28
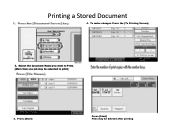
Select the document Name you want to Print. [More than one job may be selected to print]
3. Printing a Stored Document
4. To make changes Press the [To Printing Screen].
2. Press [Start]
Press [Start] Files may be deleted after printing
Quick Start Guide - Page 31
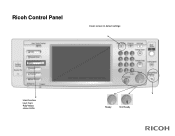
Ricoh Control Panel
Clears screen to default settings
Hard function keys have Red/Yellow status LEDs
8.5" Full Color W-VGA Screen
Ready
Not Ready
Quick Start Guide - Page 33
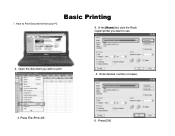
Open the document you want to use
2. Press [OK] Enter desired number of copies.
3. Press File>Print>OK
6. !. In the [Name] list, click the Ricoh Copier/printer you wish to Print Documents from your PC
Basic Printing
4. How to print
5.
Quick Start Guide - Page 34
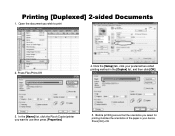
In the [Name] list, click the Ricoh Copier/printer you select for printing matches the orientation of the paper in your preferred two-sided printing method in the [Duplex] list, and then click [OK].
3. Click the [Setup] tab, click your device. Press File>Print>OK
4. Printing [Duplexed] 2-sided Documents
1. Before printing ensure that the...
Quick Start Guide - Page 35
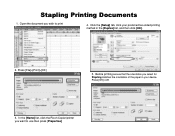
Press [File]>[Print]>[OK]
5. Before printing ensure that the orientation you want to print
4. Click the [Setup] tab, click your device. In the [Name] list, click the Ricoh Copier/printer you select for Stapling matches the orientation of the paper in your preferred two-sided printing method in the [...
Quick Start Guide - Page 37
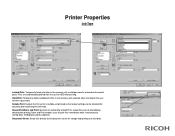
... the entire job. Sample Print: Outputs the first set of a multiple-set print job so that output settings can be checked for accuracy prior to the document server for storage and printing at the control panel. Stored Print/Store and Print: Identical in functionality to print files immediately while simultaneously storing data. 4-8 digit password is...
Quick Start Guide - Page 40
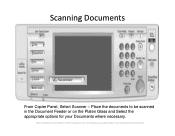
Scanning Documents
From Copier Panel, Select Scanner - Your display may vary depending on the Platen Glass and Select the appropriate options for reference purposes only. Place the documents to be scanned in the Document Feeder or on your Documents where necessary.
(Note: Screenshots are provided for your operating system and device.)
Quick Start Guide - Page 41
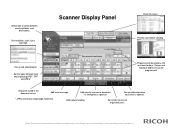
... email entry
Program email destinations into one touch buttons. Set up notification when your operating system and device.)
Your display may vary depending on your email is opened.
* JPEG scanning in the document server.
Set file types between email and folder scan destinations. encryption & signature. Set sender from list of registered users.
(Note: Screenshots are...
Quick Start Guide - Page 42
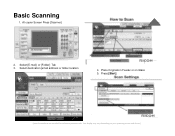
At copier Screen Press [Scanner]
2. Select [E-mail] or [Folder] Tab 3. Select destination [email address or folder location
4. Your display may vary depending on Glass 5. Press [Start]
(Note: Screenshots are provided for reference purposes only. Place Originals in Feeder or on your operating system and device.) Basic Scanning
1.
Quick Start Guide - Page 43
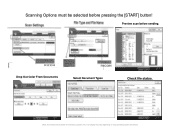
Preview scan before pressing the [START] button!
Drop Out Color From Documents
Select Document Types
Check file status.
(Note: Screenshots are provided for reference purposes only. Your display may vary depending on your operating system and device.) Scanning Options must be selected before sending.
Similar Questions

How To Set Up Your Name And Email In Ricoh Aficio C4000
(Posted by Edwarroet 10 years ago)

How To Set Original Sender For Scanner Of The Ricoh Aficio Mp 4000 To Email
addresses
addresses
(Posted by TpMWil 10 years ago)

How To Set Up Scan To Email On The C400 Sr Ps
(Posted by richardprocore 10 years ago)
How To Set Up Scan To Email?
How to set up scan to email on this printer?
How to set up scan to email on this printer?
(Posted by richardprocore 10 years ago)

Scan To Pdf And Not Tif
HOW DO I GE THE RICOH TO SCAN TO PDF WITHOUT HAVING TO SELECT PDF EVERY TIME?
HOW DO I GE THE RICOH TO SCAN TO PDF WITHOUT HAVING TO SELECT PDF EVERY TIME?
(Posted by LESLEY23585 11 years ago)