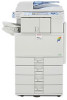
Ricoh Aficio MP C2551 Support Question
Ricoh Aficio MP C2551 Support Question
Find answers below for this question about Ricoh Aficio MP C2551.Need a Ricoh Aficio MP C2551 manual? We have 1 online manual for this item!
Question posted by Anonymous-58195 on May 1st, 2012
Why Is Ricoh Aficio C2551 Offline On The Laptop?
Hi there,
Why does printer on control panel state RICOH Aficio C2551 offline on the laptop? The machine (RICOH) itself is online.
Many thanks,
D
Current Answers
Answer #1: Posted by freginold on May 9th, 2012 3:04 AM
freginold

Member since:
December 20th, 2011 Points: 23,253,885

Member since:
December 20th, 2011 Points: 23,253,885
Hi, are both the laptop and the printer connected to the network? Can you ping the printer from your laptop, and can you ping your laptop from the printer (under User Tools > System Settings > Interface Settings > Ping Command)? If either ping fails, you have a network connection problem somewhere, either with the laptop itself, the printer itself, or somewhere in between.
If both pings go through fine, try rebooting the printer. If it still shows as offline, go into the print driver properties through the Control Panel and make sure the IP address for your printer is correct.
If both pings go through fine, try rebooting the printer. If it still shows as offline, go into the print driver properties through the Control Panel and make sure the IP address for your printer is correct.
Related Ricoh Aficio MP C2551 Manual Pages
Quick Use Guide - Page 3
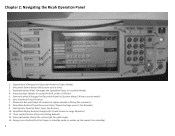
Chapter 2: Navigating the Ricoh Operation Panel
1. Printer button (Access to Copier Mode) 2. Clear/Stop button (Stops the current Job / Clears... mode or wakes up the copier from standby) 3 Copy button (Changes the Operation Panel to Locked Print & Online / Off Line) 5. Scanner button (Changes the Operation Panel to Scanner Mode / Allows scan to Large Graphics) 11. Numerical Key pad (Input...
Quick Use Guide - Page 5
Continued Making a Copy:
Paper Size (default is Auto) Select "Paper Size" if different than Auto Select
You can also determine if the machine needs paper by checking the icons above the Paper size buttons
2 sided to 2 sided copies
1 sided to 2 sided copies
5
Quick Use Guide - Page 8
Type your fax number including 9 to get an outside line, select "OK" at the top . (You can use the Touch panel or the Numerical keyboard)
Your number will be displayed.
Press the "green" Start button Your Fax will then be Sent.
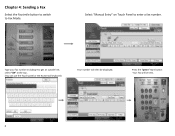
8 Select "Manual Entry" on Touch Panel to Fax Mode. Chapter 4: Sending a Fax
Select the Facsimile button to switch to enter a fax number.
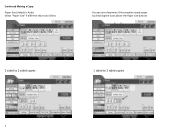
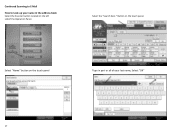
Quick Use Guide - Page 12
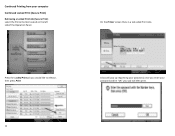
On the Printer screen there is a tab called Print Jobs
Press the Locked Print job you would like to release, then press Print
12
A box... you enter your password and hit "OK" your computer
Continued Locked Print (Secure Print)
Retrieving a Locked Print Job (Secure Print) select the Printer button located on the left sideof the Operation Panel. Continued Printing from your job will then print.
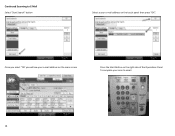
Quick Use Guide - Page 13
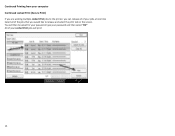
You will print
13 Continued Printing from your computer Continued Locked Print (Secure Print)
If you are sending mulitple Locked Print jobs to the printer, you can release all of your jobs at one time Select all of your Locked Print jobs will then be asked for your password, type ...
Quick Use Guide - Page 15
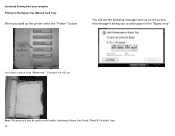
... the "Bypass tray" Your print job will see the following message come up on the screen, this message is asking you walk up the printer select the "Printer" button
You will start.
Note: This process is placed in the "Bypass tray"
Once paper is also be used to print Lables, letterhead, Heavy...
Quick Use Guide - Page 16
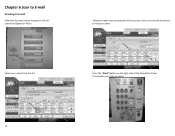
Chapter 6 Scan to E‐mail
Scanning to E‐mail
Select the Scanner button located on the right side of the Operations Panel To complete your scan to find your name
Select your last name, next use the arrow key to email.
16 Select the letter that corresponds with your name from the list
Press the "Start" Button on the left sideof the Operation Panel.
Quick Use Guide - Page 17
Select "Name" button on the touch panel
Type in part or all of your name in the address book
Select the Scanner button located on the touch panel. Button on the left sideof the Operation Panel. Select the "Search Dest."
Continued Scanning to E‐Mail
How to Look up your last name, Select "OK"
17
Quick Use Guide - Page 18
Continued Scanning to email.
18
Once you select "OK' you will see your scan to E‐Mail
Select "Start Search" button
Select a your e‐mail address on the right side of the Operations Panel To complete your e‐mail address on the main screen
Press the Start Button on the touch panel then press "OK".
Quick Use Guide - Page 19
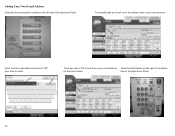
... "OK" your e‐mail address Press the Start Button on the right To complete
on the left sideof the Operation Panel. Once you select "OK' you will see your scan to email. side of the Operations Panel
19 Adding Your Own E-mail Address
Select the Scanner button located on the main screen.
Similar Questions


Ricoh Aficio Mp C3501 Pcl 6 Printer Goes Offline When I Print Excel
(Posted by DIitalom 9 years ago)

How To Fix Offline Ricoh Aficio Mp C2500 Pcl 5c Printer
(Posted by stolmhe 9 years ago)


How To Install A Ricoh Aficio Mp C2551 Pcl 5c Driver
(Posted by shivaaravi 10 years ago)