Ricoh 402054 Support Question
Ricoh 402054 Support Question
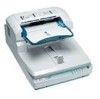
Find answers below for this question about Ricoh 402054 - IS 760.Need a Ricoh 402054 manual? We have 1 online manual for this item!
Question posted by prophetrymore on August 23rd, 2014
How To Remove Functional Problem Sc565 On Ricoh Aficio Mpc 2500
The person who posted this question about this Ricoh product did not include a detailed explanation. Please use the "Request More Information" button to the right if more details would help you to answer this question.
Current Answers
Answer #1: Posted by TechSupport101 on August 25th, 2014 8:20 AM
TechSupport101

Member since:
May 24th, 2013 Points: 12,171,305

Member since:
May 24th, 2013 Points: 12,171,305
Hi. Go here http://www.ehow.com/how_7222949_clear-sc546-error-ricoh.html for a tutorial.
Answer #2: Posted by masshoosier on September 12th, 2014 1:17 PM
masshoosier

Member since:
September 12th, 2014 Points: 100
Member since:
September 12th, 2014 Points: 100
Related Ricoh 402054 Manual Pages
Operating Instructions - Page 4

...
Procedure Breakdown 57 Scanning Originals 58 What You Can Do with the TWAIN Driver 60
Functions of the Scanner 81 How Data Size Changes Depending on the Exposure Glass 48 Placing the Originals in Installation and Other Problems 70
Cleaning ...71 Cleaning the Original Table Cove 72 Cleaning Under the Pressure Panel 73...
Operating Instructions - Page 6
... not damage, break, twist or modify the Power Cord. Modification can cause electrical shock. The inside the scanner performed by pulling the plug, not the cable) if any
of electric shock. • Never remove any covers or screws other than those specified in any covers or
screws other than those specified in...
Operating Instructions - Page 7

...objects to fall inside of the machine could damage the cord creating the risk of quality and functionality, and we recommend that the Power Cord will not be sure to drop down can cause ... Be careful not to pinch your fingers when closing the Automatic Document Feeder (ADF). • This scanner weighs approximately 72.8 lbs. • Make sure to lift it could cause a personal burn. •...
Operating Instructions - Page 10
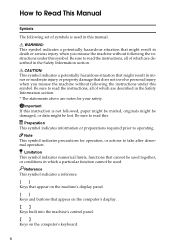
... operation, or actions to take after abnormal operation. Preparation This symbol indicates information or preparations required prior to operating. Limitation This symbol indicates numerical limits, functions that does not involve personal injury when you misuse the machine without following the instructions under this symbol.
Reference This symbol indicates a reference.
[] Keys that...
Operating Instructions - Page 12

...
This is alternatively used with the optional IEEE1394 interface board.
8. Exposure Glass
Set the original here when you place the original on the Exposure Glass.
2. Remove this screw when you set the background color for the original in black or white when you do not use the ADF scanning.
5.
Operating Instructions - Page 14

...(SCSI synchronous transmission disabled).
❒ When the scanner is set. In this scanner with the SCAM function enabled are connected to enable, when more than recommended... SCSI ID with SCSI synchronous transmission may occur if you set SCAM to the daisy chain. Function
OFF
ON
1
SCAM *1
disable
enable
2 SCSI synchronous transmission
enable
disable
3 SCSI termination
enable...
Operating Instructions - Page 17

... lock for transportation
In this machine.
2
ADC082S
Note ❒ Use a coin to remove the lock screws. ❒ Be sure to disengage the lock after you take the scanner out of the package for transportation. A Remove two lock screws fixed on without remov- ing the screws could result not only in failure in scanning, but...
Operating Instructions - Page 18

...the Scanner
C The removed lock screws are to be kept on the back of the Pressure Panel
as follows: A Lift the Pressure Panel and carefully pull out the Background Panel that
is fixed with the Velcro.
2
ADC071S
B The removed screws... on the back of the Background Panel for the Expo- ADC086S
C Return the removed Background Panel to the step B E of p.54 "Changing the Color of the Pressure Panel.
Operating Instructions - Page 20

... not to
the product, including the power cable.
ADC009S
C Pull out the scanner control unit by pulling the black ribbon on the lower back surface of the board... drop it when pulling it
out.
16
B Remove the three screws on the center
of the product. Note ❒ Use the accessory tool to re- Setting up the Scanner
Installing Options
Installing the Image-Processing Unit
Important
2...
Operating Instructions - Page 21

... the bottom surface of the image-processing unit to place the scanner on the level surface when inserting the scanner control unit.
❒ Insert the scanner control unit till you see the screw holes. 17 Installing Options
D Remove the seven screws on the scanner control unit. Note
❒ Be sure to
the connector of the...
Operating Instructions - Page 22

... drop it when pulling it
out. 18 move static from your body.
B Remove the three screws on the center
of the product. Setting up the Scanner
I Fix the scanner control unit with the USB in former state. ADC009S
C Pull out the scanner control unit by pulling the black ribbon on the lower back surface...
Operating Instructions - Page 23

ADC077S
19 Installing Options
D Remove the seven screws on the cover of the scanner control unit.
2
ADC064S
E Open the cover of the scanner control unit.
ADC011S
F Remove the USB 2.0 interface board fixed with 6 screws.
Operating Instructions - Page 24

... unit with seven screws, then insert
the scanner control unit into the main unit.
K Removed cables must connect in former state.
20 I Close the scanner control unit cover and fix with three screws. Setting up the Scanner
G Connect the IEEE1394 interface board to place the scanner on the scanner control unit. Fix the
board with four...
Operating Instructions - Page 26

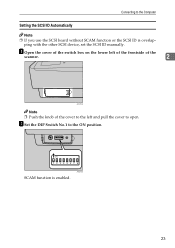
... SCSI ID by rotating the Rotary Switch. ADC069S
SCAM function is
ON. ⇒ p.34 "Using the Hard Reset Switch" 22 ADC017S
Note ❒ Press the Hard Reset Switch if you changed the SCSI ID while the power is disabled. Setting up the Scanner
Setting the SCSI ID
A Open the cover of the...
Operating Instructions - Page 27
...❒ If you use the SCSI board without SCAM function or the SCSI ID is enabled.
23 Connecting to the ON position.
ADC016S
SCAM function is overlapping with the other SCSI device, set the ...SCSI ID manually. A Open the cover of the switch box on the lower left of the frontside of the
scanner.
2
ADC015S
Note...
Operating Instructions - Page 35

... different from an outlet, be sure to Off. Connecting to a Power Source
Connecting to a Power Source
This section explains how to connect this machine are removed and the
holes left by the removed screws are covered with wet hands. Do not
use with a power source with multiple devices plugged in.
Operating Instructions - Page 36

...the machine is set to the
"Unlock" position.
2
ADC025S
Important ❒ Be sure to set to remove the lock screws. C Confirm that comes with the
lock lever set the lock lever to "Unlock". ... cord that the lock lever located on without removing the screws could result in failure in scanning or in malfunction of this machine.
Setting up the Scanner Important
❒ Be sure to "Lock" ...
Operating Instructions - Page 61

... Originals"I
Save the scanned image. Using the TWAIN Driver
This chapter describes the operations for scanning documents from a computer using DeskTopBinder Lite. In addition, some functions of the steps for scanning originals with the TWAIN driver using the TWAIN driver. Menu and procedure may be different depending on the application you...
Operating Instructions - Page 62

... Glass or on the ADF.
H Make the scan settings.
A On the [Start] menu, point to [Program], point to scan originals using the TWAIN scanner function. DeskTopBinder Lite starts. The name of the scanner you installed with p.57 "Procedure Breakdown". After a short while, the dialog box of making the scan settings and the preview...
Operating Instructions - Page 72

...misfed original is • Remove the misfed originals and
jammed inside the
scan again. ⇒ p.64 "When the Orig-
Set the panel to Black to the scanner.
• Reinstall the ... TWAIN driver. Panel on
the TWAIN driver to
original. To use the auto detect function. Please reinstall the module.
Clear Misfeed(s) in [Initial Settings] on the TWAIN driver...
Similar Questions

How Do I Get My Ricoh Aficio Is330dc To Work On Windows 7
(Posted by sandrabritschgi 10 years ago)

Error Sc491 Of Aficio Color Mp C 2030
there's an error sc491 of ricoh aficio mp c2030. i've tried to switch off and turn on again, but err...
there's an error sc491 of ricoh aficio mp c2030. i've tried to switch off and turn on again, but err...
(Posted by otosproperty 10 years ago)

Ricoh Ic800c Scanner Aficio 4100sfl
Thisscanner has notbeenused for about two years. I am now setting it up. Everything is connected co...
Thisscanner has notbeenused for about two years. I am now setting it up. Everything is connected co...
(Posted by mariapeterson 10 years ago)

What Is Error Code Service Call Sc543? What Is My Problem?
(Posted by sxa68992 11 years ago)

For Ricoh Aficio Sp 4210w. Remove Misfed Internal Path
(Posted by jimmiewatson 12 years ago)