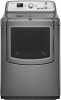
Maytag MEDB850YG Support Question
Maytag MEDB850YG Support Question
Find answers below for this question about Maytag MEDB850YG.Need a Maytag MEDB850YG manual? We have 3 online manuals for this item!
Question posted by jephhi on December 12th, 2011
Wha Is The Size?
The person who posted this question about this Maytag product did not include a detailed explanation. Please use the "Request More Information" button to the right if more details would help you to answer this question.
Current Answers
Related Maytag MEDB850YG Manual Pages
Installation Guide - Page 2

DRYER SAFETY
2
Installation Guide - Page 3

.... Pliers 3 INSTALLATION REQUIREMENTS
TOOLS AND PARTS
Gather the required tools and parts before purchasing parts. Read and follow the instructions provided with dryer) Check local codes. Parts needed :
Flat-blade screwdriver
#2 Phillips screwdriver
Leveling legs (4) Parts supplied (steam models):
Adjustable wrench that all models):
Tools needed : (Not supplied ...
Installation Guide - Page 4

...and automatic sensor cycles may not operate correctly.
■■ For a garage installation, place dryer at least 18" (457 mm) above floor.
■■ Steam models only: Cold water...for proper exhaust installation. Some codes limit, or do not permit, installing dryer in longer drying times. DRYER DIMENSIONS
Side view with elbow.
Back view:
Bottom view:
NOTE: Most installations...
Installation Guide - Page 5

...minimum ventilation openings in the top and bottom of the line. Do not have a fuse in your dryer, you will be at least 4 ft. (1.22 m) long. Mobile home - For further information... that a qualified electrician determine that the electrical connection is manufactured ready to the dryer must determine the type of electrical connection you must end in conformance with upturned ends...
Installation Guide - Page 6

...ring or spade terminals and UL listed strain relief. place under entire dryer. Firmly grasp dryer body (not console panel) and gently lay dryer down on its back, use aluminum) at least 4 ft. (1...., at least 5 ft. (1.52 m) long.
Screw in leveling legs
Examine leveling legs. Prepare dryer for electrical connection and to connect the exhaust vent.
6 To avoid damaging floor, use a wrench...
Installation Guide - Page 7

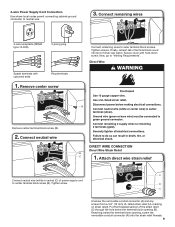
Center terminal block screw D. Hole below the terminal block opening (B) so that the wire insulation on strain relief). This connection may be used with the dryer cabinet and be in place. POWER SUPPLY CORD CONNECTION Power Supply Cord Strain Relief
1. Attach power supply cord
to Power Supply Cord Connection. Terminal block ...
Installation Guide - Page 8

... of power supply cord under center terminal block screw (B). Connect neutral ground wire
and neutral wire
E
B C
Connect neutral ground wire (E) and neutral wire (white) (C) of dryer rear panel. Tighten screw.
3. Connect ground wire
4-wire receptacle (NEMA
4-prong plug
type 14-30R)
A
F
Spade terminals with hold-down screw. Connect remaining wires
Remove...
Installation Guide - Page 9
...
A
Connect neutral wire (white or center) (C) of power supply cord
to "Venting Requirements". Now, go to center terminal block screw (B). Put the threaded section of dryer rear panel. B
C
Unscrew the removable conduit connector (A) and any screws from a 3/4" (19 mm) UL listed strain relief (UL marking on strain relief).
Installation Guide - Page 10

.... Tighten strain relief screw against the direct wire cable.
Shape ends of extra length so
F
dryer may be in a horizontal position. Remove neutral ground wire (E) from remaining 3 wires. Squeeze ...block screw (B). Connect ground wire
A
Direct wire cable must have a tight fit with the dryer cabinet and be moved if needed. Strip insulation back 1" (25 mm). Prepare to strain relief...
Installation Guide - Page 11

... terminal block screw (B). Squeeze hooked end together. Remove neutral ground wire (E) from end of dryer rear panel. Squeeze hooked ends together and tighten screws. Prepare your 3-wire cable for
direct connection...
(251"mm)
(893m½m" )
Place hooked ends of extra length so dryer may be moved if needed. Connect remaining wires
3. Tighten screw.
4. Squeeze hooked ends ...
Installation Guide - Page 12

... kinking. Only rigid or flexible metal vent shall be connected into slot of fire, this dryer MUST BE
EXHAUSTED OUTDOORS. Tighten screws.
4. Now, go to avoid sagging and kinking that...walls, ceilings, or floors. ■■ The total length should not exceed 7 3/4 ft. (2.4 m).
Dryer exhaust must not be used .
■■ Do not use plastic or metal foil vent. Replace plastic or...
Installation Guide - Page 20

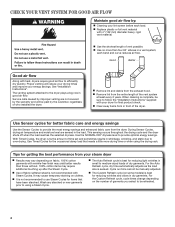
...movement? Check that the exhaust vent is properly installed. Refer to the wall is free of dryer cycles requires temperatures above 45°F (7°C).
Try the following : Clean lint screen. ... Is the exhaust vent diameter the correct size? Elelctric dryers use two household fuses or circuit breakers.Replace the fuse or reset the circuit breaker. Run dryer for details. If you are too long...
Use & Care Guide - Page 4
... For the Auto Refresh cycle, dry time automatically adjusts as the load size is not recommended with heat, dryers require good air flow to provide optimal energy savings. n The Custom Refresh... the NORMAL DRY dryness level to efficiently dry laundry. n The Auto Refresh cycle is complete, be refreshed.
4 n Use the shortest length of the dryer.
For the Custom Refresh cycle, cycle times ...
Use & Care Guide - Page 5
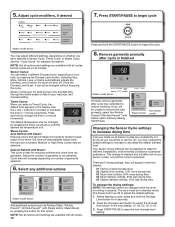
...pause it.
5
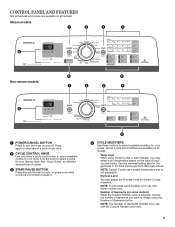
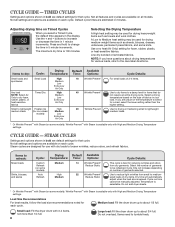
4 CYCLE MODIFIERS Use these buttons to select a cycle for your laundry load. Turn the knob to select available modifiers for your cycles. Follow garment label ...KNOB Use your dryer. Steam models
1
2
3
4
6
Non-steam models
6
5
5
1
2
3
4
1 POWER/CANCEL BUTTON Press to select available cycles on your dryer's cycle control knob to turn the dryer on and off....
Use & Care Guide - Page 7

... dryness level. Use the NORMAL dryness level to about 3/4 full.
Medium load: Fill the dryer drum up to dry:
Cycle:
Drying
Dryness Default Available
Temperature: Level: Time: Options:
Cycle... Temperature settings.
* Sensor/Eco cycle
Load Size Recommendations
For best results, follow the wet load size recommendations noted for all fabrics.
Do not overload. Items need to tumble ...
Use & Care Guide - Page 8
.... Wrinkle Prevent™ with Steam is available only with High and Medium Drying Temperature settings.
Medium load: Fill the dryer drum up to Medium heat setting may be refreshed.
Load Size Recommendations
For best results, follow the load size recommendations noted for foam, rubber, plastic, or heat-sensitive fabrics. Small load: Fill the...
Use & Care Guide - Page 9

... screen with your load. IMPORTANT: Do not overload the dryer.
Load the dryer
4. Add a dryer sheet to poor drying performance and may increase wrinkling and...screen to turn on the dryer.
Place laundry in the dryer. For additional cleaning information, see "Dryer Care".
2. Select the desired cycle for more information about each load. USING YOUR DRYER
WARNING: To reduce the ...
Use & Care Guide - Page 10
... it cannot be changed while the dryer is retained and will affect all cycles are 5 drying settings, they will increase depending on fabric type, load size, and dryness setting. Sensor cycles ...Selecting Very, More, Normal, Less, or Damp automatically adjusts the Dryness Level at which the dryer will shut off ) to increase or decrease the default dryness level.
The default temperature may...
Use & Care Guide - Page 12
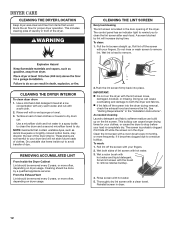
... that contain unstable dyes, such as denim blue jeans or brightly colored cotton items, may discolor the rear of the dryer interior.
A screen blocked by a qualified appliance servicer. As needed cleaning Laundry detergent and fabric softener residue can cause overheating and damage to stop before your fingers. Thoroughly dry lint screen with...
Use & Care Guide - Page 14
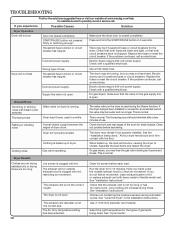
... vibrating noise
A small object caught between the edges of the drum for small objects.
Electric dryers use . Clothes are not drying satisfactorily or drying times are intact and tight, or that...power supply.
Household fuse is open . For gas dryers, make sure that the exhaust vent is not the correct size.
On gas dryers, you do not feel air movement, clean exhaust system...
Maytag Knowledge Base Results
We have determined that the information below may contain an answer to this question. If you find an answer, please remember to return to this page and add it here using the "I KNOW THE ANSWER!" button above. It's that easy to earn points!-
Washer fills slowly - Epic® front-load washer
...door and rotate the inner basket until one incoming source of water varies by cycle and load size to give you do not have your Installation Instructions, enter your product model number in your ...for each load. To test for the door to side. Make sure the washer is not cleaning laundry - Approximately ½" of the top of the washer. washer Washer will remain above the water level;... -
Lint is on the load - Dryer
...static electricity attracts lint. Automatic Dry or Sensor Dry cycle reduces overdrying. Check your dryer cycle descriptions for information on cleaning the lint screen. The lint may &...;Do not rinse or wash the screen to the lint screen. Reduce load size if needed. Dryer My dryer makes sounds or vibrations Lint is hard to match your fabric. Normal wear ... -
Loads are wrinkled - Neptune® front-load washer
... the hot and cold water inlet hoses reversed? An overloaded washer keeps the laundry items from the dryer to promptly remove loads from tumbling freely, which increases wrinkling. front-load washer Product...water rinses. Enter Model Number How do not have your Installation Instructions, enter your load size. Not draining, not spinning out water, wet loads - Were the clothes left in ...
Similar Questions

Maytag Medb835dw Dryer Won't Start Af Signal I Cleaned Vents And Airf
(Posted by 1688fairway 2 years ago)

Remove Lint Filter Holder
I need to remove the lint filter holder to get all the lint from the dryer. I have found 4 screws, 2...
I need to remove the lint filter holder to get all the lint from the dryer. I have found 4 screws, 2...
(Posted by davehard 2 years ago)

Check Lint Light Comes On
My Maytag MGDB725BW0 is not working properly. When ready to start the dryer the led reads 40 minutes...
My Maytag MGDB725BW0 is not working properly. When ready to start the dryer the led reads 40 minutes...
(Posted by eid00 4 years ago)

What Is The Size Of This Dryer In Cubic Ft?
what is the size of this dryer in cubic ft
what is the size of this dryer in cubic ft
(Posted by jarodlee 6 years ago)
