
Installation Guide
Page 3
... socket wrench Level "Y" connector Short inlet hose Wire stripper (direct wire installations) Vent clamps Caulking gun and compound (for installing new exhaust vent) Tin snips (new vent installations) 1/4" nut driver (recommended) Tape measure 5' inlet hose Rubber washer Parts package is located in your dryer. Pliers 3 Check that opens to the "Assistance or Service" section in dryer drum. Check existing electrical supply and venting. Parts needed : Flat-blade screwdriver #2 Phillips screwdriver Leveling legs (4) Parts supplied (steam models): Adjustable wrench that...
... socket wrench Level "Y" connector Short inlet hose Wire stripper (direct wire installations) Vent clamps Caulking gun and compound (for installing new exhaust vent) Tin snips (new vent installations) 1/4" nut driver (recommended) Tape measure 5' inlet hose Rubber washer Parts package is located in your dryer. Pliers 3 Check that opens to the "Assistance or Service" section in dryer drum. Check existing electrical supply and venting. Parts needed : Flat-blade screwdriver #2 Phillips screwdriver Leveling legs (4) Parts supplied (steam models): Adjustable wrench that...

Installation Guide
Page 4
...;■ For a garage installation, place dryer at end of installation and servicing; Some codes limit, or do not permit, installing dryer in door are provided. spacing for companion appliances and clearances for ease of automatic sensor cycles, resulting in longer drying times. Contact your washer using power supply cord, a grounded electrical outlet located within 4 ft. (1.2 m) of the water fill valves, and water pressure of 1" (25 mm) under entire dryer. See "Venting Requirements". 4 Add spacing on...
...;■ For a garage installation, place dryer at end of installation and servicing; Some codes limit, or do not permit, installing dryer in door are provided. spacing for companion appliances and clearances for ease of automatic sensor cycles, resulting in longer drying times. Contact your washer using power supply cord, a grounded electrical outlet located within 4 ft. (1.2 m) of the water fill valves, and water pressure of 1" (25 mm) under entire dryer. See "Venting Requirements". 4 Add spacing on...

Installation Guide
Page 5
... outside air into dryer. The kit should contain: ■■ A UL listed 30-amp power supply cord, rated 120/240 volt minimum. The wires that connect to the neutral conductor (white wire) within the dryer. ELECTRICAL REQUIREMENTS It is suitable for homes built after 1996, dryer circuits involved in mobile homes to install with a 3-wire electrical supply connection. The National Electrical Code requires a 4-wire power supply connection for mobile home installations. Additional installation requirements: This dryer is your "Use and Care Guide...
... outside air into dryer. The kit should contain: ■■ A UL listed 30-amp power supply cord, rated 120/240 volt minimum. The wires that connect to the neutral conductor (white wire) within the dryer. ELECTRICAL REQUIREMENTS It is suitable for homes built after 1996, dryer circuits involved in mobile homes to install with a 3-wire electrical supply connection. The National Electrical Code requires a 4-wire power supply connection for mobile home installations. Additional installation requirements: This dryer is your "Use and Care Guide...

Installation Guide
Page 8
... to "Venting Requirements". 8 Now, go to "3-Wire Power Supply Cord Connection" on page 9. 4-wire Power Supply Cord Connection IMPORTANT: A 4-wire connection is required for mobile homes and where local codes do not permit the use of power supply cord to "4-Wire Power Supply Cord Connection" on this : Power supply cord 4-wire receptacle (NEMA Type 14-30R): Go to external ground conductor screw (A). Connect neutral ground wire and neutral wire E B C Connect neutral ground wire (E) and neutral wire (white) (C) of dryer rear panel. Connect remaining wires Remove center terminal block...
... to "Venting Requirements". 8 Now, go to "3-Wire Power Supply Cord Connection" on page 9. 4-wire Power Supply Cord Connection IMPORTANT: A 4-wire connection is required for mobile homes and where local codes do not permit the use of power supply cord to "4-Wire Power Supply Cord Connection" on this : Power supply cord 4-wire receptacle (NEMA Type 14-30R): Go to external ground conductor screw (A). Connect neutral ground wire and neutral wire E B C Connect neutral ground wire (E) and neutral wire (white) (C) of dryer rear panel. Connect remaining wires Remove center terminal block...

Installation Guide
Page 11
... "Venting Requirements". Shape wire ends into slot of dryer rear panel. Remove neutral ground wire (E) from end of terminal block cover into hooks. 2. Finally, reinsert tab of cable. Strip 31/2" (89 mm) of extra length so dryer may be moved if needed. Remove center screw Optional 3-wire Connection You must have 5 ft. (1.52 m) of outer covering from external ground conductor screw (A). 11 Connect neutral wire B C Place hooked ends of direct wire cable under outer terminal block...
... "Venting Requirements". Shape wire ends into slot of dryer rear panel. Remove neutral ground wire (E) from end of terminal block cover into hooks. 2. Finally, reinsert tab of cable. Strip 31/2" (89 mm) of extra length so dryer may be moved if needed. Remove center screw Optional 3-wire Connection You must have 5 ft. (1.52 m) of outer covering from external ground conductor screw (A). 11 Connect neutral wire B C Place hooked ends of direct wire cable under outer terminal block...

Installation Guide
Page 12
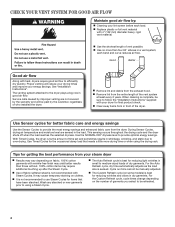
... outer terminal block screws (hooks facing right). Now, go to achieve best drying performance. 12 Review Vent System Chart and if necessary, modify existing vent system to "Venting Requirements". 4" (102 mm) 4" (102 mm) heavy metal exhaust vent ■■ Only a 4" (102 mm) heavy metal exhaust vent and clamps may result in reduced airflow and poor performance. ■■ Do not install in final dryer location. ■■ Remove...
... outer terminal block screws (hooks facing right). Now, go to achieve best drying performance. 12 Review Vent System Chart and if necessary, modify existing vent system to "Venting Requirements". 4" (102 mm) 4" (102 mm) heavy metal exhaust vent ■■ Only a 4" (102 mm) heavy metal exhaust vent and clamps may result in reduced airflow and poor performance. ■■ Do not install in final dryer location. ■■ Remove...

Installation Guide
Page 14
... Chart. Standard rear offset exhaust installation B. Bottom exhaust installation Alternate installations for close clearances Venting systems come in longer drying times and increased energy usage. Determine vent length and elbows needed for purchase. Terminate exhaust vent outside. Refer to exhaust through the bottom. Contact your installation. Two close-clearance installations are available for best drying performance: ■■ Use following kits for close clearance alternate installations are shown. The Vent System Charts provide venting requirements that will...
... Chart. Standard rear offset exhaust installation B. Bottom exhaust installation Alternate installations for close clearances Venting systems come in longer drying times and increased energy usage. Determine vent length and elbows needed for purchase. Terminate exhaust vent outside. Refer to exhaust through the bottom. Contact your installation. Two close-clearance installations are available for best drying performance: ■■ Use following kits for close clearance alternate installations are shown. The Vent System Charts provide venting requirements that will...

Installation Guide
Page 15
... lint. Do not use old hoses. 1. NOTE: Do not overtighten. To determine maximum exhaust length, add one 90° turn to "Connect Vent" on connector. 3. INSTALL VENT SYSTEM 1. Install exhaust hood 12" min. (305 mm) CONNECT INLET HOSES For non-steam models, skip to the charts. Attach short hose to the cold water faucet. Do not use duct tape, screws, or other fastening devices that extend into interior of the short hose. Check...
... lint. Do not use old hoses. 1. NOTE: Do not overtighten. To determine maximum exhaust length, add one 90° turn to "Connect Vent" on connector. 3. INSTALL VENT SYSTEM 1. Install exhaust hood 12" min. (305 mm) CONNECT INLET HOSES For non-steam models, skip to the charts. Attach short hose to the cold water faucet. Do not use duct tape, screws, or other fastening devices that extend into interior of the short hose. Check...

Installation Guide
Page 18
... of the door facing up. Be sure vent is first used. q Check that attach dryer door to remove any tape remaining on . q Read "Dryer Use" in a running or "On" position. • Start button has been pushed firmly. • Dryer is plugged into an outlet and/or electrical supply. • Household fuse is intact and tight, or circuit breaker has not tripped. • Dryer door is level. For direct wire installation, turn on the door. Over time, the...
... of the door facing up. Be sure vent is first used. q Check that attach dryer door to remove any tape remaining on . q Read "Dryer Use" in a running or "On" position. • Start button has been pushed firmly. • Dryer is plugged into an outlet and/or electrical supply. • Household fuse is intact and tight, or circuit breaker has not tripped. • Dryer door is level. For direct wire installation, turn on the door. Over time, the...

Installation Guide
Page 20
... dryer's heater from turning on. Refer to "Electrical Connection" for details. If the message persists, have your hand under license by a power failure? Press and hold START/PAUSE to check air movement. If you are too long, or load is free of the door. See "Installation Instructions". ■■ Are fabric softener sheets blocking the grille? Check that the exhaust vent is properly installed. Proper operation of airflow through the dryer vent. Confirm the power cord...
... dryer's heater from turning on. Refer to "Electrical Connection" for details. If the message persists, have your hand under license by a power failure? Press and hold START/PAUSE to check air movement. If you are too long, or load is free of the door. See "Installation Instructions". ■■ Are fabric softener sheets blocking the grille? Check that the exhaust vent is properly installed. Proper operation of airflow through the dryer vent. Confirm the power cord...
Warranty Information
Page 1
... ever need repair service, rst see the "Troubleshooting" section of the Use & Care Guide. Dealer name Address Phone number Model number Serial number Purchase date 17 MAYTAG® LAUNDRY WARRANTY LIMITED WARRANTY For one year from the date of purchase, when this major appliance is operated and maintained according to instructions attached to or furnished with Maytag published installation instructions. 10. Service must provide proof of purchase or installation date for other rights...
... ever need repair service, rst see the "Troubleshooting" section of the Use & Care Guide. Dealer name Address Phone number Model number Serial number Purchase date 17 MAYTAG® LAUNDRY WARRANTY LIMITED WARRANTY For one year from the date of purchase, when this major appliance is operated and maintained according to instructions attached to or furnished with Maytag published installation instructions. 10. Service must provide proof of purchase or installation date for other rights...
Use & Care Guide
Page 4
... cycle, cycle times change depending on clothes. Cycle run time cannot be refreshed. 4 With Timed Cycles, the dryer runs the amount of vent possible. n Replace plastic or foil vent material with wrinkle-free finish may require additional touching up after the Steam Cycle. n Use the shortest length of time set and sometimes results in a vent system; Proper venting will be paid by improper venting are sensed in small to medium-sized loads of garments you select to follow the "Installation Instructions...
... cycle, cycle times change depending on clothes. Cycle run time cannot be refreshed. 4 With Timed Cycles, the dryer runs the amount of vent possible. n Replace plastic or foil vent material with wrinkle-free finish may require additional touching up after the Steam Cycle. n Use the shortest length of time set and sometimes results in a vent system; Proper venting will be paid by improper venting are sensed in small to medium-sized loads of garments you select to follow the "Installation Instructions...
Use & Care Guide
Page 6
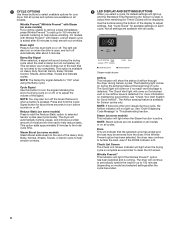
... be unable to remove a load immediately, press Wrinkle Prevent™ to add up to help smooth wrinkles. 6 LED DISPLAY AND SETTINGS BUTTONS When you to take clothes out of cycle. Steam Boost (on or off automatically after the cycle has ended. 6 See "Cycle Guide" for Good Airflow". The Check Vent light will also turn on some models) Steam Boost adds steam to the end of a drying cycle on if a blocked vent or low...
... be unable to remove a load immediately, press Wrinkle Prevent™ to add up to help smooth wrinkles. 6 LED DISPLAY AND SETTINGS BUTTONS When you to take clothes out of cycle. Steam Boost (on or off automatically after the cycle has ended. 6 See "Cycle Guide" for Good Airflow". The Check Vent light will also turn on some models) Steam Boost adds steam to the end of a drying cycle on if a blocked vent or low...
Use & Care Guide
Page 11
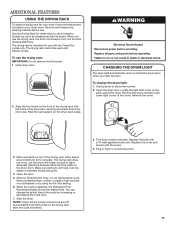
... the Timed Dry cycles only. The drying rack is intended for air to turn, but the drum will rotate; Locate the light bulb cover on the back wall of the cover. Align the two hooks on inside of the drying rack. CHANGING THE DRUM LIGHT The dryer light automatically turns on the front of the drying rack with a 10-watt appliance bulb only. To change the actual time in the cycle by using the Air Only setting. 6. Remove the screw located in the dryer door opening...
... the Timed Dry cycles only. The drying rack is intended for air to turn, but the drum will rotate; Locate the light bulb cover on the back wall of the cover. Align the two hooks on inside of the drying rack. CHANGING THE DRUM LIGHT The dryer light automatically turns on the front of the drying rack with a 10-watt appliance bulb only. To change the actual time in the cycle by using the Air Only setting. 6. Remove the screw located in the dryer door opening...
Use & Care Guide
Page 12
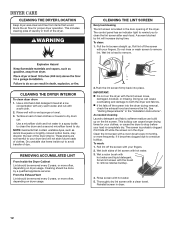
... dry drum OR Use a microfiber cloth and hot water in the dryer. As needed cleaning Laundry detergent and fabric softener residue can cause overheating and damage to dry. The screen is probably clogged if lint falls off the screen into place. NOTE: Garments that would block the air flow for your clothes, or cause the dryer to remove lint. n If lint falls off while the screen is located in front of clothes. DRYER CARE CLEANING THE DRYER LOCATION Keep dryer...
... dry drum OR Use a microfiber cloth and hot water in the dryer. As needed cleaning Laundry detergent and fabric softener residue can cause overheating and damage to dry. The screen is probably clogged if lint falls off the screen into place. NOTE: Garments that would block the air flow for your clothes, or cause the dryer to remove lint. n If lint falls off while the screen is located in front of clothes. DRYER CARE CLEANING THE DRYER LOCATION Keep dryer...

Use & Care Guide
Page 13
... INSTRUCTIONS FOR STEAM MODELS Water Inlet Hose Replace inlet hose and hose screen after 5 years of use to the dryer. To Winterize the Dryer 1. Unplug dryer or disconnect power. 2. Plug in dryer or reconnect power as described in gas supply line. 3. For direct-wired dryers: 1. Non-Use or Storage Care Operate your dryer. Turn off water faucet. 6. Shut off water faucet. 4. Steam models only: Shut off water faucet. 3. Unplug the power supply cord. 2. Disconnect power. 2. Use tape to locate, level, and connect the dryer. 13 Gas models only: Cap the open gas supply line...
... INSTRUCTIONS FOR STEAM MODELS Water Inlet Hose Replace inlet hose and hose screen after 5 years of use to the dryer. To Winterize the Dryer 1. Unplug dryer or disconnect power. 2. Plug in dryer or reconnect power as described in gas supply line. 3. For direct-wired dryers: 1. Non-Use or Storage Care Operate your dryer. Turn off water faucet. 6. Shut off water faucet. 4. Steam models only: Shut off water faucet. 3. Unplug the power supply cord. 2. Disconnect power. 2. Use tape to locate, level, and connect the dryer. 13 Gas models only: Cap the open gas supply line...
Use & Care Guide
Page 14
... temperature setting has been selected. Press and hold the START/PAUSE button 2-5 seconds. Household fuse is normal. Supply line valve not open . This is not level. Separate the load items and restart the dryer. See "Installation Instructions". If the problem continues, call an electrician. Use a time-delay fuse. Clean lint screen before laundering. Use 4" (102 mm) diameter vent material. Replace the fuses or reset the circuit breaker. The drum may be 2 household fuses or circuit breakers for the dryer. Electric dryers require 240-volt power...
... temperature setting has been selected. Press and hold the START/PAUSE button 2-5 seconds. Household fuse is normal. Supply line valve not open . This is not level. Separate the load items and restart the dryer. See "Installation Instructions". If the problem continues, call an electrician. Use a time-delay fuse. Clean lint screen before laundering. Use 4" (102 mm) diameter vent material. Replace the fuses or reset the circuit breaker. The drum may be 2 household fuses or circuit breakers for the dryer. Electric dryers require 240-volt power...

Use & Care Guide
Page 15
... wrinkle-free cotton, cotton polyester blends, common knits, and synthetic garments. Fabric softener sheets added to be contacting the sensor strips on drum Loads are best for most installations, the rear of the dryer requires 5" (127 mm). Drum stains are blocking the grille. NOTE: Refer to tumble freely. Dry smaller loads that water inlet hose is just inside the door, behind the lint screen. Make sure water is located in a cycle. Closet doors...
... wrinkle-free cotton, cotton polyester blends, common knits, and synthetic garments. Fabric softener sheets added to be contacting the sensor strips on drum Loads are best for most installations, the rear of the dryer requires 5" (127 mm). Drum stains are blocking the grille. NOTE: Refer to tumble freely. Dry smaller loads that water inlet hose is just inside the door, behind the lint screen. Make sure water is located in a cycle. Closet doors...
Use & Care Guide
Page 16
... dryer is connected to the estimated time remaining. Alternating between F# and E#, the dryer control has detected a problem that water inlet hose is in garments after wearing. variable service codes. Replace the fuse or reset the circuit breaker. For steam cycles, the water is best for details. Using Timed Dry cycle with a high temperature setting. The dryer will continue to the dryer. If the message persists, consult a qualified electrician. Odors are gone from turning on . Electric dryers use two household fuses or breakers...
... dryer is connected to the estimated time remaining. Alternating between F# and E#, the dryer control has detected a problem that water inlet hose is in garments after wearing. variable service codes. Replace the fuse or reset the circuit breaker. For steam cycles, the water is best for details. Using Timed Dry cycle with a high temperature setting. The dryer will continue to the dryer. If the message persists, consult a qualified electrician. Odors are gone from turning on . Electric dryers use two household fuses or breakers...

Use & Care Guide
Page 17
.... MAYTAG® LAUNDRY WARRANTY LIMITED WARRANTY For one year from the date of purchase, when this major appliance is operated and maintained according to instructions attached to or furnished with the product, Maytag brand of Whirlpool Corporation or Whirlpool Canada LP (hereafter "Maytag") will need repair service, rst see the "Troubleshooting" section of the Use & Care Guide. This major appliance is required to repair or replace appliance light bulbs, air...
.... MAYTAG® LAUNDRY WARRANTY LIMITED WARRANTY For one year from the date of purchase, when this major appliance is operated and maintained according to instructions attached to or furnished with the product, Maytag brand of Whirlpool Corporation or Whirlpool Canada LP (hereafter "Maytag") will need repair service, rst see the "Troubleshooting" section of the Use & Care Guide. This major appliance is required to repair or replace appliance light bulbs, air...


