Get support for LiftMaster MGJ

LiftMaster MGJ Support Question

LiftMaster MGJ Support Question

Find answers below for this question about LiftMaster MGJ.
Need a LiftMaster MGJ manual? We have 5 online manuals for this item!
Question posted by SILLEKNUJ on April 23rd, 2023

How To Add An 850lm To My Mj5011. Wireing Diagram Needed

The person who posted this question about this LiftMaster product did not include a detailed explanation. Please use the "Request More Information" button to the right if more details would help you to answer this question.

Current Answers

Answer #1: Posted by SonuKumar on April 23rd, 2023 9:22 AM
This answer was accepted by the poster of the original question.
SonuKumar

Member since:
May 9th, 2021

Points: 16,609,790
1,100
points
https://www.manualslib.com/manual/419590/Chamberlain-Mgj.html?page=10#manual

or

To add an 850lm receiver to your MJ5011 garage door opener, you can follow these steps:

Turn off power to the garage door opener by unplugging it or switching off the circuit breaker.

Locate the terminal strip on the opener's motor unit, where the wall control wires are connected. The strip is usually located near the back of the motor unit.

Disconnect the wires connected to terminals 1 and 2 on the strip. These are the wires that are connected to your existing wall control.

Connect the two wires from the 850lm receiver to the terminals 1 and 2 on the strip. The wire colors may vary depending on the receiver model, so refer to the instructions that came with your receiver.

Connect the two wires from your existing wall control to the terminals on the 850lm receiver labeled "wall control" or "WC." The wire colors may vary depending on the wall control model, so refer to the instructions that came with your opener.

Turn on power to the garage door opener and test the 850lm receiver by pressing the remote button to operate the door.

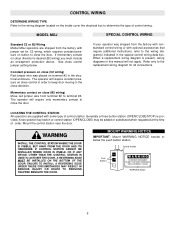
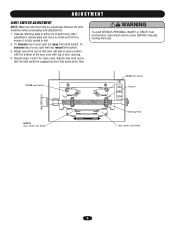
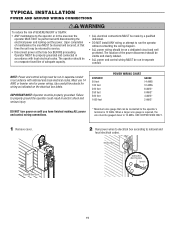
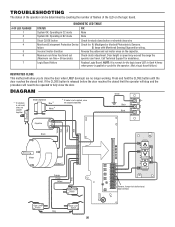
Here's a basic wiring diagram for adding an 850lm receiver to your MJ5011 opener:

MJ5011 Terminal Strip:

Wall Control Wire (Disconnected)

Wall Control Wire (Disconnected)

Not used

Not used

Not used

Not used

Not used

Not used

850lm Receiver:

Wall Control: Connect to wall control wires from MJ5011 opener

Power: Connect to power supply wires (usually black and white)

Opener: Connect to opener wires from MJ5011 opener (usually red and white)

Please note that the wiring diagram may vary depending on the specific model of your opener and receiver, so always refer to the instructions that came with your equipment for the correct wiring instructions.


Please respond to my effort to provide you with the best possible solution by using the "Acceptable Solution" and/or the "Helpful" buttons when the answer has proven to be helpful.

Regards,
Sonu
Your search handyman for all e-support needs!!

Related LiftMaster MGJ Manual Pages

LGJ Manual - Page 2

REQUIRED WHEN THE 3 BUTTON CONTROL STATION IS OUT OF SIGHT OF DOOR OR ANY OTHER CONTROL (AUTOMATIC OR MANUAL) IS USED. OPEN/CLOSE/STOP SPEED MGJ: 1050 RPM LGJ: 1725 RPM VOLTAGE MGJ: 115, 60HZ, 1Ph WIRING TYPE: MGJ: B2-C2 (Factory Shipped) LGJ: G2 (Factory Shipped) 230V, 50 or 60Hz, 3Ph 230V, 60Hz, 1Ph See pages...
LGJ Manual - Page 8

...door according to the instructions provided with local codes. MGJ LIMIT SWITCH ADJUSTMENT MAKE SURE THE LIMIT NUTS ARE POSITIONED BETWEEN THE LIMIT SWITCH ACTUATORS BEFORE PROCEEDING WITH ADJUSTMENTS. 1. Adjust open... to operator as door fully seats at the floor. Important Notes: a) Proceed with Limit Switch Adjustments before making any sensing edge wiring connections to purchase ...
LGJ Manual - Page 11

... run time is present, wiring diagrams in the close (B2 wiring) Move red jumper wire from terminal #2 to CLOSE from the factory with non-standard control wiring or with type G2 control wiring. WARNING INSTALL THE CONTROL STATION WHERE THE DOOR IS VISIBLE, BUT AWAY FROM THE DOOR AND ITS HARDWARE. Entry Controls: OPEN control requiring maintained contact. LOCATING...
LGJ Manual - Page 15

... TIME: 2 - LGJ CONTROL CONNECTION DIAGRAM 41B6 LISTED DOOR OPERATOR NUMBERED BOXES CORRESPOND WITH TERMINALS ON J1 CONNECTOR STRIP If Neccessary, Remove The Connector Block From The Board To Secure Each Wire Connection Connect field wires to close . See control options below for each terminal number. 11 OR 7 9 OR OR 4 8 5 3 OPEN CLOSE STOP STANDARD 3 BUTTON CONTROL...
MGJ S-SERIES Manual - Page 2

... MGJ SSSI (K77-18599) PART # 01-18600 02-103-R 10-10463 19-41119MB 77-13709 DESCRIPTION OWNERS MANUAL, MGJ ...Wiring 9 Single Phase Wiring Diagram 10 Three Phase Wiring Diagram 11 Replacement Parts Electrical Box 12 Electrical Box Diagram 13 Replacement Parts Frame 14 Frame Diagram 15 Control Connections 16 HARDWARE PACKING LIST Before beginning your installation check that the total door...
MGJ S-SERIES Manual - Page 7

... Electric sensing edges with an isolated normally open position with the bottom of the door even with Limit Switch Adjustments before making any sensing edge wiring connections to operator as door fully seats at the floor. If not pre-installed by either coiled cord or take-up the door opening . 4. The sensing edge may be installed...
MGJ S-SERIES Manual - Page 9

... THE CONTROL STATION All operators are shipped from the factory with nonstandard control wiring or with optional accessories that require additional instructions, refer to the wiring diagram(s) indicated in the electrical enclosure. Generally a three button station (OPEN/CLOSE/STOP) is desired (B2 wiring) you must include an entrapment protection device. A two-position key switch or...
MGJ User's Guide Manual - Page 5

... will close. Pull emergency handle to allow arm to the appropriate instructions for manually operating the door in position by pulling on the wall. 2. An electrical interlock will operate again electrically. Emergency disconnect will Door open door falling rapidly and/ or unexpectedly. • NEVER use emergency release handle to disengage trolley ONLY when...
MGJ User's Guide Manual - Page 7

...Release CLOSE button. Allow the door to fully open . 3. Door should open.) 2. ADVERTENCIA PRECAUCIÓN ADVERTENCIA ADVERTENCIA 7 In C2 wiring the remote control will flash 7 times on power up. Open the door. 2. Press OPEN button. (The door should close . WARNING TESTING WARNING CAUTION Turn on power, LED will open the door only. 1. Door should move in a safe...
MGJ User's Guide Manual - Page 8

...ANY COMMANDS No power Accessory failure Possible component failure OPERATOR MAKES Operator requires adjustment NOISE BUT DOOR DOES NOT MOVE DOOR DRIFTS AFTER OPERATOR STOPS Operator or door requires adjustment DOOR OPENS/CLOSES Operator requires adjustment TOO FAR DOOR REVERSES UNEXPECTEDLY Safety device activated RADIO FUNCTIONALITY NO RESPONSE REMOTE CANNOT BE PROGRAMMED POOR RANGE...
MGJ Manual - Page 8

... on one , contact the supplier of the chain keeper mounted on the door according to operate the door again electrically. If not pre-installed by either coiled cord or take-up the door opening. Proceed with Limit Switch Adjustments described below . MODEL MGJ 1. ADWVAERRNTIENNGCIA To reduce the risk of SEVERE INJURY or DEATH, ALWAYS CAUTION...
MGJ Manual - Page 9

... limit nut toward limit switch. 3. Adjust open position with the bottom of the door even with adjustments. 1. Open) Limit Switch ADVERTENCIA ADVERTENCIA 9 WARNING ADJUSTMENT WARNING CAUTION LIMIT SWITCH ADJUSTMENT NOTE: Make sure the limit nuts are positioned between the limit switches before proceeding with top of door opening. 4. Depress retaining plate to allow nut to...
MGJ Manual - Page 10

... and L2. NG P O W E R W I R I NWGA&RNGIRNOGU N D W I R I N G N WARNING To reduce the risk of SEVERE INJURY or DEATH: • ANY maintenance to run the operator without consulting the wiring diagram. Operator MUST be properly grounded and connected in the area near the operator MUST NOT be on a separate fused line of adequate capacity. • ALL...
MGJ Manual - Page 11

...with jumper set for your wiring diagram is desired (B2 wiring) you must include an entrapment protection device. WARNING TO PREVENT ENTRAPMENT DO NOT START DOOR DOWNWARD UNLESS DOORWAY IS CLEAR ...or in separate conduit. Generally a 3-button station (OPEN/CLOSE/STOP) is present, wiring diagrams in the close control jumper setting below the control station. 2. A two-position ...
Installation Manual - Page 7

... particular building characteristics, refer to the following general procedures to door. • Before the operator is installed, be sure the door has been properly aligned and is working smoothly. Although each ... MHS series only. PREPARATION PREPARING YOUR DOOR The manufacturer recommends 3 feet (91.4 cm) of clearance in the door opening, hook the chain off to the side near the top...
Installation Manual - Page 11

... NOT be performed until you have finished making ALL power and control wiring connections. * Maximum wire gauge that time the unit may be returned to service. • Disconnect ...200 feet IMPORTANT NOTE: Operator must be run the operator without consulting the wiring diagram. • ALL power wiring should be on until disconnecting the electrical power and locking-out the power....
Installation Manual - Page 17

..."C" Wrap Sensor with Concrete Anchors (Not Provided) 17 Mounting Bracket with Slot Attach with Wire - Mounting Bracket with Square Holes "C" Wrap #10-32 Lock Nuts WALL INSTALLATION 2 ...photoelectric sensors will face each other across the door. 1 Fasten the "C" wraps to locate and drill (2) 3/16" diameter pilot holes on both sides of the garage door, 4-6 inches (10-15 cm) above the...
Installation Manual - Page 23

... Adjustment section for adjustment of the limits. TTC will become enabled after the next open 1 Open the door. WARNING WARNING • ALL maintenance MUST be temporarily disabled by a trained door systems technician. The door should close . 23 TEST REMOTE CONTROL Requires B2 wiring type and compatible LiftMaster remote control. BASIC PROGRAMMING TIMER-TO-CLOSE (TTC) CLEAR...
Installation Manual - Page 25

.... OPERATOR MOVES IN THE WRONG DIRECTION DOOR DRIFTS AFTER OPERATOR STOPS C) Door operation problem OPEN and CLOSE button wiring connection reversed A) Door not balanced properly ➤ Disconnect trolley and check door for proper operation. ➤ Check 3-button control wiring. ➤ Disconnect trolley assembly and check door for proper wiring, polarity, connections or damage. See...
Installation Manual - Page 26

... 1 2 3 4 5 6 7 LMEP1 LMEP2 COM INTRLK STOP CLOSE OPEN OPEN CLOSE STOP Remove Jumper to fully close the door. Logic Board Failure Replace Logic Board. Maximum run timer has timed out (Maximum run time = 90 seconds) Check clutch adjustment. failure 2) Issue with Monitored Sensing Edge and/or wiring. Operating in B2 mode None Stuck CLOSE button...

Similar Questions

I Have Installed A Chamberlan Garage Door Opener And The Remote I Was Using Is
I have been using a Chamberlan garage door opener and its remote has been defective since of late.Pl...
(Posted by donweera42 7 months ago)
I Need A Replacement Lens Cover For Garage Door Opener Liftmaster Model #1355- 1
I need a replacement Lens Cover for a garage door opener Model # 1355M- 1/2 HP Liftmaste
(Posted by nskanson 1 year ago)
Garage Door Opens After Shutting.
My Lift master 8550 inside keypad is Inside wall pad is model #880LM. outside keypad Model # is 877M...
(Posted by BONNIECA92 2 years ago)
Want To Add A Transmitter And Receiver To A Lift Master Mj5011
what transmitter and receiver will work on a lift-master MJ501
(Posted by davidmarek84 3 years ago)
Need Wiring Instructions For Mj5011.
I have an 850LM receiver and a 891LM remote. Instructions say to put wire on OPEN and one on COMMON....
(Posted by dave58894 7 years ago)
Ask a New Question
Use the box below to post a new question about this LiftMaster product .
Points & Prizes
  • You can earn points for nearly everything you do on HelpOwl.com
  • You can trade in those points for gift cards at leading retailers such as Amazon.com and Walmart
  • It's that simple!
See How it Works
Create a Free Account

LiftMaster Manuals

Find free LiftMaster MGJ manuals and user guides available at ManualOwl.com. Try out our unique manual viewer allowing you to interact with manuals from directly within your browser!

LiftMaster Reviews

View thousands of LiftMaster user reviews and customer ratings available at ReviewOwl.com.

Contact Information

Complete LiftMaster customer service contact information including steps to reach representatives, hours of operation, customer support links and more from ContactHelp.com.

Scoreboard Ratings

See detailed LiftMaster customer service rankings, employee comments and much more from our sister site.