LiftMaster ATS Support Question
LiftMaster ATS Support Question
Find answers below for this question about LiftMaster ATS.Need a LiftMaster ATS manual? We have 1 online manual for this item!
Question posted by Lbimhoff on June 3rd, 2014
I Have An Ats 211 Opener And I Have Replaced The Rpm Sensor, Main Board,
I have adjusted the down force knob to the fullest . I have even called a service tech out and he can not get the opener to work. It moves 6 inches up and 6 inches down. What could the problem be?
Current Answers
Related LiftMaster ATS Manual Pages
ATS2113X Manual - Page 1
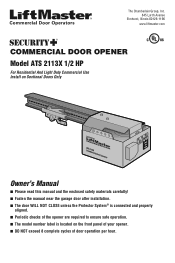
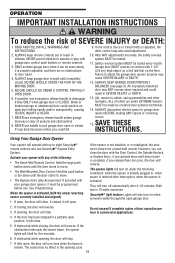
... this manual and the enclosed safety materials carefully! ■ Fasten the manual near the garage door after installation. ■ The door WILL NOT CLOSE unless the Protector System® is connected and properly
aligned. ■ Periodic checks of the opener are required to ensure safe operation. ■ The model number label is located on...
ATS2113X Manual - Page 2
...
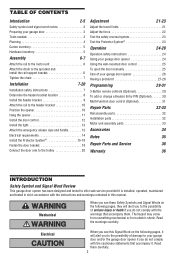
This garage door opener has been designed and tested to offer safe service provided it is installed, operated, maintained and tested in strict accordance with the instructions and warnings contained in this Signal Word on the following pages, they will alert you to the trolley 20
Adjustment
21-23
Adjust the travel limits 21 Adjust the force 22...
ATS2113X Manual - Page 3
... SERIOUS INJURY or DEATH:
• ALWAYS call a trained door systems technician if garage door binds, sticks or is any ropes connected to garage door.
• Complete the following test to loosen, move or adjust garage door, door springs, cables, pulleys, brackets or their hardware, ALL of the opener, instructions will call a trained door systems technician. SERIOUS INJURY could result from...
ATS2113X Manual - Page 4

... tension is normal when garage door is required.
Safety Reversing Sensor
Vertical Centerline of Garage Door
Extension Spring OR
Torsion Spring
Access Door
Wall-Mounted Door Control
Safety Reversing Sensor
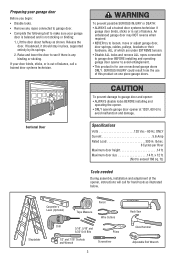
Gap between the bottom of the garage door and the floor MUST NOT exceed 1/4" (6 mm). Planning
Identify the type and height of your opener.
Header Wall
FINISHED CEILING...
ATS2113X Manual - Page 5
...unit and all parts illustrated below .
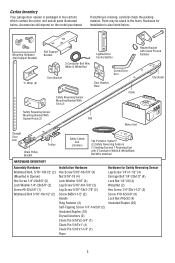
Carton Inventory
Your garage door opener is packaged in the foam. Mounting Hardware (Rail Support Bracket)
"C" Wrap (2)
Rail Support Bracket
Lighted Door Control Button
2-Conductor Bell Wire White & White/Red
Door Bracket
Door Bracket Plate
Curved Door Arm
Safety Reversing Sensor Mounting Bracket With Slot (2)
Chain
Header Bracket with Clevis...
ATS2113X Manual - Page 12
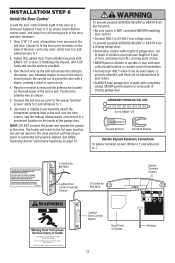
... properly adjusted, and there are located on the inside of the garage door. Connect the bell wire by color: white wire to 2 and white/red wire to 1.
6. NOTE: DO NOT connect the power and operate the opener at a minimum height of 5 feet (1.5 m) where small children cannot reach, and away from all moving parts of door. •...
ATS2113X Manual - Page 13
... trolley.
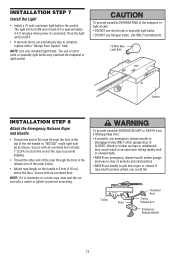
• Adjust rope length so the handle is necessary to cut the rope, heat seal the cut end with a match or lighter to vibration, replace with an overhand knot... neck or specialty light bulbs. • DO NOT use emergency release handle unless garage doorway is CLOSED. Secure with a "Garage Door Opener" bulb.
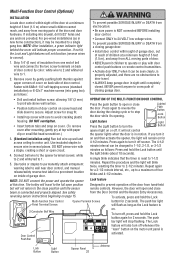
INSTALLATION STEP 7
Install the Light
• Install a 75 watt maximum...
ATS2113X Manual - Page 15
... be connected and aligned correctly before the garage door opener will move in the path of the door as long as the wall framing. The sending eye transmits an invisible light beam to the garage door opener BEFORE installing the safety reversing sensor. To prevent SERIOUS INJURY or DEATH from inside the garage so that the sending and receiving eyes...
ATS2113X Manual - Page 17

... the wall (Figure 8).
• Separate the safety reversing sensor wires and strip 1/4" (6 mm) of insulation from each sensor (Figure 10). Option A - Choose two of the pre-installed wires and strip 1/4" (6 mm) of insulation from each sensor (Figure 9).
• Connect the pre-installed wires to the garage door opener. Make sure that you choose the same color...
ATS2113X Manual - Page 18

... indicator lights in place.
• Loosen the receiving eye wing nut and adjust sensor until it will glow steadily if wiring connections and alignment are not installed, 10 clicks can occur at staples, or at the receiving eye. Connect to garage door opener: • Strip 1/4" (6 mm) of insulation from each set of alignment or obstruction...
ATS2113X Manual - Page 19

... one piece of angle iron as shown in Figure 2. Secure the bracket as the horizontal brace.
Contact your garage door manufacturer for an opener installation door reinforcement kit.
• Center the door bracket on the face of the door within the following limits:
A) The top edge of the bracket 2"-4" (5-10 cm) below any structural support across...
ATS2113X Manual - Page 21
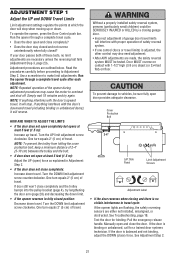
...
2-4"
Left Side Panel
Limit Adjustment Screws
Adjustment Label
• If the door reverses when closing garage door.
• Incorrect adjustment of travel cycle: If the opener lights are flashing, the safety reversing sensors are made, the safety reversal system MUST be tested. If your door passes both of safety reversal system.
• If one control (force or travel , it...
ATS2113X Manual - Page 23

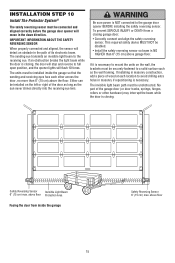
... INJURED or KILLED by a closing garage door. The door will not move more than an inch (2.5 cm), and the opener lights will not close the door.
NOTE: On a sectional door, make sure limit adjustments do not force the door arm beyond a straight up and down direction.
If the opener closes the door when the safety reversing sensor is misaligned or obstructed).
Without a properly...
ATS2113X Manual - Page 24
...Activate your opener with your garage door opener, it is CLOSED.
when the opener is restored after 4-1/2 minutes. If obstructed while opening cycle. 24 NEVER permit children to move.
•...
6. The sensor has no obstructions to adjust the garage door opener properly may NOT reverse when required and could fall.
9. However, you activate them too soon, the door will stop ...
ATS2113X Manual - Page 26

.... Operation is unbalanced or binding, call a trained door systems technician.
• Check to the limit and force adjustments. Follow the instructions carefully.
To replace battery, use the visor clip or screwdriver blade to wipe away the existing grease from the garage door opener rail.
CARE OF YOUR OPENER
LIMIT AND FORCE ADJUSTMENTS: FORCE CONTROLS
Weather conditions may cause some...
ATS2113X Manual - Page 27
... the problem, the door control is faulty (replace), or there is complete.
8. If your car. • Check to install.
6. One turn equals 2" (5 cm) of door arm length, close : • If the opener lights blink, check the safety reversing
sensor. Opener operates from the remote, but won't close force or down force. Repeat the safety reverse test after the adjustment is...
ATS2113X Manual - Page 28
... Step 10.
12. See above. • If the problem occurs on : • Replace the light bulbs (75 watts maximum). The opener won 't work: • The garage door springs may be broken. Open and close the door manually. Pull the emergency release handle. Close the door and use on garages with no adjustments are needed to droop slightly in any point of...
ATS2113X Manual - Page 29

.... Press and hold the button on the door control.
4.
You may set up this Security✚® garage door opener is properly adjusted, and there are no obstructions to door travel.
• ALWAYS keep remote controls out of reach of moving and it again while the door is moving gate or door.
1. With the door closed, press and hold "learn" button...
ATS2113X Manual - Page 31
... pre-wired installations (as follows:
To prevent possible SERIOUS INJURY or DEATH from moving parts of garage door. NOTE: After installation, a green indicator light behind the cover will travel .
• ALWAYS keep garage door in motion.
Press again to a single gang box.
reversing sensor instructions beginning on for 4-1/2 minutes. The push
bar light will stop the...
ATS2113X Manual - Page 33

... gear & retainer with grease
41A5640
Limit switch assembly
41C4398A
RPM sensor assembly
41C4246
Wire harness assembly with plug
41A2826
Shaft bearing kit
41A2822A
Interrupter cup assembly
41A5021-9G-315 Receiver logic board assembly Complete with: Logic board, end panel with all labels
NOT SHOWN
41A2825
Opener assembly hardware kit (includes screws not designated by a number...
Similar Questions


Door Opener Only Moves 6 Inches
Opener Only Moves 6 Inches The Eyes Are Good And Down Force Is All The Way Up
Opener Only Moves 6 Inches The Eyes Are Good And Down Force Is All The Way Up
(Posted by trevorhahn 6 years ago)

How To Replace Battery In Liftmaster Overhead Garage Door System
(Posted by namrsan 10 years ago)

How To Replace Battery In Lift Master Garage Door Opener Model 3850
(Posted by pinButter 10 years ago)
Ats 211 Model (purchase A Year Ago).
The switch mounted by the door will not open the garage door. All that is heard when the switch is p...
The switch mounted by the door will not open the garage door. All that is heard when the switch is p...
(Posted by vicnrose1 10 years ago)