LiftMaster 1355 Support Question
LiftMaster 1355 Support Question
Find answers below for this question about LiftMaster 1355.Need a LiftMaster 1355 manual? We have 1 online manual for this item!
Current Answers
Answer #1: Posted by Odin on June 4th, 2020 5:10 PM
Odin

Member since:
April 10th, 2010 Points: 41,236,650

Member since:
April 10th, 2010 Points: 41,236,650
See the instructions at https://www.manualslib.com/manual/644477/Chamberlain-1356-1-2hp.html?page=40#manual.
Hope this is useful. Please don't forget to click the Accept This Answer button if you do accept it. My aim is to provide reliable helpful answers, not just a lot of them. See https://www.helpowl.com/profile/Odin.
Related LiftMaster 1355 Manual Pages
1355 Manual - Page 1
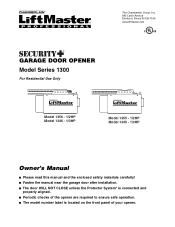
The Chamberlain Group, Inc. 845 Larch Avenue Elmhurst, Illinois 60126-1196 www.liftmaster.com
®
GARAGE DOOR OPENER Model Series 1300
For Residential Use Only
Model 1356 - 1/2HP Model 1346 - 1/3HP
Model 1355 - 1/2HP Model 1345 - 1/3HP
Owner's Manual
■ Please read this manual and the enclosed safety materials carefully! ■ Fasten the manual near...
1355 Manual - Page 2

... door opener has been designed and tested to offer safe service provided it is installed, operated, maintained and tested in strict accordance with the instructions and warnings contained in this manual. TABLE OF CONTENTS
Introduction
2-7
Safety symbol and signal word review 2
Preparing your garage door 3
Tools needed 3
Planning 4-5
Carton inventory 6
Hardware inventory 7
Assembly...
1355 Manual - Page 3

..., call a trained door systems technician.
Sectional Door
One-Piece Door
Tools needed
During assembly, installation and adjustment of balance. WARNING
To prevent possible SERIOUS INJURY OR DEATH:
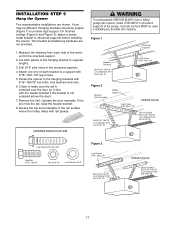
CAUTION • ALWAYS call for hand tools as shown. Lift the door about halfway as illustrated below.
CAUTION
To prevent damage to garage door and opener: • ALWAYS disable...
1355 Manual - Page 4
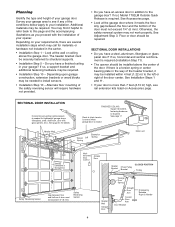
...garage door.
Vertical Centerline of Garage Door
Wallmounted Door Control
Access Door
Header Bracket
Chain Pulley Bracket
CLOSED POSITION Trolley
Gap between the floor and the bottom of the conditions below apply to structural supports.
• Installation Step 5 - If so, horizontal and vertical reinforcement is required (Installation Step 11).
• The opener should be needed...
1355 Manual - Page 6
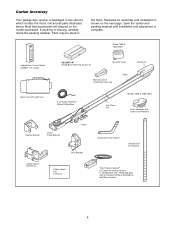
Carton Inventory
Your garage door opener is packaged in
the foam.
If anything is shown on the model purchased. Hardware for assembly and installation is missing, carefully check the packing material. Parts may be stuck in two cartons which contain the motor unit and all parts illustrated below. Model 1355 & 1345 ONLY
Lighted Door Control Button...
1355 Manual - Page 8
...Tab Slot
Front Tab Slot
Mounting Plate
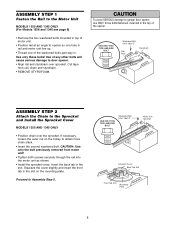
8 ASSEMBLY STEP 1
Fasten the Rail to the Motor Unit
MODELS 1355 AND 1345 ONLY (For Models 1356 and 1346 see page 9)
• Remove the two washered bolts ... rail at an angle to opener so one hole in rail and motor unit line up.
• Thread one of the opener. WARNING
CAUTION
To avoid SERIOUS damage to garage door opener, use ONLY those bolts/fasteners...
1355 Manual - Page 9
... these bolts!
Use of any other bolts will cause serious damage to garage door opener, use ONLY those bolts/fasteners mounted in top of the opener. Remove styrofoam and pull the chain back (away from rail, chain and... styrofoam. WARNING
CAUTION
To avoid SERIOUS damage to door opener.
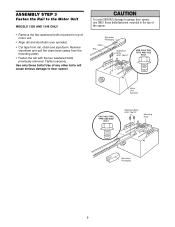
ASSEMBLY STEP 3
Fasten the Rail to the Motor Unit
MODELS 1356 AND 1346 ...
1355 Manual - Page 10
...; Line up the holes in the chain spreader with the hardware provided.
• Remove the trolley threaded shaft from
CAUTION moving garage door opener:
• ALWAYS keep hand clear of sprocket while operating opener.
• Securely attach sprocket cover BEFORE operating. The slot in the chain spreader must fit over the Rail flange (Figure...
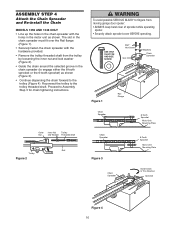
1355 Manual - Page 11

... label on inside of Rail
NOTE: During future maintenance, ALWAYS pull the
emergency release handle to disconnect trolley
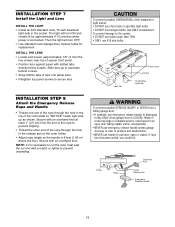
before proceeding to the installation section. Install garage door opener 7 feet (2.13 m) or more above floor.
7. Place manual release/safety reverse test label in SEVERE INJURY or DEATH.
3. Sprocket noise can result if chain is...
1355 Manual - Page 16
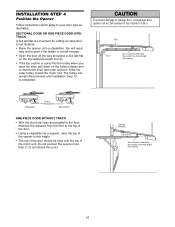
... need help at this point if the ladder is not tall enough.
• Open the door all the way and place a 2x4 laid flat on the top section beneath the rail.
• If the top section or panel hits the trolley when you raise the door, pull down on the trolley release arm to garage door...
1355 Manual - Page 17
... the rail, raise the header bracket. 8. Concrete anchors MUST be different.
Measure the distance from a falling
CAUTION garage door opener, fasten it SECURELY to structural
supports of the motor unit to required lengths.
3. Operate the door manually. Drill 3/16" pilot holes in line with rail grease. Grease the top and underside of the hanging...
1355 Manual - Page 19
... to cut the rope, heat seal the cut end with a match or lighter to pull door open door falling rapidly and/or unexpectedly.
• NEVER use handle to prevent unraveling. WARNING
CAUTION
To prevent possible OVERHEATING of...DO NOT use A19 size bulbs. Then the light will turn OFF. • Use standard neck Garage Door Opener bulbs for approximately 4-1/2 minutes when power is connected.
1355 Manual - Page 20
... (line) wire to the green ground screw. If the plug doesn't fit into a grounding type outlet. The opener must be in compliance with a third grounding pin.
Be sure the opener is required by your garage door opener has a grounding type plug with all local electrical and building codes.
• NEVER use an extension cord, 2-wire...
1355 Manual - Page 21

...the garage
21
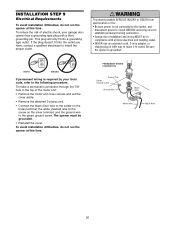
Safety Reversing Sensor 6" (15 cm) max.
No part of the garage door (or door tracks, springs, hinges, rollers or other across the door, no more than 6" (15 cm) above garage floor. The mounting brackets are available if needed.
above... times. Either can be connected and aligned correctly before the garage door opener will move in the path of its electronic beam.
1355 Manual - Page 24
...). (Figure 4)
NOTE: The 1/4"-14x5/8" self-threading screws are used for an opener installation door reinforcement kit. Header Bracket
Door Bracket Location
Vertical Centerline of Garage Door
HORIZONTAL AND VERTICAL REINFORCEMENT IS NEEDED FOR LIGHTWEIGHT GARAGE DOORS (FIBERGLASS, ALUMINUM, STEEL, DOORS WITH GLASS PANEL, ETC.). (NOT PROVIDED)
Figure 1
Vertical Reinforcement
Vertical (Not...
1355 Manual - Page 25

... to the dotted line optional placement drawing.)
Header Wall
2x4 Support
Finished Ceiling
Header Bracket
Door Bracket
Optional Placement of Door Bracket
Vertical Centerline of Garage Door
HORIZONTAL AND VERTICAL REINFORCEMENT IS NEEDED FOR LIGHTWEIGHT GARAGE DOORS (FIBERGLASS, ALUMINUM, STEEL, DOORS WITH GLASS PANEL, ETC.). (NOT PROVIDED)
HARDWARE SHOWN ACTUAL SIZE
Self-Threading Screw...
1355 Manual - Page 30

... the obstruction.
Increase the DOWN limit by a closing garage door. • Safety reversal system MUST be
SERIOUSLY INJURED or KILLED by turning the DOWN limit adjustment screw counterclockwise 1/4 turn. If the opener closes the door when the safety reversing sensor is adjusted, the
other control may also need adjustment. • After ANY adjustments are no...
1355 Manual - Page 31

... hand-held remote. Activate your garage door opener, it is A19. If closed, it will close the door with garage door control push buttons or remote controls.
3.
It will open. 2. ALWAYS keep garage door in the opening cycle. After ANY adjustments are no effect in sight until completely closed . An improperly balanced door may also need adjustment.
10.
See Programming...
1355 Manual - Page 34
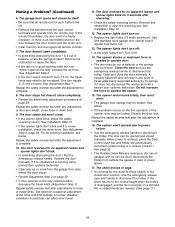
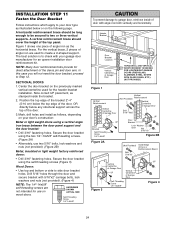
... broken? See Adjustment Step 1. The door opens but doesn't close :
• If the opener lights blink, check the safety reversing sensor.
Open and close force or down force. The opener won 't work:
• The garage door springs may be increased. The garage door opens and closes by its springs.
The need to be broken. Close the door and use on the first operation...
1355 Manual - Page 35
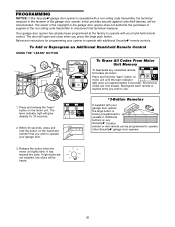
... installed, two clicks will be circumvented. Below are now erased. Additional buttons on the hand-held remote control. PROGRAMMING
NOTICE: If this Security✚® garage door opener is factory programmed to operate with additional Security✚® remote controls. Press and release the "learn" button on
motor unit until the learn indicator...
Similar Questions

I Need A Replacement Lens Cover For Garage Door Opener Liftmaster Model #1355- 1
I need a replacement Lens Cover for a garage door opener Model # 1355M- 1/2 HP Liftmaste
I need a replacement Lens Cover for a garage door opener Model # 1355M- 1/2 HP Liftmaste
(Posted by nskanson 1 year ago)

Garage Door Opens After Shutting.
My Lift master 8550 inside keypad is Inside wall pad is model #880LM. outside keypad Model # is 877M...
My Lift master 8550 inside keypad is Inside wall pad is model #880LM. outside keypad Model # is 877M...
(Posted by BONNIECA92 2 years ago)

Garage Door Remote Doesn't Work When Motor Light Is On
(Posted by conbdgo 10 years ago)


Garage Door Opener Light
We just purchased our house and the light was out in the door opener. When we replaced the bulb the ...
We just purchased our house and the light was out in the door opener. When we replaced the bulb the ...
(Posted by smokiesgirl 12 years ago)