Get support for LiftMaster 1355

LiftMaster 1355 Support Question

LiftMaster 1355 Support Question

Find answers below for this question about LiftMaster 1355.
Need a LiftMaster 1355 manual? We have 1 online manual for this item!
Question posted by mamacita on July 18th, 2011

Reset Code

The person who posted this question about this LiftMaster product did not include a detailed explanation. Please use the "Request More Information" button to the right if more details would help you to answer this question.

Current Answers

There are currently no answers that have been posted for this question.
Be the first to post an answer!

Remember that you can earn up to 1,100 points for every answer you submit. The better the quality of your answer, the better chance it has to be accepted.

Related LiftMaster 1355 Manual Pages

1355 Manual - Page 1

The Chamberlain Group, Inc. 845 Larch Avenue Elmhurst, Illinois 60126-1196 www.liftmaster.com ® GARAGE DOOR OPENER Model Series 1300 For Residential Use Only Model 1356 - 1/2HP Model 1346 - 1/3HP Model 1355 - 1/2HP Model 1345 - 1/3HP Owner's Manual ■ Please read this manual and the enclosed safety materials carefully! ■ Fasten the manual near...
1355 Manual - Page 2

... on the following pages, they will alert you to the possibility of damage to WARNING your garage door opener 33 Having a problem 34 Programming 35-36 To add or reprogram a hand-held remote control .....35 To erase all codes 35 3-Button remotes 35 To add, reprogram or change a Keyless Entry PIN 36 Repair Parts...
1355 Manual - Page 3

... and remove ALL ropes connected to WARNING garage door BEFORE installing and operating garage door opener to avoid malfunction and damage. If your garage door is balanced and is not sticking or binding: 1. CAUTION To prevent damage to garage door and opener: • ALWAYS disable locks BEFORE installing and operating the opener. • ONLY operate garage door opener at 120V, 60 Hz to avoid...
1355 Manual - Page 6

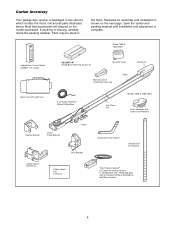
...and packing material until installation and adjustment is shown on the model purchased. Model 1355 & 1345 ONLY Lighted Door Control Button w/6ABx1-1/2" screws SECURITY✚® Single-Button Remote Control (1) Sprocket ... installation is complete. Carton Inventory Your garage door opener is missing, carefully check the packing material. If anything is packaged in the foam.
1355 Manual - Page 8

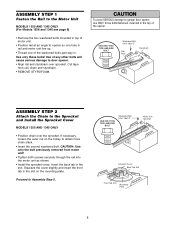
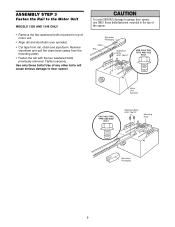
...slightly and insert the front tab in the slot. Proceed to garage door opener, use ONLY those bolts/fasteners mounted in the top of the opener. WARNING CAUTION To avoid SERIOUS damage to Assembly Step 5. If...way in. Use only these bolts! ASSEMBLY STEP 1 Fasten the Rail to the Motor Unit MODELS 1355 AND 1345 ONLY (For Models 1356 and 1346 see page 9) • Remove the two washered ...
1355 Manual - Page 9

...BOLT Washered Bolts 5/16"-18x1/2" Mounting Plate Styrofoam Packaging 9 ASSEMBLY STEP 3 Fasten the Rail to door opener. Tighten securely. Use of motor unit. • Align rail and styrofoam over sprocket. •... (away from rail, chain and styrofoam. WARNING CAUTION To avoid SERIOUS damage to garage door opener, use ONLY those bolts/fasteners mounted in top of any other bolts will cause ...
1355 Manual - Page 10

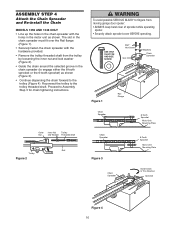
...; Line up the holes in the chain spreader with the hardware provided. • Remove the trolley threaded shaft from CAUTION moving garage door opener: • ALWAYS keep hand clear of sprocket while operating opener. • Securely attach sprocket cover BEFORE operating. The slot in the chain spreader must fit over the Rail flange (Figure...
1355 Manual - Page 11

... of the rail at minimum height of Rail NOTE: During future maintenance, ALWAYS pull the emergency release handle to disconnect trolley before proceeding to garage door control. 11. Install garage door opener 7 feet (2.13 m) or more above floor. 7. Mount emergency release handle 6 feet (1.83 m) above floor. 6. Upon completion of SEVERE INJURY or DEATH: 1. ASSEMBLY STEP...
1355 Manual - Page 16

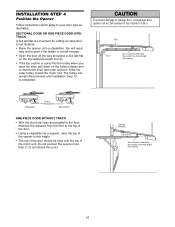
... correct mounting height from ceiling. INSTALLATION STEP 4 Position the Opener Follow instructions which apply to your door type as a support, raise the top of door. SECTIONAL DOOR OR ONE-PIECE DOOR WITH TRACK A 2x4 laid flat is completed. WARNING CAUTION To prevent damage to garage door, rest garage door opener rail on 2x4 placed on the trolley release arm to...
1355 Manual - Page 17

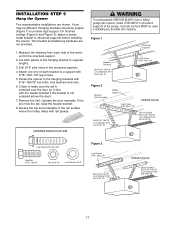
... hanging brackets with the header bracket if the bracket is centered over the door (or in the structural supports. 4. Check to the structural support. 2. Operate the door manually. Concrete anchors MUST be different. Measure the distance from a falling CAUTION garage door opener, fasten it SECURELY to provide rigid support. Drill 3/16" pilot holes in line...
1355 Manual - Page 19

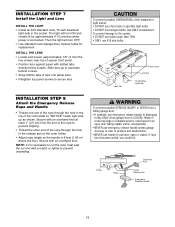
... is 6 feet (1.83 m) above the floor. Secure with slotted tabs directly below screws. Then the light will turn OFF. • Use standard neck Garage Door Opener bulbs for approximately 4-1/2 minutes when power is connected. INSTALLATION STEP 7 Install the Light and Lens INSTALL THE LIGHT • Install an A19 standard neck, 75 ...
1355 Manual - Page 20

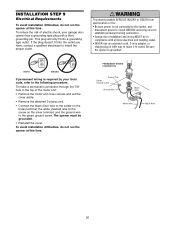
... you have, contact a qualified electrician to the screw on the brass terminal; RIGHT WRONG If permanent wiring is required by your garage door opener has a grounding type plug with all local electrical and building codes. • NEVER use an extension cord, 2-wire adapter, or change plug in the top of electric shock, your local...
1355 Manual - Page 21

... eye (with an amber indicator light) transmits an invisible light beam to the garage door CAUTION opener BEFORE installing the safety reversing sensor. The units must be securely fastened to ... above floor The invisible light beam path must be connected and aligned correctly before the garage door opener will flash 10 times. above the floor. This required safety device MUST NOT be disabled...
1355 Manual - Page 30

... (or a 2x4 laid flat) ADJUSTMENT STEP 4 Test the Protector System® • Press the remote control push button to open the door. • Place the opener carton in the path of the opener. The garage door opener will flash. Door MUST reverse on contact with 1-1/2" (3.8 cm) high object (or 2x4 laid flat) on the floor, centered under the...
1355 Manual - Page 31

... FOLLOW ALL WARNINGS AND INSTRUCTIONS. 2. NO ONE SHOULD CROSS THE PATH OF THE MOVING DOOR. 5. NEVER use handle to a matching code which are under the following : • The hand-held remote control have been factory-set to pull garage door open , the door will reverse. See Programming. If closed . If the obstruction interrupts the sensor beam...
1355 Manual - Page 33

... door, foil backed insulation, or metal garage siding. 5. Follow the instructions carefully. 7 3 5 KG 7 3 5 KG Repeat the safety reverse test Open ...opener to the limit and force adjustments. 9 1 9 1 Only a screwdriver is off. • Program the opener to match the remote control code. (Refer to install. 33 Opener operates from the remote, but not from either the Door...
1355 Manual - Page 34

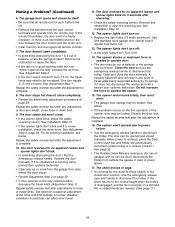
... doesn't close force or down force. Weather conditions in particular can be broken. Use A19 standard neck garage door opener bulb if regular bulb burns out. 13. If it is a new installation, check the down limit. 9. The door can affect door travel . The door doesn't open all the way, increase the up force. See Adjustment Step 1. The...
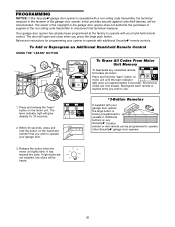
1355 Manual - Page 35

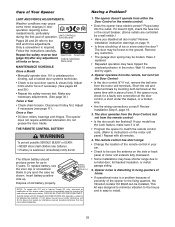
...✚® garage door opener is factory programmed to operate it. Your garage door opener has already been programmed at the factory to operate with your opener to operate with a non-rolling code transmitter, the technical measure in the garage door opener does not authorize the purchaser or supplier of the garage door opener, which provides security against code-theft devices...
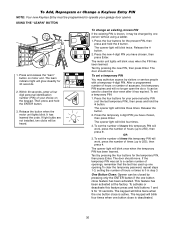
1355 Manual - Page 36

...It has learned the code. If light bulbs are not installed, two clicks will work , press the number of hours (up to 255), then press #. Release the button. 2. The opener light will blink once... close the door even after it may authorize access by one opening.To clear the temporary password, repeat steps 1-3, setting the number of hours or times to operate your garage door opener. OR 3....
1355 Manual - Page 39

...Security✚® remote. ACCESSORIES 1702LM 1708LM Outside Quick Release: Required for a garage with Security✚®: Enables homeowner to operate garage door opener from outside by entering a password on a specially designed keyboard. Monitors up to a programmable number of garage door opener from portable remotes and a Light Feature for constant light. 98LM 902LM/903LM...

Similar Questions

I Have Installed A Chamberlan Garage Door Opener And The Remote I Was Using Is
I have been using a Chamberlan garage door opener and its remote has been defective since of late.Pl...
(Posted by donweera42 8 months ago)
I Need A Replacement Lens Cover For Garage Door Opener Liftmaster Model #1355- 1
I need a replacement Lens Cover for a garage door opener Model # 1355M- 1/2 HP Liftmaste
(Posted by nskanson 1 year ago)
Garage Door Opens After Shutting.
My Lift master 8550 inside keypad is Inside wall pad is model #880LM. outside keypad Model # is 877M...
(Posted by BONNIECA92 2 years ago)
Garage Door Opener Light
We just purchased our house and the light was out in the door opener. When we replaced the bulb the ...
(Posted by smokiesgirl 12 years ago)
Ask a New Question
Use the box below to post a new question about this LiftMaster product .
Points & Prizes
  • You can earn points for nearly everything you do on HelpOwl.com
  • You can trade in those points for gift cards at leading retailers such as Amazon.com and Walmart
  • It's that simple!
See How it Works
Create a Free Account

LiftMaster Manuals

Find free LiftMaster 1355 manuals and user guides available at ManualOwl.com. Try out our unique manual viewer allowing you to interact with manuals from directly within your browser!

LiftMaster Reviews

View thousands of LiftMaster user reviews and customer ratings available at ReviewOwl.com.

Contact Information

Complete LiftMaster customer service contact information including steps to reach representatives, hours of operation, customer support links and more from ContactHelp.com.

Scoreboard Ratings

See detailed LiftMaster customer service rankings, employee comments and much more from our sister site.