LiftMaster 1345 Support Question
LiftMaster 1345 Support Question
Find answers below for this question about LiftMaster 1345.Need a LiftMaster 1345 manual? We have 1 online manual for this item!
Question posted by MARKOHD on October 30th, 2014
How Many Wall Stations Can I Wire Into My Lm-1355 Operator?
The person who posted this question about this LiftMaster product did not include a detailed explanation. Please use the "Request More Information" button to the right if more details would help you to answer this question.
Current Answers
Answer #1: Posted by TommyKervz on November 3rd, 2014 10:07 AM
TommyKervz

Member since:
January 10th, 2013 Points: 17,776,803

Member since:
January 10th, 2013 Points: 17,776,803
Sorry for taking long
Please send an email to liftmasters for instand help
Related LiftMaster 1345 Manual Pages
1355 Manual - Page 1
...
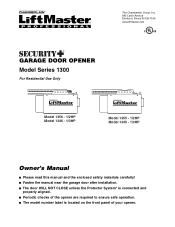
Model 1355 - 1/2HP Model 1345 - 1/3HP
Owner's Manual
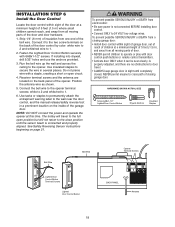
■ Please read this manual and the enclosed safety materials carefully! ■ Fasten the manual near the garage door after installation. ■ The door WILL NOT CLOSE unless the Protector System® is connected and
properly aligned. ■ Periodic checks of the opener are required to ensure safe operation...
1355 Manual - Page 2

... the force 29
Test the safety reversal system 30
Test the Protector System 30
Operation
31-34
Operation safety instructions 31
Using your garage door opener 31
Using the wall-mounted door control 32
To open the door manually 32
Care of your garage door and/or the garage door opener if
you see this manual. WARNING The hazard may come from something mechanical...
1355 Manual - Page 3

...garage door and opener: • ALWAYS disable locks BEFORE installing and operating
the opener. • ONLY operate garage door opener at 120V, 60 Hz to avoid entanglement. Release
the door. Sectional Door
One-Piece Door...call a trained door systems technician if garage door binds, sticks, or is out of balance.
Carpenter's Level (Optional)
12
Tape Measure
Pencil Wire Cutters
Drill
...
1355 Manual - Page 6
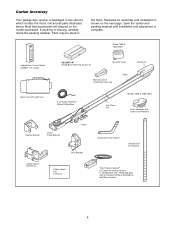
...all parts illustrated below. Model 1355 & 1345 ONLY
Lighted Door Control Button w/6ABx1-1/2" screws
...Door Arm Section
Straight Door Arm Section
The Protector System® (2) Safety Reversing Sensors (1 Sending Eye and 1 Receiving Eye) with 2-Conductor White & White/Black Bell Wire attached
6 If anything is missing, carefully check the packing material. Carton Inventory
Your garage door opener...
1355 Manual - Page 8
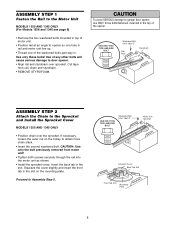
... the Chain to garage door opener, use ONLY those bolts/fasteners mounted in the top of the opener. If necessary, loosen the outer nut on the mounting plate. Proceed to obtain more chain slack.
• Insert the second washered bolt. ASSEMBLY STEP 1
Fasten the Rail to the Motor Unit
MODELS 1355 AND 1345 ONLY (For Models...
1355 Manual - Page 9
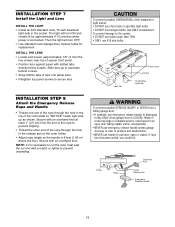
Use only these bolts! WARNING
CAUTION
To avoid SERIOUS damage to garage door opener, use ONLY those bolts/fasteners mounted in the top of any other bolts will cause serious damage to the ... Sprocket
USE ONLY THIS TYPE AND SIZE
BOLT
Washered Bolts 5/16"-18x1/2"
Mounting Plate
Styrofoam Packaging
9
Use of the opener. Tighten securely. ASSEMBLY STEP 3
Fasten the Rail to door opener.
1355 Manual - Page 10
... holes in the chain spreader with the hardware provided.
• Remove the trolley threaded shaft from
CAUTION moving garage door opener:
• ALWAYS keep hand clear of sprocket while operating opener.
• Securely attach sprocket cover BEFORE operating.
The slot in the chain spreader must fit over the Rail flange (Figure 1).
• Securely fasten the chain...
1355 Manual - Page 11

...INJURY or DEATH.
3. Upon completion of garage door.
12. Door MUST reverse on contact with the door closed. WARNING
You have now finished assembling your garage door opener. READ AND FOLLOW ALL INSTALLATION WARNINGS AND INSTRUCTIONS.
2. All repairs to the installation section. Install wall-mounted garage door control: • within sight of the garage door. • out of reach of the...
1355 Manual - Page 16
... trolley toward the motor unit. WARNING
CAUTION
To prevent damage to garage door, rest garage door opener rail on 2x4 placed on the trolley release arm to your door type as a support, raise the top of the opener to this height.
• The top of the door should be level with the top of the motor unit. Header...
1355 Manual - Page 17
...garage. Operate the door manually. Concrete anchors MUST be different. Yours may be used if installing any brackets into masonry. Hanging brackets should be angled (Figure 1) to a support with the header bracket if the bracket is
centered over the door...17 Measure the distance from a falling
CAUTION garage door opener, fasten it SECURELY to the hanging brackets with rail grease. If the...
1355 Manual - Page 18
... located on the inside of the garage door. Run the bell wire up the wall and across the ceiling to 1.
6. Connect the bell wire to the opener terminal screws: white to 2 and white/red to the opener.
To prevent possible SERIOUS INJURY or DEATH from a closing garage door.
Use insulated staples to secure the wire in a prominent location on the...
1355 Manual - Page 19
... OFF. • Use standard neck Garage Door Opener bulbs for approximately 4-1/2 minutes when power is necessary to cut the rope, heat seal the cut end with an overhand knot at least 1" (2.5 cm) from a
CAUTION falling garage door:
• If possible, use emergency release handle to disengage trolley ONLY when garage door is clear of persons and obstructions...
1355 Manual - Page 20
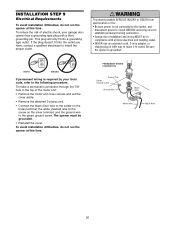
... BEFORE removing cover to establish permanent wiring connection.
• Garage door installation and wiring MUST be grounded.
• Reinstall the cover. To avoid installation difficulties, do not run the opener at this time.
If the plug doesn't fit into a grounding type outlet. Be sure the opener is required by your garage door opener has a grounding type plug with all...
1355 Manual - Page 21

... be connected and aligned correctly before the garage door opener will flash 10 times.
above floor WARNING
Be sure power is not connected to full open position, and the opener lights will move in the path of its electronic beam. No part of the door as long as the wall framing. INSTALLATION STEP 10
Install The Protector...
1355 Manual - Page 30

... 26. • Repeat the test. • When the door reverses on the floor, centered under the garage door. • Operate the door in the down direction. WARNING
Without a properly installed safety reversal...far enough in the down position. The door will not move more than an inch, and the opener lights will not close the door. The garage door opener will flash. WARNING
Without a properly ...
1355 Manual - Page 31

... interruption; The light will reverse. 3. ALWAYS keep remote controls out of reach of persons and obstructions.
8. Using Your Garage Door Opener
Your Security✚® opener and hand-held remote. See Programming. If opening , the door will operate with each use handle to eight Security✚® remote controls and one Security✚® Keyless Entry System...
1355 Manual - Page 34
... 1.
Remove any ice or snow from outside the garage in case of the opener, door may need for 5 seconds after any point of travel. The opener lights don't turn off .
• Remove the bell wire from the door control terminals and operate from the remote only. The door can affect door travel limits.
Pull the emergency release handle. The...
1355 Manual - Page 35
...Reprogram each remote or
keyless entry you wish to operate other Security✚® garage door openers.
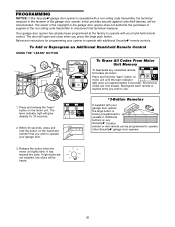
3. It has learned the code. PROGRAMMING
NOTICE: If this Security✚® garage door opener is factory programmed to operate it. The door will glow steadily for programming your opener to operate your garage door.
*3-Button Remotes
If supplied with your hand-held Remote...
1355 Manual - Page 36
... release the "learn
indicator light will work , press the number of openings, remember that the test has used to operate your garage door opener.
The opener light will blink three times. To set to a certain number of hours (up to 255), then press ✽. The opener light will blink once when the PIN has been learned. The...
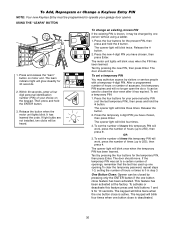
1355 Manual - Page 39
... designed keyboard.
LOCK
LIGHT
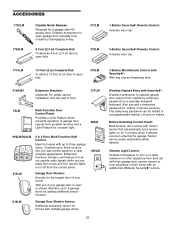
395LM
916LM
Garage Door Monitor Sensor:
Additional accessory sensor for homes with multiple garage doors.
39
Wireless Keyless Entry with Security✚®: Enables homeowner to operate garage door opener from portable remotes and a Light Feature for constant light.
98LM
902LM/903LM
2 & 3 Door Multi-Function Wall Control:
Ideal for homes with up...
Similar Questions

All Remote Controls Of My Lm 1345 Stop Working Suddenly. Door Control Still Ok.
All remote controls of my LM 1345 stop working all the sudden. When I press the transmit button on a...
All remote controls of my LM 1345 stop working all the sudden. When I press the transmit button on a...
(Posted by huangtingwei 9 years ago)

How To Relocate A Loose Wire And Pulley In Garage Door Opener
(Posted by gportswanto 10 years ago)

Can I Operate Garage Door Opener Liftmaster 3850p Without The Battery
(Posted by bonda 10 years ago)

My Opener Works Fine From The Wall Unit. None Of The Remotes Work.
The wall unit works fine but the remotes just stopped working. I reset the codes and can not reset t...
The wall unit works fine but the remotes just stopped working. I reset the codes and can not reset t...
(Posted by Nelsoneric84 11 years ago)

Liftmaster Cptk-3, How Do I Program My New Key Remote To Existing Garage Door
(Posted by alisonwood 11 years ago)