Lexmark X5410 Support Question
Lexmark X5410 Support Question
Find answers below for this question about Lexmark X5410 - All In One Printer.Need a Lexmark X5410 manual? We have 3 online manuals for this item!
Question posted by gjgjrcpa on April 19th, 2013
Fax Receipt
How do I setup fax to get a sheet showing fax has been sent?
Current Answers
Answer #1: Posted by TommyKervz on April 19th, 2013 10:16 AM
TommyKervz

Member since:
January 10th, 2013 Points: 17,776,813

Member since:
January 10th, 2013 Points: 17,776,813
Greetings - Please download a fax guide for your Lexmark X5410 and look up Print Fax History or Transmission Status Report from the Table of Content page.
Related Lexmark X5410 Manual Pages
Fax Guide - Page 2

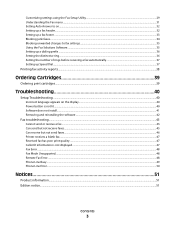
Contents
Introduction 5
Finding information about the printer...5
Understanding the parts of the printer 7
Understanding the parts of the printer...7
Fax Setup 9
Getting the printer ready to fax...9
Using an RJ11 adapter ...9 Choosing a fax connection...12 Connecting to an answering machine...13 Connecting directly to a telephone wall jack...14 Connecting directly to a telephone wall jack in ...
Fax Guide - Page 3
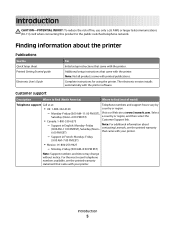
... 40
Setup Troubleshooting...40
Incorrect language appears on the display...40 Power button is not lit ...40 Software does not install...41 Removing and reinstalling the software ...42
Fax troubleshooting...43
Cannot send or receive a fax...43 Can send but not receive faxes...45 Can receive but not send faxes...46 Printer receives a blank fax...47 Received fax...
Fax Guide - Page 5
...
(8:00 AM-11:00 PM EST), Saturday (Noon- Support in English: Monday-Friday
Note: For additional information about the printer
Publications
See the Quick Setup sheet Printed Getting Started guide
Electronic User's Guide
For Initial setup instructions that came with printed publications. Select
Saturday (Noon-6:00 PM EST)
a country or region, and then select...
Fax Guide - Page 8
... a power source.
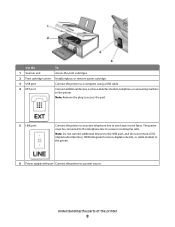
Understanding the parts of the printer
8
Note: Do not connect additional devices to the LINE port, and do not connect a DSL (digital subscriber line), ISDN (integrated services digital network), or cable modem to the printer.
6 Power supply with port Connect the printer to receive incoming fax calls. Note: Remove the plug to access...
Fax Guide - Page 9

... the telephone cord into the Line port of the adapter.
Note: The UK adapter is shown. Fax Setup
9 Fax Setup
Getting the printer ready to fax
CAUTION-SHOCK HAZARD: Do not use the telephone line adapter included in your location.
3 Connect the telephone line of your printer to an answering machine or other telecommunications equipment, use the...
Fax Guide - Page 10

...; Russia • Slovenia • Spain • Turkey
Fax Setup
10 Note: Once this plug is removed, any country- Warning-Potential Damage: Do not touch cables or the printer in the area shown while actively sending or receiving a fax. or region-specific equipment you connect to the printer by the adapter, as shown, will not function...
Fax Guide - Page 11

...connect to the printer by the adapter, as shown, will not function properly.
2 Connect your telecommunications equipment directly to the printer:
1 Remove the plug from the back of the printer. To connect... EXT port on the back of the printer. Warning-Potential Damage: Do not touch cables or the printer in the area shown while actively sending or receiving a fax. Note: Once this plug is removed,...
Fax Guide - Page 12
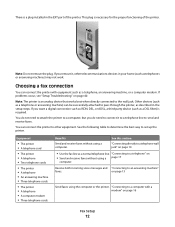
... you remove it to a telephone line to send and receive faxes.
Note: The printer is a plug installed in the setup steps.
If you want a digital connection such as ISDN, DSL, or ADSL, a third-party device (such as described in the EXT port of the printer. See the following table to determine the best way to...
Fax Guide - Page 13
Fax Setup
13 For more information on your country or region. Note: Setup steps may vary depending on connecting the printer to telecommunications equipment, see the related topic, "Using an RJ11 adapter."
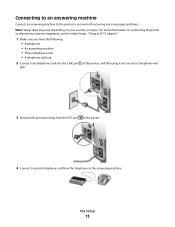
1 Make sure you have the following: • A telephone • An answering machine • Three ...
Fax Guide - Page 14
Fax Setup
14 5 Connect a third telephone cord from the answering machine to the EXT port of the telephone cord into an active telephone wall jack. Connecting directly to a telephone wall jack
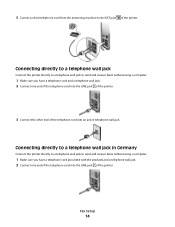
Connect the printer directly to a telephone wall jack to send and receive faxes without using a computer.
1 Make sure you have a telephone cord (provided with...
Fax Guide - Page 16
... active telephone wall jack.
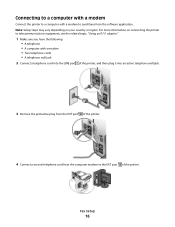
3 Remove the protective plug from the EXT port of the printer.
4 Connect a second telephone cord from the computer modem to send faxes from the software application. Note: Setup steps may vary depending on connecting the printer to telecommunications equipment, see the related topic, "Using an RJ11 adapter."
1 Make sure you...
Fax Guide - Page 17
... your telephone is located to make copies or to send and receive faxes without using a computer. Fax Setup
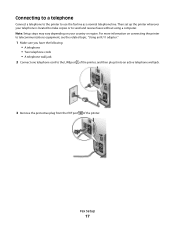
17 Then set up the printer wherever your country or region. Connecting to a telephone
Connect a telephone to the printer to the LINE port of the printer, and then plug it into an active telephone wall jack.
3 Remove the...
Fax Guide - Page 18

... your ISDN provider.
• If you are using DSL, connect to a DSL filter or router that is not recognizable to most fax machines. Fax Setup
18 Certain devices can be connected to the printer so that digital telephone services can be connected to a Private Branch Exchange (PBX) telephone system. If
none exists, consider installing an...
Fax Guide - Page 25

.../or these symbols
6 Click OK to display Caller ID information.
1 From the control panel, press Fax Mode. 2 Press or repeatedly until Tools appears. 3 Press . 4 Press or repeatedly until Device Setup appears. 5 Press . 6 Press or repeatedly until Caller ID Pattern appears. The printer supports two distinct Caller ID patterns: Pattern 1 (FSK) and Pattern 2 (DTMF). Using...
Fax Guide - Page 32

... you have not entered this On Hook Dial Delay Fax
Auto Answer Lighter / Darker* Fax Setup
Tools
To
Dial a telephone number while listening to send a fax. If you specify.
• Maintenance - Setting Auto Answer to send a fax.
Print a test page.
• Device Setup-Customize printer setup settings. • Defaults-Customize printer settings. Answer all incoming phone calls. Using...
Fax Guide - Page 34

...setup of your printer, you were prompted to save the setting. Blocking junk faxes
1 From the desktop, double-click the Productivity Studio icon. 2 From the left pane of the fax number. • A fax...Faxes tab. 5 From the "Block Junk Faxes" area, select the check box beside Enable Fax Blocking. 6 If you have not entered
this information:
a Press twice.
b Press or repeatedly until Device Setup...
Fax Guide - Page 44
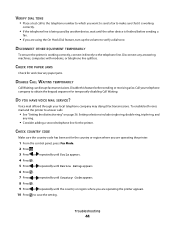
... Press to obtain the keypad sequence for the country or region where you are operating the printer:
1 From the control panel, press Fax Mode. 2 Press . 3 Press or repeatedly until Tools appears. 4 Press . 5 Press or repeatedly until Device Setup appears. 6 Press . 7 Press or repeatedly until Country Code appears. 8 Press . 9 Press or repeatedly until the other...
User's Guide - Page 17
Setting up the printer
17
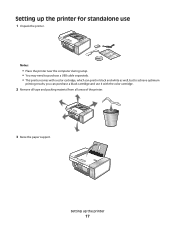
Setting up the printer for standalone use
1 Unpack the printer.
1 2 3
Notes:
• Place the printer near the computer during setup. • You may need to purchase a USB cable separately. • This printer comes with a color cartridge, which can print in black and white as well, but to achieve optimum
printing results, you...
User's Guide - Page 89
... AND PAUSE SETTINGS
1 Click: • In Windows Vista: Œ Control Panel Œ Printers (under Hardware and Sound). • In Windows XP: Start Œ Printers and Faxes. • In Windows 2000: Start Œ Settings Œ Printers.
2 Double-click the printer queue device. 3 Click Printer.
• Make sure no check mark appears next to Pause Printing. • If a check...
User's Guide - Page 122
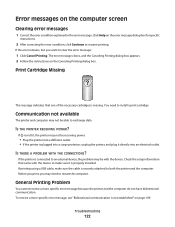
... dialog box. If the error remains, but you may be receiving power.
• Plug the printer into a different outlet. • If the printer is properly installed. Communication not available
The printer and computer may not be with the device to restart the computer.
You need to make sure the cable is missing.
The error...
Similar Questions

How Can I Download A Lexmark Printer Without The Cd X5410
(Posted by vicmacleive 9 years ago)

How To Install Lexmark Printer X5410 For Mac
(Posted by walmic 10 years ago)

Is The Lexmark X5410 Printer Compatible With Windows 7 And 8
(Posted by holNANCYR 10 years ago)

I Want An Automatic Fax Report After Each Fax Sent. How Do I Set That Up?
(Posted by carmenloveland 11 years ago)

What Does Lost Mean When I Draw Up Report In Faxes Sent
I have the Lexmark Prevail Pro 707 fax etc. I am sending 2000 faxes via the software provided from m...
I have the Lexmark Prevail Pro 707 fax etc. I am sending 2000 faxes via the software provided from m...
(Posted by michael23449 11 years ago)