
Lexmark X264dn Support Question
Lexmark X264dn Support Question
Find answers below for this question about Lexmark X264dn.Need a Lexmark X264dn manual? We have 8 online manuals for this item!
Question posted by fotow on November 25th, 2013
How To Reset Pc Kit On Lexmark X264dn
The person who posted this question about this Lexmark product did not include a detailed explanation. Please use the "Request More Information" button to the right if more details would help you to answer this question.
Current Answers
Related Lexmark X264dn Manual Pages
User's Guide - Page 1
Lexmark X264dn, X363dn, X364dn, and X364dw
User's Guide
September 2009
Machine type(s): 7013 Model(s): 231, 235, 432, 436, 43W, d01, d02, gd1, gd2, dn1, dn2, gd1, gd2
www.lexmark.com
User's Guide - Page 153
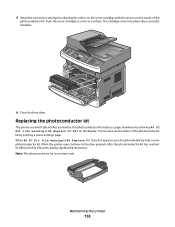
When 84 PC Kit life warning or 84 Replace PC Kit first appears, you before the photoconductor kit reaches a page maximum by showing 84 PC Kit life warning or 84 Replace PC Kit on the tracks of the
photoconductor kit.
While the printer may continue to function properly after the photoconductor kit has reached its official end-of the photoconductor kit by aligning...
User's Guide - Page 182
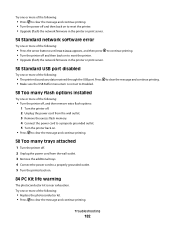
... to clear the message and continue printing. • Turn the power off and then back on to reset the printer. • Upgrade (flash) the network firmware in the printer or print server.
54 Standard...
1 Turn the printer off and then back on .
84 PC Kit life warning
The photoconductor kit is not set to reset the printer. • Upgrade (flash) the network firmware in the printer or print ...
User's Guide - Page 183
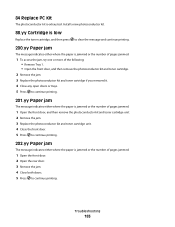
... Tray 1. • Open the front door, and then remove the photoconductor kit and toner cartridge.
2 Remove the jam. 3 Replace the photoconductor kit and toner cartridge if you removed it. 4 Close any open doors or... the paper is exhausted.
Troubleshooting
183 84 Replace PC Kit
The photoconductor kit is jammed or the number of pages jammed.
1 Open the front door, and then remove the...
User's Guide - Page 210

... the manufacturer intends to the information herein; Evaluation and verification of express or implied warranties in which it operates. Notices
Product information
Product name: Lexmark X264dn, Lexmark X363dn, Lexmark X364dn, Lexmark X364dw Machine type: 7013 Model(s): 231, 235, 432, 436, 43W, d01, d02, gd1, gd2, dn1, dn2, gd1, gd2
Edition notice
September 2009 The following...
User's Guide - Page 222
... a new or repaired item. When warranty service involves the exchange of a product or part, the item replaced becomes the property of Limited Warranty
Lexmark X264dn, Lexmark X363dn, Lexmark X364dn, Lexmark X364dw
Lexmark International, Inc., Lexington, KY
This limited warranty applies to deliver your product. The replacement may be required to the United States and Canada. Notices...
User's Guide - Page 228
... 58 Too many flash options installed 182 58 Too many trays attached 182 84 PC Kit life warning 182 84 Replace PC Kit 183 840.01 Scanner Disabled 186 840.02 Scanner Auto Disabled 186 88.yy... stock loading 46 tips 65 checking an unresponsive printer 176 checking an unresponsive scanner 192 checking device status on Embedded Web Server 158
cleaning ADF separator rollers 147 exterior of the printer 146...
User's Guide - Page 232
...182 58 Too many trays attached 182 84 PC Kit life warning 182 84 Replace PC Kit 183 840.01 Scanner Disabled 186 840.... Access Cover
Open 179 Toner is low 179 Unsupported USB device, please
remove 179 Unsupported USB hub, please
remove 180 ...
R
recommended print side 55 recycled paper
using 56 recycling 213
Lexmark packaging 38 Lexmark products 38 toner cartridges 38 WEEE statement 212 reducing a copy ...
Maintenance Guide - Page 10

... printer may continue to function properly after the photoconductor kit has reached its official end-of the
photoconductor kit. Note: The photoconductor kit is one item only. You can also see the status of the photoconductor kit by showing 84 PC Kit life warning or 84 Replace PC Kit on the tracks of -life, print quality significantly decreases...
Service Manual - Page 1

Revision: July 16, 2013
Lexmark™ X264dn, X363dn, X364dn, X364dw 7013-235 7013-432 7013-436 7013-43W
• Table of contents • Start diagnostics • Safety and notices • Trademarks • Index
Lexmark and Lexmark with diamond design are trademarks of Lexmark International, Inc., registered in the United States and/or other countries.
Service Manual - Page 23
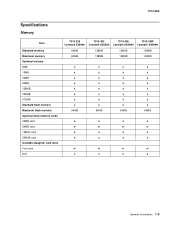
... 128MV card 256MB card Available daughter card slots Font card DLE
7013-235
7013-432
7013-436
7013-43W
Lexmark X264dn Lexmark X363dn Lexmark X364dn Lexmark X364dw
64MB 64MB
128MB 128MB
128MB 128MB
128MB 128MB
x x x x x x x x 64MB
x x x x x x x x 64MB
x x x x x x x x 64MB
x x x x x x x x 64MB
x
x
x
x
✔
✔
✔
✔
x
x
x
x
x
x
x
x
✔
✔...
Service Manual - Page 24
7013-XXX
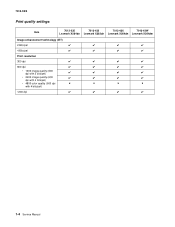
Print quality settings
Item
7013-235
7013-432
7013-436
7013-43W
Lexmark X264dn Lexmark X363dn Lexmark X364dn Lexmark X364dw
Image enhancement technology (IET)
2 Bits/pel
✔
✔
✔
✔
4 Bits/pel
✔
✔
✔
✔
Print resolution
300 dpi
✔
✔
✔
✔
...
Service Manual - Page 25
...XXX
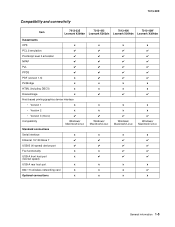
Compatibility and connectivity
Item
7013-235
7013-432
7013-436
7013-43W
Lexmark X264dn Lexmark X363dn Lexmark X364dn Lexmark X364dw
Datastreams
XPS
x
x
x
x
PCL 6 emulation
✔
✔...x
Ethernet 10/100 Base T
✔
✔
✔
✔
USB-B (hi-speed) device port
✔
✔
✔
✔
Fax functionality
USB-A front host port (low/full speed...
Service Manual - Page 26
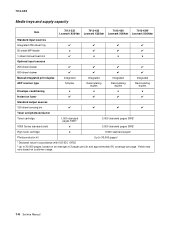
...trays and supply capacity
Item
7013-235
7013-432
7013-436
7013-43W
Lexmark X264dn Lexmark X363dn Lexmark X364dn Lexmark X364dw
Standard input sources Integrated 250-sheet tray 50-sheet MP feeder 1-sheet...185; 3,500 standard pages SWE¹
High toner cartridge
x
9,000 standard pages¹
Photoconductor kit
Up to 30,000 pages²
¹ Declared value in accordance with ISO/IEC 19752
...
Service Manual - Page 33
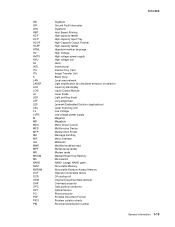
... MMR MPF MR MROM MS NAND NVM NVRAM OCF OCR OEM OHP OPC OPT PC PDF PICS PIN
Gigabyte Ground Fault Interrupter Gigahertz Host Based Printing High-capacity feeder ... diode Long edge feed Lexmark Embedded Solution (applications) Laser Scanning Unit Low Voltage Low voltage power supply Magenta Megabyte Motor Driver Control Multifunction Device Multifunction Printer Message handling Motor interface...
Service Manual - Page 44
... the USB port is started.
2-10 Service Manual
Any data received on .
84 PC Kit Life Warning Replace the PC kit to the ADF is enabled and the job
can be performed if job recovery is ...open The cover to ensure print quality.
84 Replace PC Kit 88 Cartridge Low
This warning is displayed when the cartridge is reset or menus are entered. Turn the printer power off and then...
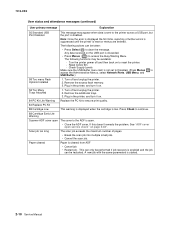
Service Manual - Page 45

... on page 2-30. Error
Description
Action
200.00 Paper jam around input sensor.
Remove the PC kit and paper or debris at the input sensor. Possible causes include multi-sheet feed, tray size...200.06 Imaged page not expected page (bouncy passthru sensor)
Remove the toner cartridge/PC kit. First, remove the PC kit and paper or debris at the input sensor.
200.01 200.02
Classic input ...
Service Manual - Page 46

...
If the flag is transferred too quickly to ramp up ). Remove the toner cartridge/PC kit, and inspect for any obstructions. Possible causes: slow or missing transport motor positional feedback... strips in machine during warmup.
2-12 Service Manual Remove the toner cartridge/PC kit. Remove the toner cartridge/PC kit. At the front, remove the upper front guide, and inspect the flag...
Service Manual - Page 47

... service check" on page 2-43.
200.37 Timeout on page 4-71.
200.32 Media more than the printhead jitter-stable specification. Remove the toner cartridge/PC kit and check for any page(s) ahead to declaring MPF source empty.
Check the main motor. See "Main motor service check" on page 4-3. The alignment roller...
Service Manual - Page 48

Also Remove the PC kit and paper or debris at fuser nip before fuser reached acceptable operating temperature.
The flag is...then replace the fuser.
See "Printhead service check" on the page at fuser earlier than intended
Remove the toner cartridge/PC kit and check for obstructions between the input sensor and the fuser.
While feeding along the media, and immediately after it was...
Similar Questions


