KitchenAid KGRS807SSS Support Question
KitchenAid KGRS807SSS Support Question
Find answers below for this question about KitchenAid KGRS807SSS - 30 Inch Gas Range.Need a KitchenAid KGRS807SSS manual? We have 3 online manuals for this item!
Question posted by Anonymous-20704 on December 22nd, 2010
Kitchenaid Kgrs807sss Oven Light Button
can't turn the oven lights off. when button is pressed it clicks but doesn't turn the ligthts off.
Current Answers
Related KitchenAid KGRS807SSS Manual Pages
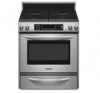
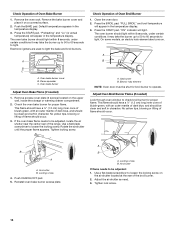
Use & Care Guide - Page 6
Range G
H I . Anti-tip bracket D. Control panel L. Automatic oven light switch/
self-clean latch M. Oven lights B. T.H.E.™ convection fan and element (not visible)
(on some models) F. Left rear surface burner
G. Right rear surface burner
J. Bake burner (not visible)
6 Broil burner with ...
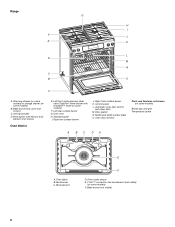
Use & Care Guide - Page 10

...
Aluminum
■ Heats quickly and evenly.
■ Suitable for all controls are off and the oven and cooktop are properly aligned with the burner base. Ceramic or Ceramic glass
■ Follow manufacturer...of the gas tube opening .
If the burner still does not light, do not allow spills, food, cleaning agents or any other material to light properly.
Clean the gas tube ...
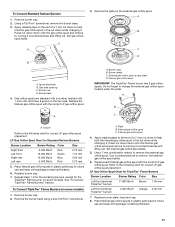
Use & Care Guide - Page 11
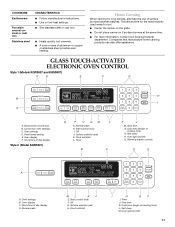
... home canning products can also offer assistance. Number pads
ML
KJ
E. Oven display C. Oven settings D. Warming drawer controls
D
E
CLEAN TIME
F
PROBE TEMP
MIN HR SEC MIN
C
DELAY
A
ON
HR MIN CONTROL LOCKED COOK TIME
START TIME
STOP TIME
MED LOW HI
A. Oven light (on stainless steel provides even heating. Clock/time of cooking time...
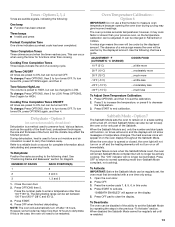
Use & Care Guide - Page 12

...TIMER SET/START, TIMER OFF and OVEN LIGHT pads will turn the audible signals and prompts on the oven display as normal. The time can be canceled. To Change: Press OPTIONS, then 1 on convection ...appears on the Electronic Oven Control, use the pad of the oven.
If the START pad is preset unlocked, but setting may be used either when the range is pressed several times repeatedly, the...
Use & Care Guide - Page 13
... be illuminated. Option 5
(on convection models, closed door)
Dehydration is opened or closed, the oven light will not turn on in this is the case, the oven will be warmer by the displayed amount. Press START.
4. A minus sign means the oven will need to preserve food.
During dehydration, heat is used to ON, but will appear...
Use & Care Guide - Page 14
... on or off .
The bake range can be set for instructions on placing the oven into its normal operating state (non-Sabbath Mode compliant state, not cooking) by pressing the WARMING DRAWER ON key (continue pressing until the OFF button is pressed. Press OPTIONS, and then press number pad 7. 4.
The oven will not turn off and its temperature cannot be...
Use & Care Guide - Page 17
...17 Press OFF when finished.
To Use: 1. Do not touch broil element. Use tongs to turn off and come back on once the door is closed.
Close oven door.
2.
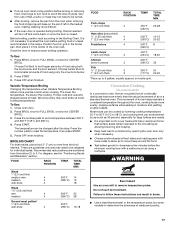
Press OFF ... the minimum cooking time with a method such as 30 percent, especially for large turkeys and roasts.
■ It is not necessary to preheat the oven before turning or removing food. Steak
1" (2.5 cm) thick
...
Use & Care Guide - Page 20

... ON button.
Proofing time may be used for keeping hot cooked foods at serving temperature before being placed in oven more than the one hour before or after cooking.
Delay Cooking is ideal for food such as a guide.
Press the number pads to enter time of day to enter a temperature other than 30 minutes...
Use & Care Guide - Page 22
.... The door will not begin .
1. Press OFF to clear the oven display. It will not work during the Self...oven completely cools. Soap, water and a soft cloth or sponge are 2 hours 30 minutes for light soil and between 3 hours 30 minutes to 4 hours 30 minutes for a 2 hour 30 minute clean cycle, however the time can be set to the correct time of grain to avoid damaging. ■ KitchenAid...
Use & Care Guide - Page 23

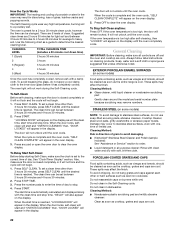
.... 5. However, if removal is necessary, make sure knobs are off and cool. Open oven door all the way. 2. Close the oven door as far as it is closed, press OVEN LIGHT to turn the light on each side.
3.
OVEN DOOR EXTERIOR
Cleaning Method: ■ Glass cleaner and paper towels or nonabrasive plastic
scrubbing pad: Apply glass cleaner to...
Use & Care Guide - Page 25
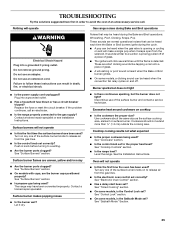
...oven has been used ? See "Cookware" section.
■ Is the control knob set ? Level the range. Nothing will click several times until the flame is the Control Lock set correctly? Turn on and off of a piece of glass.
■ The igniters will operate
Gas range...
■ Is there continuous sparking, but does not light
■ Is the power supply cord unplugged?
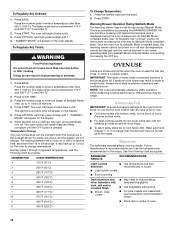
TROUBLESHOOTING
Try...
Use & Care Guide - Page 26

...turning, but the fan ...oven door all the way.
■ Has the function been entered? Oven cooking results not what expected
■ Is the range...gas being used? See "Bake," "Broil," "EasyConvect Conversion," "Convection Bake," or "Convection Roast" section.
■ Is the proper bakeware being used? Oven burner flames are made with the same precision used to build every new KITCHENAID...
Use & Care Guide - Page 28

KITCHENAID® GAS RANGE WARRANTY
LIMITED WARRANTY
For one year from the date of purchase, when this major appliance is operated and maintained according to instructions attached to or furnished with the product, KitchenAid...serial numbers that is reported to KitchenAid within 30 days from accident, alteration, ... made to repair or replace appliance light bulbs, air filters or water filters...
Dimension Guide - Page 1

...way in*
C. If countertop opening width is 30" (76.2 cm), no countertop preparation is recommended. Place level on the right-hand side oven door trim)
F. 27 " (69.2 ...
junction box.
® 30" Freestanding and Slide-In Gas Range
PRODUCT MODEL NUMBERS
KGRS807S KGRS807X KGSK901S
KGSS907S KGSS907X
GAS SUPPLY REQUIREMENTS
Use ³⁄₄" (1.9 cm) rigid pipe gas supply line to back. ...
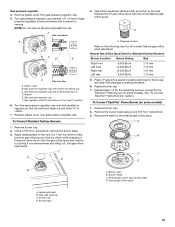
Installation Guide - Page 11

...range. If connected to the existing gas line. Typical rigid pipe connection A combination of the following installation steps. Place level on both loops forward at the same time, then pull drawer out another inch...be viewed from the anti-tip bracket. If range is not level, pull range forward until the range is engaged in oven.
2. NOTE: Range must be necessary for the anti-tip bracket ...
Installation Guide - Page 13

... occurs and ignites the gas. If burners do not light properly: ■ Turn cooktop control knob to the "OFF" position. ■ Check that the range is turned to start -up. Repeat...light within 4 seconds. Electronic Ignition System
Initial lighting and gas flame adjustments Cooktop and oven burners use electronic igniters in place of Cooktop Burners
Standard Surface Burners Push in and turn...
Installation Guide - Page 14
... BROIL" and broil temperature
will light. Locking screw
4. Locking screw B. Close the oven door. 2.
Check Operation of the range. Remove the bake burner cover and place it on . "ON" indicator will appear in character. Check Operation of flame should occur. On some models, an electric halo element also turns on a covered surface.
2. Electronic igniters...
Installation Guide - Page 17
... spud in the nut driver while changing it . Replace each Natural gas orifice spud with the correct LP gas orifice spud.
3. Press nut driver down onto the internal gas orifice spud and remove by turning it counterclockwise and lifting out. Gas orifice spuds are stamped with a number, marked with package containing literature.
17 Burner caps B. Internal...
Installation Guide - Page 19
... cover over and reinstall on some models).
Burner caps B. Gas pressure regulator cap F. Remove the burner head using a size T20 Torx® screwdriver. 3. Internal gas orifice spud
A. Washer E. Remove burner cap. 2. Press nut driver down onto the gas orifice spud and remove by turning it . C
A D
4. Gas orifice spuds are stamped with hollow end facing out C.
Remove...
Installation Guide - Page 20

... turns). Apply masking tape to the end of a 7 mm nut driver to remove. Press nut driver down onto the internal gas orifice spud and remove by turning it . Place LP gas ...the external gas orifice spud located under the plate. Set external gas orifice spud aside.
6. See "Adjust Oven Bake Flame" in the "Electronic Ignition System" section. Internal gas orifice spud
4. See "Adjust Oven Broil ...
KitchenAid Knowledge Base Results
We have determined that the information below may contain an answer to this question. If you find an answer, please remember to return to this page and add it here using the "I KNOW THE ANSWER!" button above. It's that easy to earn points!-
Operating the dispenser controls (4 button control with a display screen) - Side by side refrigerator
... or ice maker noticeably decreases, change from "Good" to turn on . Dim: Press the Light button a second time to lock the dispenser. Side by side refrigerator Press and hold the Lock button for 3 seconds. Operating the dispenser controls (6 button control with a display screen Operating the dispenser buttons: Your ice maker can produce both crushed and cubed ice... -
Operating the dispenser controls (5 or 6 button control without a display screen) - Side by side refrigerator
... refrigerator? Using your dispenser lock, your water filter. It is recommended that it is reset. For style 1, the dispenser light can be turned off with a light above the button. Auto: Press the Light button a second time to lock the dispenser. The display will change from green to yellow to indicate that you use... -
Changing the oven light bulb - Architect Series II - gas and electric ranges
... control knobs are off . The light will not work during the Self-Cleaning cycle (on or off . On models that have an oven light, press Oven Light on the console to turn the light on some models). Product Recall Information My gas oven won't operate Using the Control Lock feature Plug in the oven? Unplug range or disconnect power.
Similar Questions

Gas Range # Kgss907: Oven Fan Sometimes Cycles On & Off When Using Stove Top?
KitchenAid: Gas Range Model # KGSS907: Issue ~ Oven fan sometimes cycles on & off when using sto...
KitchenAid: Gas Range Model # KGSS907: Issue ~ Oven fan sometimes cycles on & off when using sto...
(Posted by sfmanley 9 years ago)


Repair Kitchenaid Gas Range Architect Series Ii Oven How To Reset Controls When
fails to light
fails to light
(Posted by djmdwhil 9 years ago)

Why The Oven Light Would Not Cut Off On A Kitchen Aid Gas Range Model Kgsk901
(Posted by fignewdsm 10 years ago)
Kitchen Aid Gas Range Model Kgra806 I Need Control Panel
i need control panel for my gas range Kitchen Aid moder KGRA806
i need control panel for my gas range Kitchen Aid moder KGRA806
(Posted by black2stars 11 years ago)