KitchenAid KGRA806PSS Support Question
KitchenAid KGRA806PSS Support Question
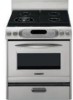
Find answers below for this question about KitchenAid KGRA806PSS - ARCHITECT Series: 30'' Gas Range.Need a KitchenAid KGRA806PSS manual? We have 2 online manuals for this item!
Question posted by saulofernandes on April 22nd, 2013
Kitchenaid Kgra806pss On Lp Gas
Just converted my range to LP, it is now leaking gas and flames are way to high.
any idea?
Current Answers
Related KitchenAid KGRA806PSS Manual Pages
Use and Care Guide - Page 1
...consommateur: lire ce manuel et le conserver pour consultation ultérieure. www.kitchenaid.com or www.KitchenAid.ca
CUISINIÈRE À GAZ
Guide d'utilisation et d'entretien
Au Canada... this book for installation and service, call: 1-800-807-6777 or visit our website at... GAS RANGE
Use & Care Guide
For questions about features, operation/performance, parts accessories or service, call: ...
Use and Care Guide - Page 3
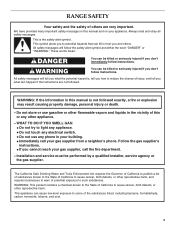
..., and tell you don't follow instructions. RANGE SAFETY
Your safety and the safety of others . This symbol alerts you cannot reach your appliance.
Follow the gas supplier's
instructions.
• If you to... injured if you what can be performed by a qualified installer, service agency or the gas supplier.
Always read and obey all safety messages. WARNING: If the information in the ...
Use and Care Guide - Page 7
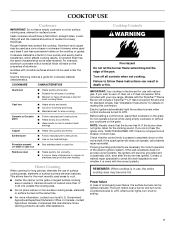
... Controls
WARNING
Fire Hazard Do not let the burner flame extend beyond the edge of surface cooking areas, elements or surface burners between batches. Gas Conversion Kit and a kit for the clicking sound.... the surface burners can also offer assistance. Canners should not extend more information, contact your new range. s For more than ½" (1.25 cm) outside the cooking area. Turn off all...
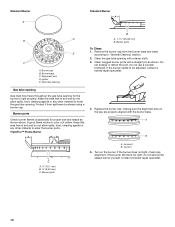
Use and Care Guide - Page 9

...grate is completely cool before handling.
2. The InstaWok™ Ring supports 12" to 14" (30.5 cm to a low simmer. Check that the control knob is in place when using a...
The TripleTier™ Flame Burner with High Power Settings and Low Power Simmer Settings" section.
Gas tube opening
A C
B D
A. Wok supports pointing up .
TripleTier™ Flame Burner
A.
To Use...
Use and Care Guide - Page 10
... spillovers by always using a burner cap. Do
not enlarge or distort the port. If the burner needs to light properly. A good flame is blue in color, not yellow.
Clean the gas tube opening .
If the burner still does not light, do not allow spills, food, cleaning agents or any other material to...
Use and Care Guide - Page 16
... may be pressed again.
5.
Broil
This unit has both a gas burner and an electric halo element that work together to reduce spattering... opened during baking or roasting, the broil element will turn off in 30 seconds to 2 minutes.
s Use only the broiler pan and grid ... will show on and off in intervals to be lined with the range. If the oven door is ideal for 325°F (163°...
Use and Care Guide - Page 24
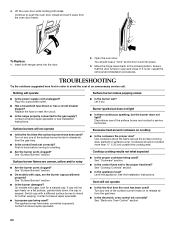
... 1. Open the oven door.
If it away from the gas lines. s Is the range properly connected to the locked position. Turn on to a setting...size? Replace the fuse or reset the circuit. Surface burner flames are the burner caps positioned properly? See "Surface Burners" ...Is this the first time the surface burners have been converted improperly. Push in order to avoid the cost of the...
Use and Care Guide - Page 25
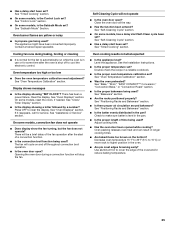
... been set ?
Oven burner flames are yellow or noisy
s Is propane gas being used ? The appliance might have been converted improperly. Contact a trained repair specialist.
Oven temperature too high or too low
s Does ... baking, broiling or cleaning
s It is normal for service. Close the oven door all the way.
See "Self-Cleaning Cycle" section. s On some models, is in the oven. See ...
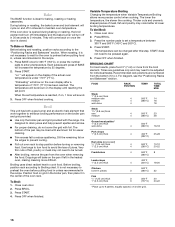
Use and Care Guide - Page 26
...KitchenAid designated service center. If you need replacement parts If you use only factory specified parts.
Stainless Steel Cleaner & Polish (stainless steel models) Order Part #4396095
Gas...you the cost of appliances. Saturday 8:30 a.m. - 4:30 p.m. (EST).
Our consultants provide assistance with any questions or concerns at :
KitchenAid Brand Home Appliances Customer Interaction Center 553...
Use and Care Guide - Page 27
... according to instructions attached to or furnished with the product, KitchenAid will pay for factory specified parts for any gas burner to correct defects in the U.S.A. SECOND THROUGH TENTH YEAR LIMITED WARRANTY ON RANGES AND BUILT-IN OVENS PORCELAIN OVEN CAVITY/INNER DOOR
On ranges and built-in ovens only, in the second through...
Installation Instructions - Page 2
... Anti-Tip Bracket...8 Install Rear Vent ...9 Verify Anti-Tip Bracket Location ...9 Level Range...9 Make Gas Connection ...9 Check Operation ...10 Replace Oven Racks & Storage or Warming Drawer...12 Complete Installation ...12 GAS CONVERSIONS...13 LP Gas Conversion ...13 Natural Gas Conversion...15
TABLE DES MATIÈRES
SÉCURITÉ DE LA CUISINIÈRE ...18 EXIGENCES...
Installation Instructions - Page 3
... always be performed by smell. WARNING: If the information in this or any phone in the vicinity of Massachusetts, the following installation instructions apply:
If a gas leak is not followed exactly, a fire or explosion may result causing property damage, personal injury or death.
- In the State of this manual is detected, follow...
Installation Instructions - Page 5
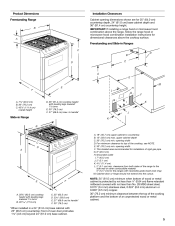
...;" (0.64 cm) flame retardant millboard covered with not less than No. 28 MSG sheet steel, 0.015" (0.4 mm) stainless steel, 0.024" (0.6 mm) aluminum or 0.020" (0.5 mm) copper. 30" (76.2 cm) minimum clearance between the top of the cooking platform and the bottom of rigid gas pipe G. 8" (20.3 cm) H. Product Dimensions Freestanding Range
B
Installation Clearances
Cabinet...
Installation Instructions - Page 10
... regulator shutoff valve is turned to the range.
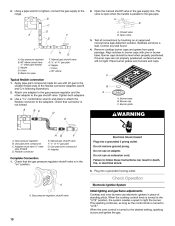
2. Burner cap C. Use pipe-joint compound C. E. ON
Check Operation
A
Electronic Ignition System Initial lighting and gas flame adjustments
A. Gas pressure regulator shutoff valve
Cooktop and oven burners use with pins in the "on an approved noncorrosive leak-detection solution. This sparking continues, as long as the control...
Installation Instructions - Page 11
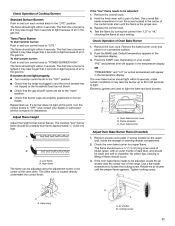
... in and turn the control knobs to light because of the range. Tighten locking screw. The flame should light within 8 seconds, under certain conditions it on the upper wall, inside the storage or warming drawer compartment. 2. The flame should light within 4 seconds. High flame
B
The flame can be adjusted, locate the air shutter near the center...
Installation Instructions - Page 13
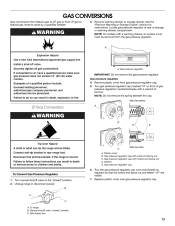
...serious burns to rear range foot. Unplug range or disconnect power.
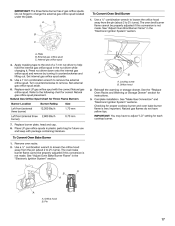
6. GAS CONVERSIONS
Gas conversions from Natural gas to LP gas or from LP gas to remove. Remove ...gas pressure regulator cap. 5.
C
Side view after
A. Gas pressure regulator cap with a wrench to Natural gas must be removed from the gas pressure regulator. Washer E. Gas pressure regulator cap
To Convert Gas...
Installation Instructions - Page 14
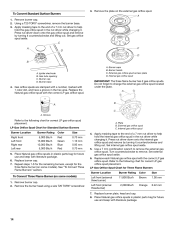
... in plastic parts bag for correct LP gas orifice spud placement. Burner base
4. LP Gas Orifice Spud Chart for Three Flame Burners Burner Location Burner Rating 11,800 Btu/h 2,200 Btu/h Color Brown Orange Size 1.00 mm 0.42 mm
To Convert Three Flame Burner (on some models). External gas orifice spud C. Place Natural gas orifice spuds in the nut...
Installation Instructions - Page 15
... Storage Drawer" section for instructions. Remove oven racks. 2. Complete installation. LP gas flames have to adjust the "LO" setting for proper cooktop burner flames and oven burner flames is not made . IMPORTANT: You may have a slightly yellow tip.
IMPORTANT: Do not overtighten. A
2. Unplug range or disconnect power. See the "Remove Warming or Storage Drawer" section...
Installation Instructions - Page 16
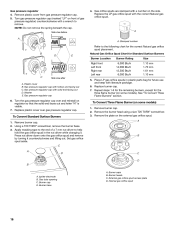
... side.
Stamped number
Refer to remove. Plastic cover B. Gas pressure regulator cap with literature package. 6. Washer E. Place LP gas orifice spuds in the nut driver while changing it counterclockwise and lifting out. Replace burner cap. 7. Turn the gas pressure regulator cap over gas pressure regulator cap.
To Convert Three Flame Burner (on front of a 7 mm nut driver...
Installation Instructions - Page 17
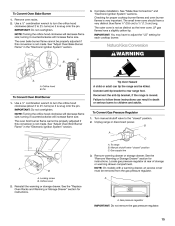
... To Convert Oven Bake Burner
1. Remove oven racks. 2. Internal gas orifice spud
4. Use a 7 mm combination wrench to remove. Replace each cooktop burner.
7. Natural Gas Orifice Spud Chart for each LP gas orifice spud... to help hold the internal gas orifice spud in plastic parts bag for proper cooktop burner and oven bake burner flame is not made . Place LP gas orifice spuds in the nut ...
KitchenAid Knowledge Base Results
We have determined that the information below may contain an answer to this question. If you find an answer, please remember to return to this page and add it here using the "I KNOW THE ANSWER!" button above. It's that easy to earn points!-
Using your meat thermometer
... - gas and electric ranges Hidden Options - Ranges and built-in ovens The internal temperature, not the appearance of the thermometer should determine doneness. After reading the thermometer once, push it into the center of the thickest portion of the meat or the inner thigh or breast of meat, poultry, and fish. Temperature probe - Architect Series... -
Replacing oven light bulbs - Built-in ovens
... is closed, touch Oven Light to operate the lights. Remove the bulb from the oven. Architect Series II - When the oven door is off and feels cool to handle the bulb. The...snapping it does not come on when either door is opened . gas and electric ranges FAQs Knowledgebase search tips Setting the clock Changing the beverage center light bulb Replacing oven light bulbs ... -
Temperature probe - Architect Series II - gas and electric ranges
gas and electric ranges How do I use : Before using, insert the probe into the center of the thickest portion of meat ... or "End" will appear as possible. After cooking, unplug the probe and remove food from the oven when removing food. Architect Series II My gas oven won't operate Temperature adjustment Keep the probe as far away from the probe jack. Press Bake, Convect Bake or Convect Roast...
Similar Questions


Repair Kitchenaid Gas Range Architect Series Ii Oven How To Reset Controls When
fails to light
fails to light
(Posted by djmdwhil 9 years ago)
Kitchenaid Gas Range How To Remove Glass Cover
(Posted by kheeltb 10 years ago)

Kitchen Aid Gas Range Model Kgra806 I Need Control Panel
i need control panel for my gas range Kitchen Aid moder KGRA806
i need control panel for my gas range Kitchen Aid moder KGRA806
(Posted by black2stars 11 years ago)

Kgra806pss Gas Kitchen Range
Kitchenaid Superba Gas Stove And Oven
I need to replace the whole glass control top. How can I purchase one? The glass is broken, but the ...
I need to replace the whole glass control top. How can I purchase one? The glass is broken, but the ...
(Posted by mmissymouse 13 years ago)