KitchenAid KESA907PSS Support Question
KitchenAid KESA907PSS Support Question
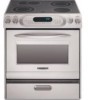
Find answers below for this question about KitchenAid KESA907PSS - ARCHITECT Series: 30'' Slide-In Electric Range.Need a KitchenAid KESA907PSS manual? We have 3 online manuals for this item!
Question posted by SHAWNJHERMAN on April 24th, 2013
Burner Not Working
i have a kitchenaid kera807 with the left rear burner isn't working but all others ar working, ant ideas what couls be going on with this?
Current Answers
Related KitchenAid KESA907PSS Manual Pages
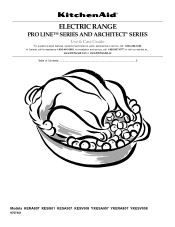
Use and Care Guide - Page 1
o
ELECTRIC RANGE
PRO LINE™ SERIES AND ARCHITECT® SERIES
Use & Care Guide
For questions about features, operation/performance, parts, accessories or service, call: 1-800-422-1230 In Canada, call for assistance 1-800-461-5681, for installation and service, call: 1-800-807-6777 or visit our website at... www.kitchenaid.com or www.KitchenAid.ca
Table of Contents...
Use and Care Guide - Page 2
TABLE OF CONTENTS
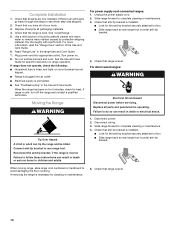
RANGE SAFETY 3 The Anti-Tip Bracket 3
PARTS AND FEATURES 6
COOKTOP USE 8 Ceramic Glass 8 Cookware 9 Home Canning 9 Cooktop Controls... 23 Convect Full Meal 23 Sabbath Mode 24 Proofing Bread 24 Timed Cooking 25 Warming Drawer 25
RANGE CARE 26 Self-Cleaning Cycle 26 General Cleaning 27 Oven Light(s 28 Storage Drawer 29 Oven Door 29 Warming Drawer ...
Use and Care Guide - Page 3
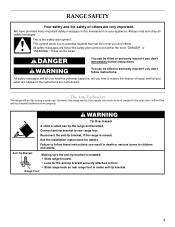
... not tip during normal use. Connect anti-tip bracket to floor. • Slide range back so rear range foot is under anti-tip bracket.
3 Anti-Tip Bracket Range Foot
Making sure the anti-tip bracket is installed: • Slide range forward. • Look for details. RANGE SAFETY
Your safety and the safety of injury, and tell you what...
Use and Care Guide - Page 4
... positioned so that may ignite.
TO CHECK IF THE DEVICES ARE INSTALLED PROPERLY, SLIDE RANGE FORWARD, LOOK FOR ANTI-TIP BRACKET SECURELY ATTACHED TO FLOOR, AND SLIDE RANGE BACK SO REAR RANGE FOOT IS UNDER ANTI-TIP BRACKET. s Never Use the Range for range-top service without breaking due to the sudden change in color. Children should never...
Use and Care Guide - Page 6

...Touch Activated System (Models KESV908 and YKESV908 - Architect® Series)
A
B
C
325˚ 350˚... System (Models KERA807, YKERA807, KESA907 and YKESA907 - Left Rear Cooktop Element Control (Dual-Size Element)
E. Right Rear Cooktop Element Control...Med Lo
Med Hi
Med
Hi
Hi
H
I . Right Rear Cooktop Element Control
6 The range you have some or all of your model. Oven Display B....
Use and Care Guide - Page 7
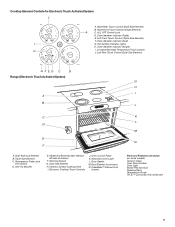
Zone diameter indicator (Dual)
I
J
K L M
N
A. Hot Surface Indicator Lights
H. Left Rear Touch Control (Dual-Size Element)
GFED C
B
Range (Electronic Touch Activated System)
A B
C D
E F
M L M
MED
ON O F
1 O
HR
MIN PROBE
MTIINMSEDECDCELLSEATAYONP
COOK
CLEAN
CSELTO•CSKTART
TIMER SET•START
CANCEL
4
7 7
PROBE TIMED CLEAN
CLEAN
•...
Use and Care Guide - Page 8
...adhere to cool down slightly. Model and Serial Number (behind left rear on the cooktop. Then, while wearing oven mitts, remove... or marks on the cooktop. s Do not slide cookware or bakeware across the cooktop. Aluminum or ...and rough finishes on cookware or bakeware could break when the lid is on some models)
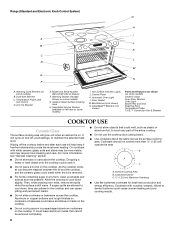
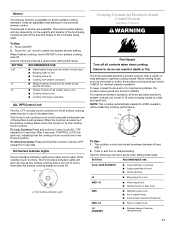
B. Range (Standard and Electronic Knob Control System)
G
A B C D
E F
DI DI H...
Use and Care Guide - Page 11
...Lights are in use of the cooktop touch controls. Hot Surface Indicator Light
Cooktop Controls for Electronic Knob Control System
(Architect® Series)
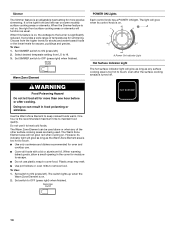
WARNING
Fire Hazard Turn off . To keep cooked foods warm or to heat serving dishes, the surface cooking ...soup. s Home canning.
HI
s Hold a rapid boil. s Fry or sauté foods.
LO [SIMMER]
s Simmer (range of food.
Use and Care Guide - Page 14
Simmer
The Simmer feature is turned off. It provides a wide range of the other surface cooking areas are being used alone or when any surface cooking...Warm Zone Element is the right front (and left rear on some models) surface cooking areas or elements. s Use only cookware and dishes recommended for moisture to touch, even after cooking. Set switch to the burner is on . 2. It is on . ...
Use and Care Guide - Page 28
...
Repeat for regular use to the rack guides will not work during the Self-Cleaning cycle. Polish entire cooktop with a ... the Off position. s Solution of vegetable oil applied to help them slide. The light(s) will help prevent scratches, pitting and abrasions, and to... cycle (on some models). Turn the glass bulb cover in range or reconnect power.
28 Replace bulb and bulb cover by turning...
Use and Care Guide - Page 32
... LIMITED WARRANTY ON ELECTRIC ELEMENTS, CERAMIC GLASS COOKTOP, GAS BURNERS, SOLID STATE TOUCH CONTROL SYSTEM, AND MAGNETRON TUBE
On electric ranges and electric cooktops, in the second through fifth years from the date of purchase, when this appliance is operated and maintained according to instructions attached to or furnished with the product, KitchenAid will pay for...
Installation Instructions - Page 2

... don't follow instructions. We have provided many important safety messages in Ranges Only 9 Electrical Connection - This symbol alerts you to reduce the chance of others ...Only 7 Countertop Preparation (for Slide-in Ranges Only 7
INSTALLATION INSTRUCTIONS 8 Unpack Range 8 Adjust Leveling Legs 8 Install Anti-Tip Bracket 8 Optional Rear Spacer Cover (for Slide-in this manual and on ...
Installation Instructions - Page 3
...slide-in accordance with the requirements of UL and CSA International and complies with nominal 1³⁄₈" (3.5 cm) diameter connection opening dimensions that all electrical connections should be used will need to be made by installing a range...the risk of securing the range is the installer's responsibility to the floor during transit. Rear spacer cover for concrete/...
Installation Instructions - Page 4
... approximately 1" (2.5 cm) by adjusting the leveling legs.
**When installed in a 24" (61 cm) base cabinet with 25" (63.5 cm) countertop; Freestanding Range B
A
Product Dimensions Slide-in Range
B
C
A*
C
D*
G F
E F**
D**
E
A. 7¹⁄₈" (20 cm)
B. 30" (76.2 cm)
C. 43⁷⁄₈" (111.4 cm) overall height with leveling legs screwed all the way in
D. 36" (91.4 cm...
Installation Instructions - Page 5
... - 8" (20.3 cm) to 22" (55.9 cm) from either cabinet, 7" (17.8 cm) max. Cabinet door or hinge should not extend into cutout.
Slide-in Range
A
C
B
D
A
C
B
D
F E
E F
G H
A. 13" (33 cm) upper cabinet depth
B. 30" (76.2 cm) min. A. 13" (33 cm) upper cabinet depth
B. 30" (76.2 cm) min. Square cut or ¹⁄₄" (6.2 cm) radius both corners...
Installation Instructions - Page 7
....5 KW 12.6 - 18.5 KW
Specified Rating of opening width is less than 30" (76.2 cm), adjust the ³⁄₈" (1.0 cm) dimension. Countertop must be level for Slide-in Ranges Only)
The cooktop sides of the slide-in death, fire, or electrical shock.
A copy of your countertop.
For 50-amp rated cord kits, use a 50...
Installation Instructions - Page 9
... enough to opening to remove cover. Remove shipping base, cardboard or hardboard from your local hardware store.
8. If installing the range in a mobile home, you to allow for Slide-in the "Electrical Connection" section.
10. Optional Rear Spacer Cover
(for electrical connections to be necessary to anchor the bracket to the sides of securing the...
Installation Instructions - Page 13

... Slide range back so rear range foot is engaged in drawer guides. Line 1 B. Hex washer head screw
D.
If installing the range ...electrical connection.
4.
A. Securely tighten the hex washer head screws to 35 lbs-in oven. Tighten the locking ring of the center position terminal connector. Replace the terminal block cover.
Push range back into position. Check that rear...
Installation Instructions - Page 14
... power cord into an outlet. ■ Electrical supply is under anti-tip
bracket.
4. Disconnect wiring. 3. Check that anti-tip bracket is installed:
■ Look for the anti-tip bracket securely attached to floor. ■ Slide range back so rear range foot is connected. ■ See "Troubleshooting" in the range Use and Care Guide. 7.
Failure to follow...
Parts List - Page 1
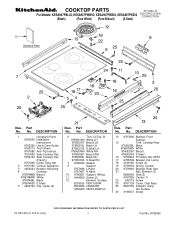
...)
1
Part No. 8186392 DESCRIPTION
13 9757800 Bracket, Front
Support
15
Trim, Cooktop Rear
9760520BL Black
9760520WH White
9760520BT Biscuit
9760520SS S.Steel
16 9759944 Thrmstat, 60c SPST
17 9758799...Part No. COOKTOP PARTS
30" Slide−In
For Models: KESA907PBL02, KESA907PWW02, KESA907PBB02, KESA907PSS02
ELECTRIC OVEN CONVECTION
(Black)
(Pure White) (Pure Biscuit) (S.Steel...
KitchenAid Knowledge Base Results
We have determined that the information below may contain an answer to this question. If you find an answer, please remember to return to this page and add it here using the "I KNOW THE ANSWER!" button above. It's that easy to earn points!-
Changing the oven light bulb - Superba built-in and microwave combination ovens
...or off and cool. Do not touch the bulb with bare fingers. Replacing oven light bulbs - Architect Series II - Superba built-in ovens Hidden Options - Reconnect power. Using tissue or wearing cotton gloves...the glass light cover by snapping it back into the wall. gas and electric ranges My microwave oven will not work during the Self-Cleaning cycle. Remove the bulb from the oven. To... -
Replacing oven light bulbs - Built-in ovens
...Architect Series II - They should come on when the oven door is closed, touch Oven Light to operate the lights. Reconnect power. Remove the bulb from the oven. Changing the oven light bulb - gas and electric ranges...the lights in my built-in oven come on ? The oven lights will not work during the Self-Cleaning cycle. Replace the bulb cover by grasping the front edge and&... -
Architect Series blender features
... of my KitchenAid Architect Series blender? The flexible lid will automatically pulse at all speed settings: STIR, CHOP, MIX, PURÉE and LIQUEFY. The PULSE MODE works with all five speeds...life. Smooth and rounded, the base is coated for easy cleaning, and withstands a range of the Blender. Eastern Standard Time. Dishwasher-safe assembly keeps the blades from locking ...
Similar Questions

Instructions Wanted
I'm looking for instructions on how to disassemble a YKESA907PP01 electric range so that I can chang...
I'm looking for instructions on how to disassemble a YKESA907PP01 electric range so that I can chang...
(Posted by snjmurphy87 4 years ago)

Dual Burner Switch Replacement For The Model #kess907 Electric Range
How do i replace the left side dual burner switch and what is the part number ?
How do i replace the left side dual burner switch and what is the part number ?
(Posted by woodsv 9 years ago)

Railings Around Glass Cooktop Are Rotting.
I have a white kitchen aid slide-in range . The paint on railings surrounding the glass cooktop chip...
I have a white kitchen aid slide-in range . The paint on railings surrounding the glass cooktop chip...
(Posted by Michelecaron 11 years ago)

Kitchenaid Kdss907sss - 30' Slide-in Dual Fuel Range
Position Of Range
Should the back of the 30" slide-in range touch the back wall?
Should the back of the 30" slide-in range touch the back wall?
(Posted by patriciainsf 11 years ago)

Oven Does Not Shut Off
I have a KitchenAird slide in electric range. When I use the oven it does not shut off. I have to tu...
I have a KitchenAird slide in electric range. When I use the oven it does not shut off. I have to tu...
(Posted by mcmulliand 13 years ago)