Kenwood KVT-719DVD Support Question
Kenwood KVT-719DVD Support Question
Find answers below for this question about Kenwood KVT-719DVD.Need a Kenwood KVT-719DVD manual? We have 1 online manual for this item!
Question posted by forbiddengirl13 on December 11th, 2020
Disconnected Cable Found. Please Confirm A Connection Line.
Hihi my radio quit working and there's a message disconnected cable found please confirm a connection line where and how do I do this please help
Current Answers
Answer #1: Posted by INIMITABLE on December 11th, 2020 6:29 AM
INIMITABLE

Member since:
April 3rd, 2020 Points: 2,082,120

Member since:
April 3rd, 2020 Points: 2,082,120
Receiver unit is disconnected.
Connect the wire correctly, referring to the
section on <INSTALLATION MANUAL>
Ref;https://www.manualslib.com/manual/86107/Kenwood-Kvt-717dvd.html?page=85
I hope this is helpful? PLEASE "ACCEPT" and mark it "HELPFUL" to complement my little effort. Hope to bring you more detailed answers
-INIMITABLE
Related Kenwood KVT-719DVD Manual Pages
Installation Manual - Page 1

KVT-719DVD KVT-739DVD
MONITOR WITH DVD RECEIVER
INSTALLATION MANUAL
MONITOR CON RECEPTOR DVD
MANUAL DE INSTALACIÓN
© B54-4513-00/00 (KV/RV)
Installation Manual - Page 3
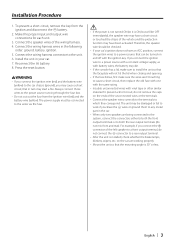
...out the fuse from the ignition and disconnect the - Always connect those wires to which they correspond. To prevent a short circuit, do not connect the - on the car are working properly.
• Mount the unit ... in turn may have been activated. The power supply must be damaged or fail to work if you connect the + connector of the left speaker to the wires via the fuse.
¤...
Installation Manual - Page 4
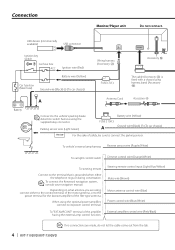
... the vehicle's parking brake detection switch harness using the optional power amplifier, connect to connect the parking sensor.
Depending on what antenna you are made, do not let the cable come out from the tab.
4 | KVT-719DVD/KVT-739DVD Parking sensor wire (Light Green)
Battery wire (Yellow)
FUSE ( 10A )
A
Ground wire (Black) - (To car chassis)
PRK...
Installation Manual - Page 5
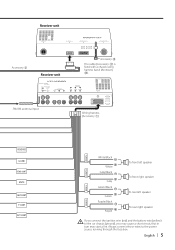
Always connect those wires to the car chassis (ground), you may cause a short circuit, that in turn may start a fire..../Black Purple +
To front left speaker To front right speaker To rear left speaker To rear right speaker
REAR L
REAR R
If you connect the ignition wire (red) and the battery wire (yellow) to the power source running through the fuse box.
English | 5 Receiver unit...
Installation Manual - Page 6
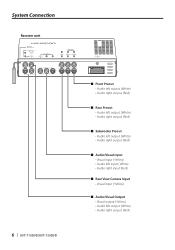
System Connection
Receiver unit
6 | KVT-719DVD/KVT-739DVD
■ Front Preout • Audio left output (White) • Audio right output (Red)
■ Rear Preout • Audio left output (White) • Audio right output (Red)
■ Subwoofer Preout • Audio left output (White) • Audio right output (Red)
■ Audio/Visual input • Visual input (Yellow) • Audio ...
Installation Manual - Page 7
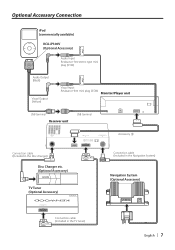
...iPod (commercially available)
KCA-iP300V (Optional Accessory)
Audio Input Resistance-free stereo type mini plug (3.5Ф)
iPod VIDEO IN
Audio Output (Black)
Visual Output (Yellow)
Visual Input Resistance-free mini plug (3.5Ф)
Monitor/Player unit
USB terminal Receiver unit
USB terminal
Accessory 3
Connection cable (Included in the Disc changer)
Disc Changer etc. (Optional Accessory...
Installation Manual - Page 8
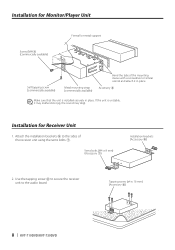
... the audio board.
If the unit is installed securely in place. Use the tapping screw 8 to secure the receiver unit to the sides of the mounting sleeve with a screwdriver or similar utensil and attach it may malfunction (eg, the sound may skip). Tapping screw (ø4 × 16 mm) (Accessory 8)
8 | KVT-719DVD/KVT-739DVD Installation...
Installation Manual - Page 10

... Mitsubishi Car using Brackets at Holes shown by "●"
or
Accessory 0 (M5x6mm) or Accessory ! (M5x7mm)
Car Bracket
Accessory 0 (M5x6mm) or Accessory ! (M5x7mm)
Screws (included in audio unit package)
Audio unit or others
Screws (included in audio unit package)
⁄
• Do not use the wrong screws, you could damage
the unit.
10 | KVT-719DVD/KVT-739DVD
Installation Manual - Page 11
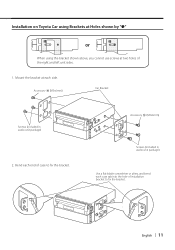
Bend each end of case to fix the bracket. English | 11 Accessory 0 (M5x6mm)
Screws (included in audio unit package)
2.
Accessory 0 (M5x6mm)
Car Bracket
Screws (included in audio unit package)
Use a flat-blade screwdriver or pliers, and bend each side. Installation on Toyota Car using Brackets at Holes shown by "●"
or
When ...
Similar Questions


How To Update The Software For A Car Audio Kenwood Kvt 514
(Posted by jfmkaykud 9 years ago)

My Device Dpx-mp4070 Suddenly Off It Is Not Getting On.
I am using Kenwood DPX-MP4070 player in my car.My device DPX-MP4070 suddenly off. it is not getting ...
I am using Kenwood DPX-MP4070 player in my car.My device DPX-MP4070 suddenly off. it is not getting ...
(Posted by gopalmalli 10 years ago)

I Have A Ddx 790. How Can I Get My Videos On My Iphone To Display?
how can I get my movies/music videos on my iPhone to display video? I have the special cable with th...
how can I get my movies/music videos on my iPhone to display video? I have the special cable with th...
(Posted by Mikemastro28 11 years ago)