Kenmore 6965 Support Question
Kenmore 6965 Support Question
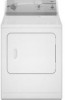
Find answers below for this question about Kenmore 6965 - 600 5.9 cu. Ft. Capacity Electric Flatback Dryer.Need a Kenmore 6965 manual? We have 2 online manuals for this item!
Current Answers
Related Kenmore 6965 Manual Pages
Quick Start Guide - Page 1
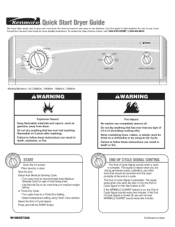
... dryer.
ethisguidteohelpoptimitzheeuseofyoudr ryer.
Place laundry in death, explosion, or fire. or Timed Dry Cycle.
• Turn cycle knob to a Timed Dry Setting. • Select temperature setting using an Air Cycle...even after washing). Failure to medium-weight fabrics. The End of Cycle Signal. J
Continued on , the End of Cycle Signal sounds when a cycle is selectabte. Shut the...
Quick Start Guide - Page 2
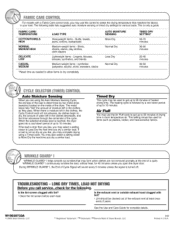
...room temperature air. Air Fluff
You may be used for items such as they pass. This setting should be used to get up to 10 minutes. WRINKLE GUARD _ I continuously tumbles the load, without heat, for ...closer to 90 minutes of a cycle.
LIII IIY TIMES,LIAI NIT IIYINI
Before you open the dryer door. See the Use and Care Guide for the following.
When there is drier than you like...
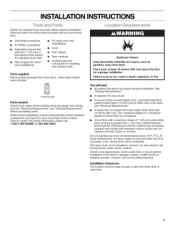
Installation Instructions - Page 1
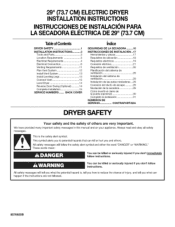
... alerts you to reduce the chance of others . 29" (73.7CM) ELECTRIC DRYER INSTALLATIONINSTRUCTIONS
INSTRUCCIONES DE INSTALACION PARA LASECADORA ELI_CTRICADE 29" (73.7 CM)
TableofContents
DRYER SAFETY 1 INSTALLATION INSTRUCTIONS 3
Tools and Parts 3 Location Requirements 3 Electrical Requirements 4 Electrical Connection 6 Venting Requirements 11 Plan Vent System 12 Install Vent System 13...
Installation Instructions - Page 2
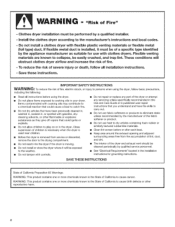
..., electric shock, or injury to persons when using the dryer, follow all instructions before using the dryer.
[] Do not place items exposed to the manufacturer's instructions and local codes. iMPORTANT SAFETY iNSTRUCTiONS
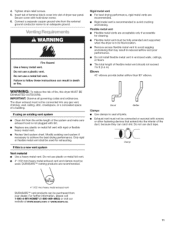
WARNING: To reduce the risk of fire. Install the clothes dryer according to cooking oils in the installation instructions for use heat to...
Installation Instructions - Page 3
...."
• A separate 30-amp circuit.
• If you are using a power supply cord, a grounded electrical outlet located within 2 ft (610 mm) of either side of 1" (25 mm) under entire dryer. (If slope is greater than 1" [25 mm], install Extended Dryer Feet Kit, Part Number 279810.) Clothes may not tumble properly and models with automatic...
Installation Instructions - Page 4
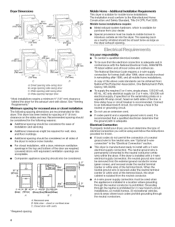
... considered on the sides and rear. Wide opening side-swing door C. This dryer has been tested for homes built after 1996, dryer circuits involved in remodeling after 1996, and all sides of the dryer to introduce outside air into the dryer. The National Electrical Code requires a 4-wire supply connection for spacing of a neutral ground wire to...
Installation Instructions - Page 5
... with all local codes and ordinances.
[] For a permanently connected dryer: This dryer must be connected to the dryer must have three 10-gauge copper wires and match a 3-wire receptacle of least resistance for use aluminum).
• At least 5 ft (1.52 m) long. WARNING: Improper connection of electric shock. The cord should contain: • A UL listed 30...
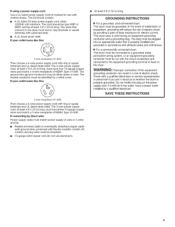
Installation Instructions - Page 6
.... Disconnect power. 2.
The strain relief should have a tight fit with the dryer cabinet and be connected to green ground connector= Connect remaining 2 supply wires to...the terminal block opening so that the wire insulation on strain relief). Disconnect power before making electrical connections. o
A. Clamp section D. Connect remaining 2 supply wires to remaining 2 terminals ...
Installation Instructions - Page 7
... G. A
B
F
4. Ground prong D.
Electrical Connection Options
If your home has:
And you will be in a horizontal position. Spade terminals with the dryer cabinet and be connecting to:
Go to Section...center terminal block screw. Hole below the terminal block opening. Put the threaded section of electrical connection: 4-wire (recommended)
3-wire (if 4-wire is not available)
CD
E
G...
Installation Instructions - Page 8

...dryer rear panel. B. Neutral wire (white or center wire) D. 3/4" (19 mm) UL listed strain relief E. Neutral ground wire
4= Connect the other wires to "Venting Requirements."
You have 5 ft...of power supply cord under center, terminal block screw. Direct wire cable must have completed your electrical connections. Neutral wire (white or center wire) D. 3/4" (19 mm) UL listed strain ...
Installation Instructions - Page 9
...screws.
! Ring terminals G.
B
C
/
5= Tighten strain relief screws. 6. Tighten screws.
!
4. Insert tab of terminal block cover into slot of dryer rear
panel. Spade terminals with hold -down screw.
7= You have completed your electrical connections.
Secure cover with up turned ends E. 3/4" (19 mm) UL listed strain relief F. A
A. Neutral ground wire B. You have completed your...
Installation Instructions - Page 10
... block screw D. Insert tab of extra length so dryer can be moved if needed. Direct wire cable must have completed your electrical connections. Tighten strain relief screw. 5.
Remove neutral ...block (hook facing right), squeeze hooked end together and tighten screw, as shown.
3. You have 5 ft (1.52 m) of terminal block cover into a hook shape. A BC
1= Loosen or remove center terminal...
Installation Instructions - Page 11
...8226; Replace any gas vent, chimney, wall, ceiling, attic, crawlspace, or a concealed space of dryer rear panel. Exhaust vent must not be purchased from the entire length of fire, this is in... (2.4 m)
Elbows
45 ° elbows provide better airflow than 90 ° elbows. If this dryer MUST BE
EXHAUSTED OUTDOORS. 4.
Rigid metal vent • For best drying performance, rigid metal vents...
Installation Instructions - Page 12
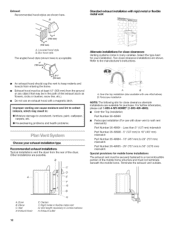
... provisions for your exhaust installation type Recommended exhaust installations Typical installations vent the dryer from the rear of the mobile home structure and must be at least ... kits for close clearance alternate installations are available for close -clearance installations are possible.
Dryer B. Clamps E Rigid metal or flexible metal vent G. Louvered hood style B. Box ...
Installation Instructions - Page 13

... Iouvered hoods
Angled hoods
0
Rigid metal
64 ft (20 m) 58 ft (17.7 m)
1
Rigid metal
54 ft (16.5 m) 48 ft (14.6 m)
2
Rigid metal
44 ft (13.4 m) 38 ft (11.6 m)
3
Rigid metal
35 ft (10.7 m) 29 ft (8.8 m)
4
Rigid metal
27 ft (8.2 m) 21 ft (6.4 m)
Excessive Weight Hazard Use two or more people to move and install dryer, Failure to use duct tape, screws, or...
Installation Instructions - Page 14
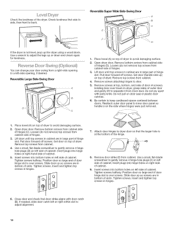
...on right side of cabinet.
9= Insert screws into hinge holes on top of dryer to separate it from cabinet. If needed, slide door catch left or right within... centered between doors. Useawrenctho adjustthelegsupordownandcheckagain forlevelness. Do not pull on top of dryer. Place towel (A) on dryer, grasp sides of door (4 screws). Reattach outer door panel to avoid damaging...
Installation Instructions - Page 15
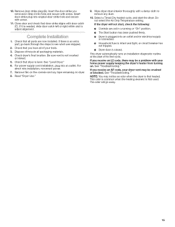
...blocked. If it is an extra part, go away.
15 See "Level Dryer." 6. Do not select the Air Only Temperature setting.
If there is needed, slide door catch left or right... when the heating element is not crushed
or kinked. 5. Check that dryer is closed.
NOTE: You may be a problem with screw.
11.
Insert door strike plug into an outlet and/or electrical supply is connected...
Installation Instructions - Page 32

... home appliances and items like vacuums, lawn equipment, and electronics, call anytime for the location of all major brand appliances, lawn and garden equipment, or heating and cooling systems,
no matter who made it, no matter who sold it -yourself.
of your home -
in your nearest
Sears Parts & Repair Service Center...
Similar Questions

How To Open Front Panel
How do you open the front panel of Kenmore gas dryer 98042
How do you open the front panel of Kenmore gas dryer 98042
(Posted by 2rnzrus 1 year ago)

Dryer Vent Positioning
Where is the vent positioned on the back of an 8787 HE3 7.0Cu Ft Electric Dryer?
Where is the vent positioned on the back of an 8787 HE3 7.0Cu Ft Electric Dryer?
(Posted by monte20536 1 year ago)

Diasble Buzzer On Kenmore 8041
How do I go about diabling the buzzer on the Kenmore 8041 5.8 CU FT electric dryer?
How do I go about diabling the buzzer on the Kenmore 8041 5.8 CU FT electric dryer?
(Posted by dhuard22 9 years ago)

I Have A Kenmore 600 Series Dryer And I Am Going From A 4 Prond Cord To A 3 Pron
do i need to attach a 10g wire from ground screw to center white neutral wire
do i need to attach a 10g wire from ground screw to center white neutral wire
(Posted by dentonkola 11 years ago)

New Dryer Has No Heat. Runs Cold Then I Can Smell Gas Coming Out Of Vent
(Posted by piepergeorge 12 years ago)