Jenn-Air JGCP436WP Support Question
Jenn-Air JGCP436WP Support Question
Find answers below for this question about Jenn-Air JGCP436WP.Need a Jenn-Air JGCP436WP manual? We have 5 online manuals for this item!
Question posted by cderstine on May 24th, 2014
How To Adjust The Burner Flames
Burners are way to high on low and food will not simmer.
Current Answers
Answer #1: Posted by online24h on May 25th, 2014 1:07 PM
online24h

Member since:
March 28th, 2014 Points: 531,660

Member since:
March 28th, 2014 Points: 531,660
Hello
Download owners manual for adjustment
http://www.helpowl.com/manuals/Jenn-Air/JGCP436WP/196313
Hope that will be helpful Don't forget to click helpful
Hope this will be helpful "PLEASE ACCEPT"
Related Jenn-Air JGCP436WP Manual Pages
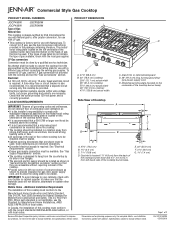
Dimension Guide - Page 1
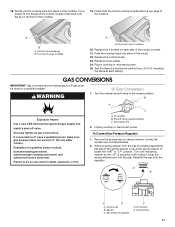
... "Gas Supply Requirements" section.
Electrical:
q A 120 volt, 60 Hz, AC only, 15-amp, fused electrical circuit is designed to hang from left underside of the cooktop burner base has information on the types of cutout enclosure as windows, doors and strong heating vents or fans. IMPORTANT: To avoid damage to your cabinets...
Installation Instruction - Page 3
...9632; Wrench or channel lock
pliers
For LP/Natural Gas Conversions ■ Adjustable wrench
drive ratchet ■ ½" deep-well socket
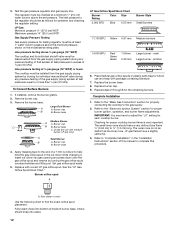
■ 7 ...cooktop is not recommended that they are included.
■ Gas pressure regulator
■ Burner grates
■ Burner bases and burner caps
■ Griddle drip tray (on the underside of this cooktop must be available. Natural gas high...
Installation Instruction - Page 4
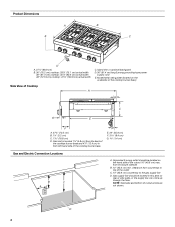
... rear or side walls, or the supply line can come up through the floor. Grounded 3-prong outlet should be located on the underside of the cooktop burner base)
Side View of the cutout 16" (40.6 cm) max.
Model/serial rating plate (located on left -hand side of cutout enclosure not shown. from...
Installation Instruction - Page 6
...
The model/ serial rating plate located on the left underside of the cooktop burner base has information on the types of E.I.
No attempt shall be made...-delay fuse or circuit breaker is recommended that resist the action of Gas
Natural Gas: This cooktop is design-certified by a qualified service technician.
Electrical Requirements
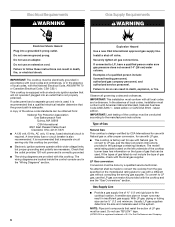
WARNING
Gas Supply Requirements
WARNING
Electrical ...
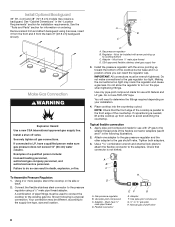
Installation Instruction - Page 7
...) I.D., flexible metal appliance connector may be located in the same room but external to the cooktop enclosure or cabinet. Shutoff valve "open" position C.
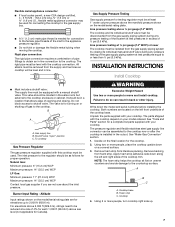
Unpack the parts supplied with your model ordered... surface. 3. Burner Input Rating - Remove foam strip from literature packing. INSTALLATION INSTRUCTIONS
Install Cooktop
WARNING
Excessive Weight Hazard Use two or...
Installation Instruction - Page 8
... adapter to the adapters. Check that the front edge of the cooktop is needed, lift entire cooktop up toward the bottom of the cooktop burner base and in a position where you can result in death, explosion... Failure to the
smaller thread ends of pipe fittings must be used to connect the cooktop to the supply line type, size and location.
Your connection may be installed with Natural...
Installation Instruction - Page 9

...shutoff valve in death, fire, or electrical shock.
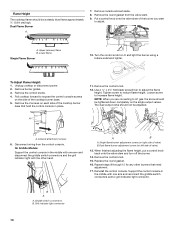
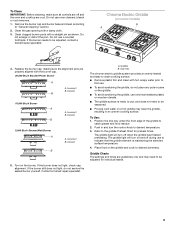
5,000 Btu/h Simmer/Melt Burner
A
B
A. Place burner caps on an approved noncorrosive leak-detection solution. Do not remove ... Off. Place burner caps on cooktop. Incorrect B. Electronic Ignition System
Initial lighting and gas flame adjustments Cooktop burners use electronic igniters in place of Cooktop Burners" section in and...
Installation Instruction - Page 10
... from the valve stem.
9. Griddle switch connectors B.
Upper (simmer) flame B. Pull cooktop forward to increase flame height. Use a ¹⁄₈" x 4¼" flat-blade screwdriver to reduce flame height. Remove the control knobs.
4. Tighten screw to adjust the flame height. Grill indicator light connector
10 Dual Flame Burner
A
B
7. Turn the control knob to LO and...
Installation Instruction - Page 11
... control from LO to HI, checking
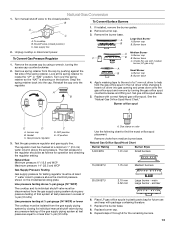
the flame at the spring retainer to do so can result in death, explosion, or fire. Control console flange B. Push the cooktop back into place in cooktop or reconnect power. 25. To Convert Gas Pressure Regulator
1. Gas pressure regulator
C
D.
Replace burner grates. 24.
Replace the control knobs. 23...
Installation Instruction - Page 12
... the gas pressure regulator and gas supply line. Burner cap
B
B. Burner cap
C
B B. Burner base
C. main Large burner - Refer to the "Make Gas Connection" section for properly connecting the cooktop to adjust the "LO" setting for proper burner ignition, operation, and burner flame adjustments. Checking for proper cooktop burner flame is not as distinct as follows for operation and...
Installation Instruction - Page 13
...
Gas supply pressure for future use with medium
burner, LP gas only)
A
Small Burner
B
A.
simmer
6. A B
A
Medium Burner A. Replace with package containing literature.
7. Burner orifice spud
A
E
D
A. The inlet pressure to or less than ½ psi (3.5 kPa).
B
To Convert Surface Burners
A
C
A. To cooktop B. Shutoff valve (closed position. If installed, remove...
Installation Instruction - Page 14
...
1. Refer to the gas supply.
2. Refer to the "Electronic Ignition System" section for properly connecting the cooktop to the "Make Gas Connection" section for proper burner ignition, operation, and burner flame adjustments. STRIP CIRCUIT
Griddle 120V Control Wiring Diagram To Cooktop Stand-Alone
R
P2-1
P1-1 OR/W 1320W/120V OR/W
Lamp 120V
BU
W
Rotary Control
P1-3 W P1...
Installation Instruction - Page 15
Verify proper operation after servicing.
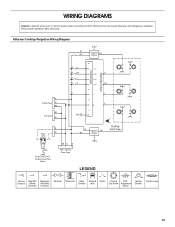
6 Burner Cooktop Reignition Wiring Diagram
W
BU
Reignition BU Module
Electrodes Output Control Input
G
RR R BR RY RG
2
1
SW1
SW2
R
SW3
SW4
OR
R
R Griddle Spare W
BK
4
3
L
Y
N
G
BK
Grill Spare
GND
W
6
5
R
Power
W
Cord
L
N
BK W R
GND
Power Cord Only To Cooktop Stand-Alone
Version
Main - Harness Power Spare
W BK
...
Installation Instruction - Page 16
...SW3
SW4
BU
2
1
R Griddle Spare W
BK
BK Grill Spare W
Power
Cord
L
N
R W
BK W
R
GND R
GND
Main - Gas Burner Temperature
Sensor
Heating Element
Indicator Lamp
16 Harness Power Spare
L
OR
N
Y
4
3
Cooktop Front View
Power Cord Only To Cooktop Stand Alone
Version
LEGEND
Ground Plug With Receptacle (Chassis) Female With Male
Connector Connector
Electrode
Transformer Relay...
Use and Care - Page 4
...cooktop -
The cooktop, when installed, must be adjusted so it does not extend beyond the edge of the cooking utensil. IMPORTANT SAFETY INSTRUCTIONS
WARNING: To reduce the risk of the cooktop... - Flammable materials should not be stored on or near surface units.
■ Top burner flame size should be seriously injured.
■ Proper Installation - State of California Proposition 65 ...
Use and Care - Page 5

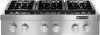
...) D. Heavy-duty double grate design C. Right front control knob E. 20,000 Btu/h burner F. 15,000 Btu/h burner G. 5,000 Btu/h burner H. 15,000 Btu/h burner
A B
C D
5 Electric chrome griddle (on griddle models)
Not shown: Optional backguards Optional griddle cover Optional wok ring
G H
A.
The cooktop you have purchased may not match those of the items listed. B
C D
A
E
Control...
Use and Care - Page 7
... empty cookware or without any small or medium burner are turned to the LITE position, all controls when not cooking. If the spark igniter still does not operate, call a trained repair specialist. HI (High)
MED (Medium) LO (Low) Simmer HI (High) Simmer LO (Low)
■ Start food cooking. ■ Bring liquid to a boil. ■ Preheat skillets/pans. ■...
Use and Care - Page 8

.... ■ Quickly brown or sear food. Burner ports
Burner ports: Check burner flames occasionally for proper size and shape as a guide when setting heat levels. 15,000 Btu/h Burner
SETTING
RECOMMENDED USE
LITE (Light)
■ Light the burner. LO (Low)
■ Cook soups, sauces and gravies. ■ Stew or steam foods.
5,000 Btu/h Simmer/Melt Burner
SETTING
RECOMMENDED USE
LITE (Light...
Use and Care - Page 9
.... A. Refer to "General Cleaning" section.
2. The griddle light will turn on some models)
B A
4. Place food on the burner.
Incorrect B. Contact a trained repair specialist.
To Use: 1. Position the drip tray under the front edge of the griddle to be adjusted, contact a trained repair specialist. The griddle light will turn off when the griddle has...
Use and Care - Page 12
... uneven, yellow and/or noisy
■ Are the burner ports clogged? Surface burner flames are the burner caps positioned properly? Let it dry. Cookware should not extend more information.
■ Are foods taking too long to the proper heat level? See "Cooktop Controls" section.
■ Is the cooktop level?
Use cookware about the same size as the...
Similar Questions

Cvgx2423w - Burner Removal
Steps to be taken for Burner removal to gain access to the ignition module.
Steps to be taken for Burner removal to gain access to the ignition module.
(Posted by dalexa64 8 years ago)

How To A Get Replacement Burners On My Grill Under Lifetime Warranty?
Warranty
Warranty
(Posted by Edwicks 9 years ago)

Burner Elements
When i turn on the front element switch the back burner also comes on. If I turn on the back burner ...
When i turn on the front element switch the back burner also comes on. If I turn on the back burner ...
(Posted by fleet87602 9 years ago)

How To Replace Burner Gas Valve On Jenn-air Cvgx2423
I ordered a new valve and assume that the replacement burner gas valve screws into the manifold, can...
I ordered a new valve and assume that the replacement burner gas valve screws into the manifold, can...
(Posted by jblapilusa 10 years ago)

Burners Get Warm But Not Hot
I have a jennair model JED8130ADB, all four burners will get warm but none hot enough to boil water....
I have a jennair model JED8130ADB, all four burners will get warm but none hot enough to boil water....
(Posted by jblawrence1 10 years ago)